sweet potato challah – vegan, delicious, and super easy!

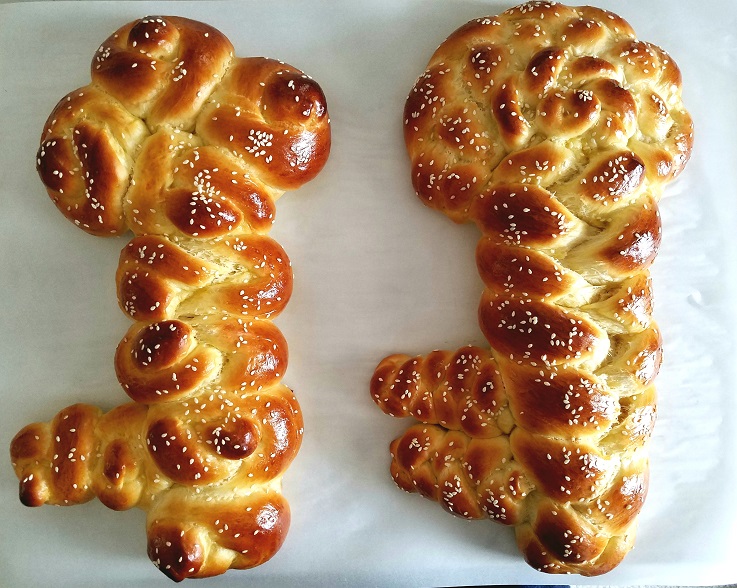
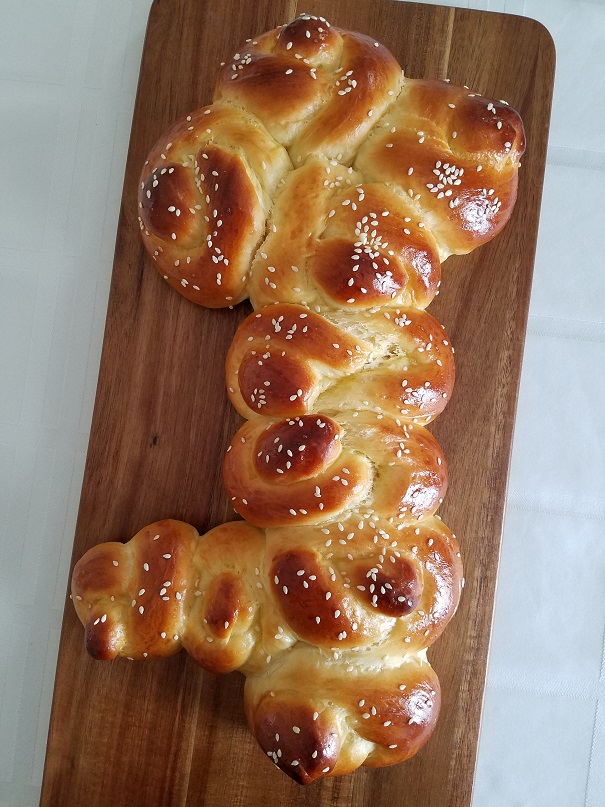
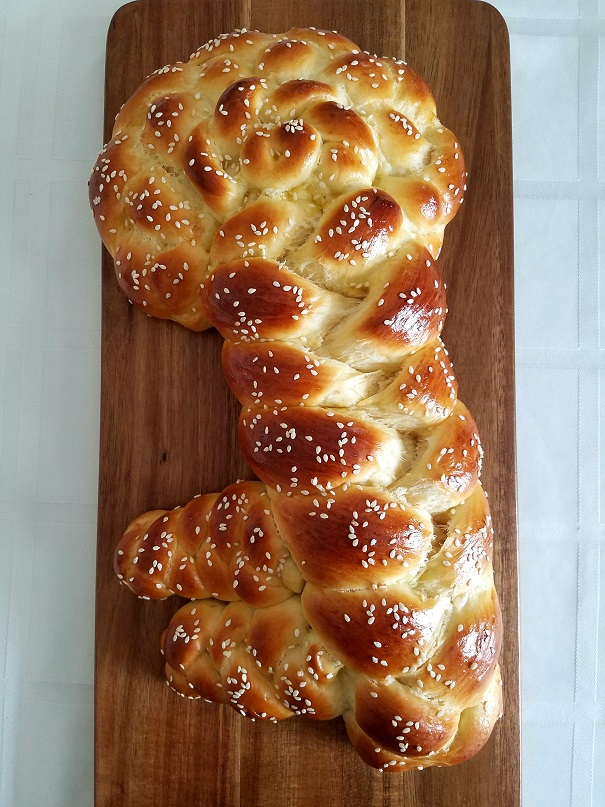
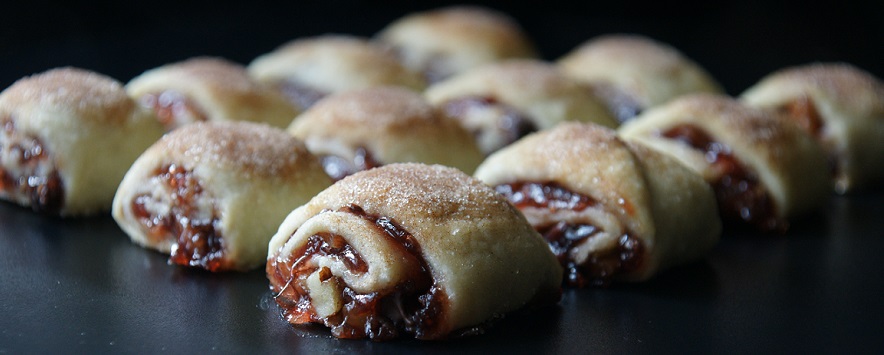
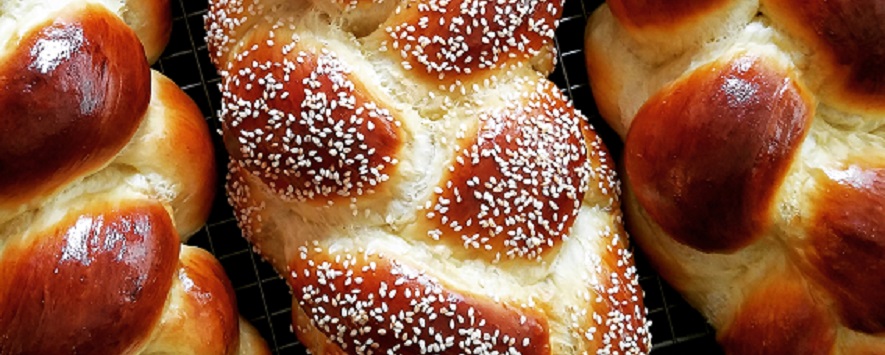
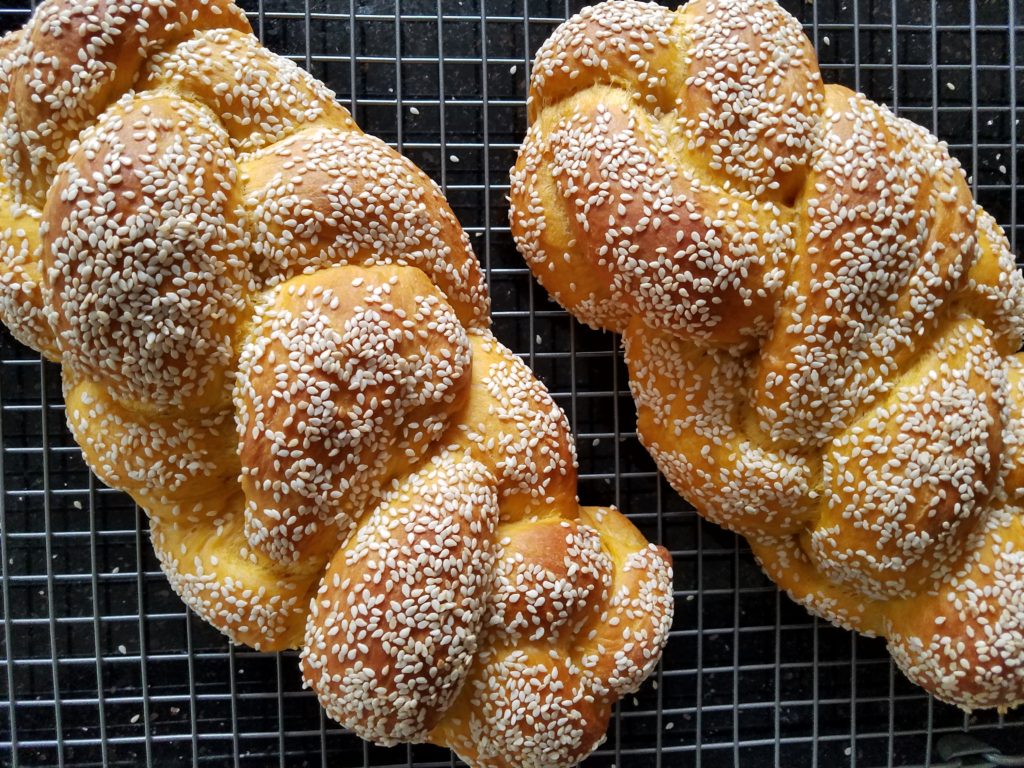
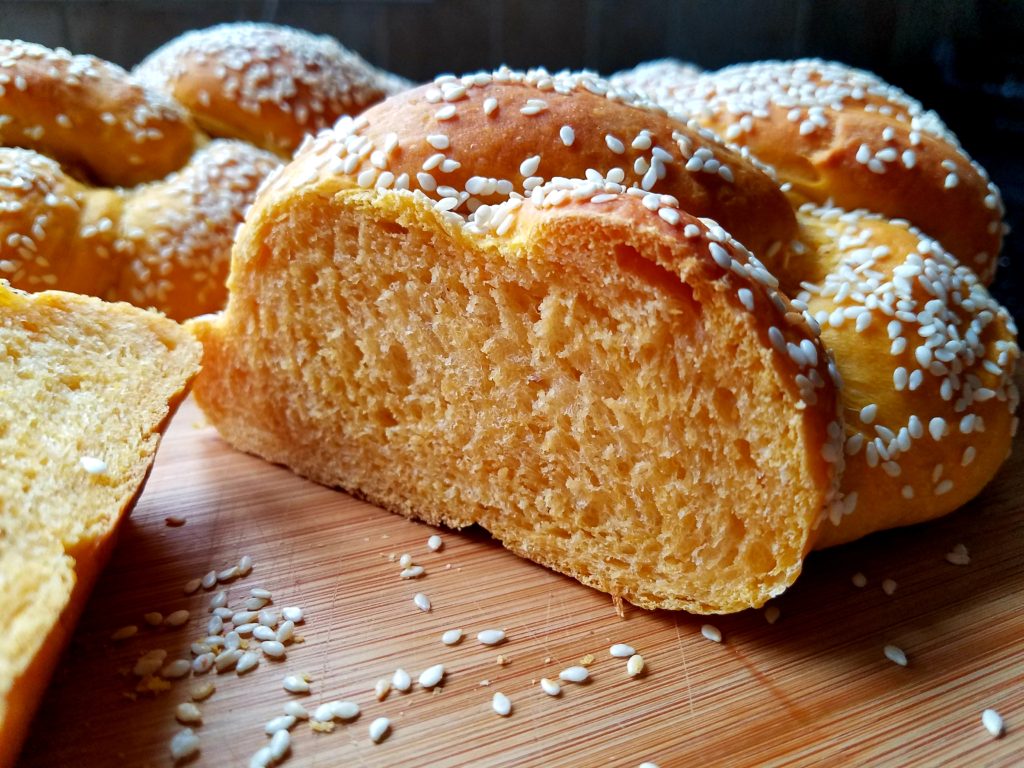
A couple of weeks ago I made a sweet potato challah that’s vegan, delicious and super easy! It came out totally amazing – not to mention pretty to look at! By now, you must know how much I love to bake, photograph, and of course eat challah – it’s my own personal trifecta. It came out so good, I couldn’t wait to make two more the very next day. The reason I made a vegan sweet potato challah to begin with was for a friend who just had a baby. She is a vegetarian and also doesn’t eat white sugar, her husband is vegan (so no eggs or honey for him). No sugar, no eggs, no honey – challenge accepted!

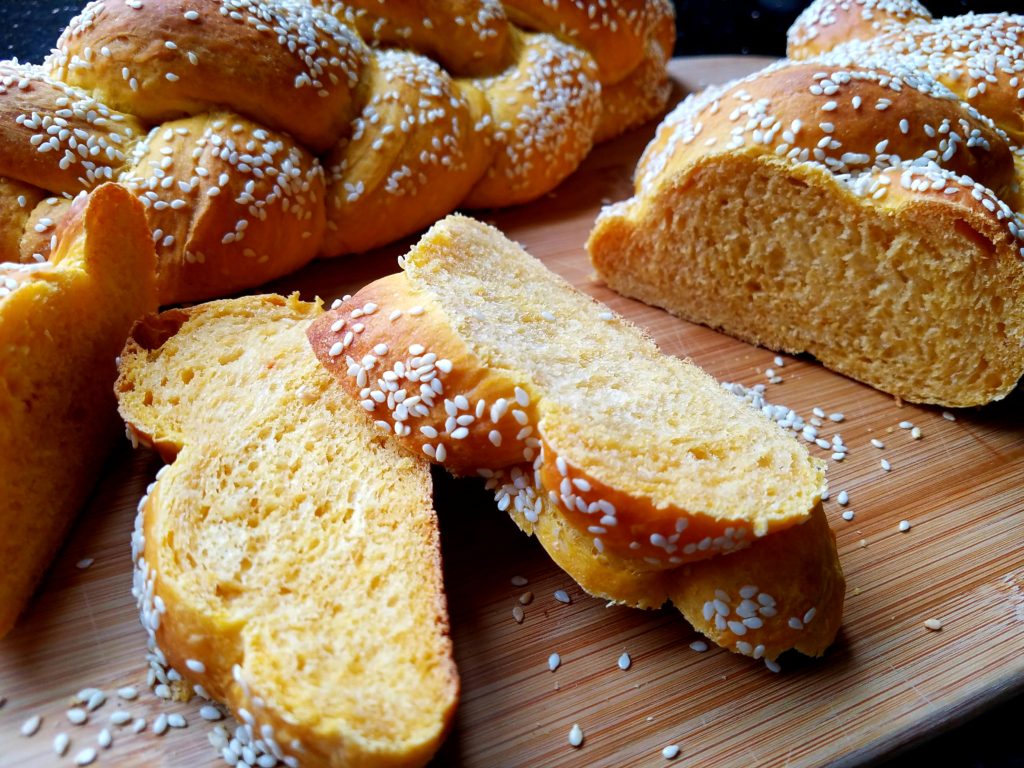
There are a few vegan challah recipes out there, but none seemed right to me. Plus, I knew I didn’t want it to taste or look like white bread. I really wanted it to have a good challah flavor, good chew, and a nice color. I remembered making a vegan sweet potato challah when I was in Israel with a wonderful baker named Rina, https://www.rinabarina.com/. It was a lovely golden color, a little sweet, had nice body, and was really delicious.

I tried using her recipe but I got all tangled up converting grams to ounces and was afraid if I didn’t do it right it would be a total loss. Instead I used a recipe I created last year for a local challah bake. It’s a simple and easy dough so starting with it made sense. I’ll have to share that one too another time. After a couple of tries, it was perfect!

Since I had to replace the sugar, I decided to use a combination of date syrup which is also known as silan and maple syrup for additional sweetness. Silan is made from dates and is rich and thick like molasses. It has a deep caramel and brown sugar flavor. On a side note, it is delicious mixed in coffee and drizzled over ice cream! It’s also loaded with so much natural goodness it deserves its own post and I will definitely get to work on that for a later date (get it? Later DATE!).

The flavor of the sweet potato is subtle but definitely a bonus. Not only does it add a beautiful golden color, it also adds some sweetness, and great nutrients. You’ll be surprised to find you don’t miss the eggs, sugar, or honey at all. What I’ve created is a really easy challah recipe with quick rise times. It’s nice to change things up a little on Friday night every now and then so try my vegan sweet potato challah and you’ll thank me! Oooh, I wonder how it would taste as French toast the next day, which I know is the opposite of vegan but a girl can dream! Enjoy!
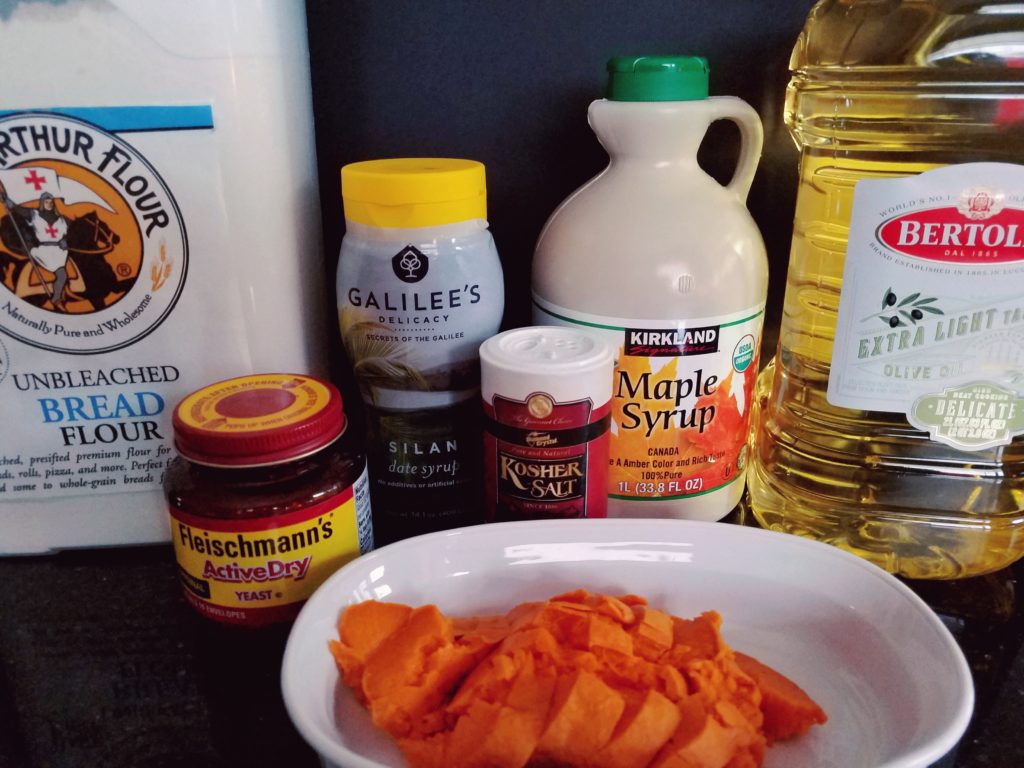
ingredients
3 ½ to 4 cups bread flour (I use King Arthur)
2 ½ teaspoons salt
¾ cup cooked and pureed sweet potato (roasted ahead/instructions below)
1 cup warm water
1 tablespoon active dry yeast
¼ cup extra light olive oil
¼ cup Silan* (date syrup)
1/8 cup real maple syrup plus ½ teaspoon to add to yeast
sesame seeds (optional)

vegan “egg wash” for the top of the bread
2 tablespoons nondairy milk (I used almond milk)
1 teaspoon maple syrup
½ teaspoon olive oil
Pinch of salt

a couple of quick tips
Before measuring the date and maple syrup, spray the measuring cup with oil, the syrup will slide right out. This recipe makes one 2 pound challah or two 1 pound challahs. If you can, use a scale to weigh the dough so the strands are all about the same size. This is more a secret than a tip,0 but I like to take a little dough off as a baker’s treat and make a little challah roll for myself!

how to roast a sweet potato
Roast your sweet potato the day before, or a couple hours before you decide to make the challah so it has plenty of time to cool. Preheat oven to 425 degrees (a toaster oven works well too). Line a baking tray with aluminum foil. Wash and scrub the potato, poke it with a few holes and wrap in foil. Place on the tray and bake for 1 to 1 ½ hours depending on the size. It’s done when a fork pierces through easily. While you’re at it, roast a couple extra and save for a delicious snack or side dish. They keep well in the fridge for at least 3 to 4 days.

and now for the challah
In a 2 cup measuring cup (or bowl) add 1 cup warm water, yeast plus a ½ teaspoon of maple syrup and stir. Wait about 5 minutes or until the yeast starts to bloom (this is when it foams up).

In a large 5 quart bowl add 3 ½ cups flour and salt and whisk together. In a medium size bowl stir together the pureed sweet potato, oil, date syrup and maple syrup. Once the yeast has bloomed, add it to the sweet potato mixture.

Make a well in the center of the flour and pour in the wet ingredients. You can use a mixer with a dough hook but I like to mix it by hand. Mix together with a spoon when it becomes too difficult to mix, use your hands and then start to knead the dough.

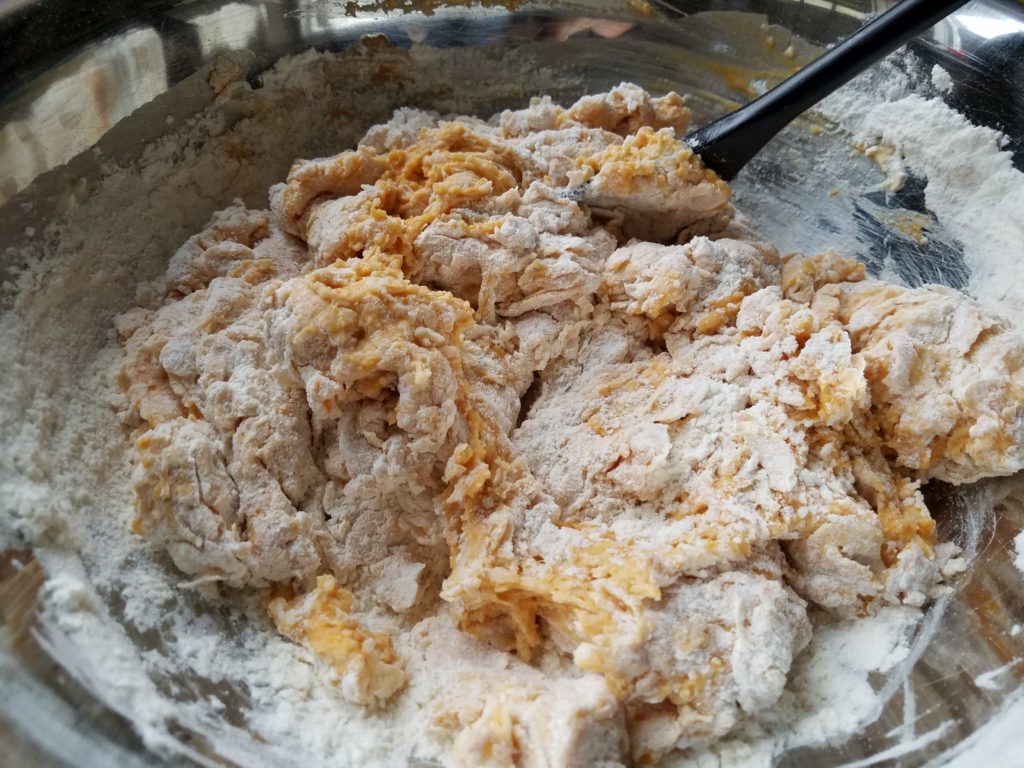
I knead it right in the bowl, or you can turn it out onto a lightly floured counter. Knead for about 5 minutes until the dough comes together and pulls away from the sides. If the dough is too wet, add more flour a tablespoon at a time until it comes together into a smooth ball. It should be soft but not sticky.

Add a little oil around the sides of the bowl and roll the dough ball around in it, cover with plastic wrap, and let the dough rise for at least one hour or until doubled in size.

A trick for keeping your counter clean when rolling out the dough is to place plastic wrap directly onto your countertop. Sprinkle a little flour and turn the dough out onto the counter. Press the air out to deflate the dough.

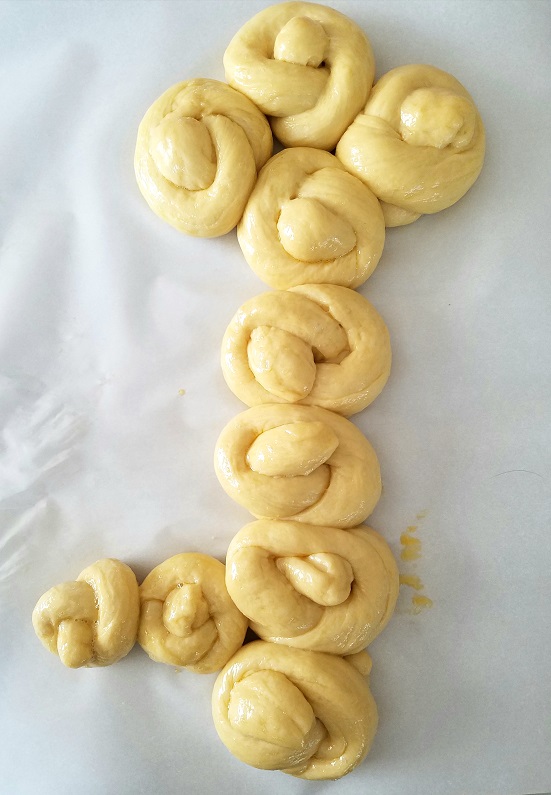
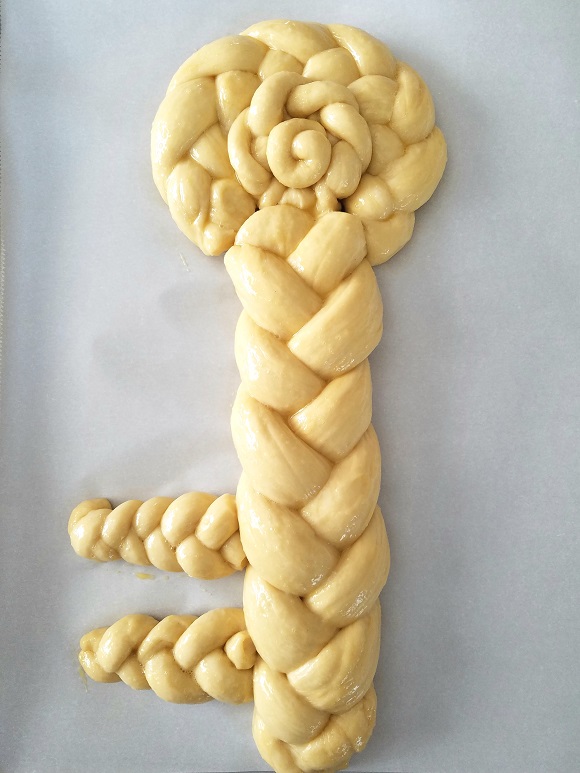
From here you can make a 3 or 4 strand challah. The 3 strand is the most common braid but I’ve been going with the 4 strand for a while.

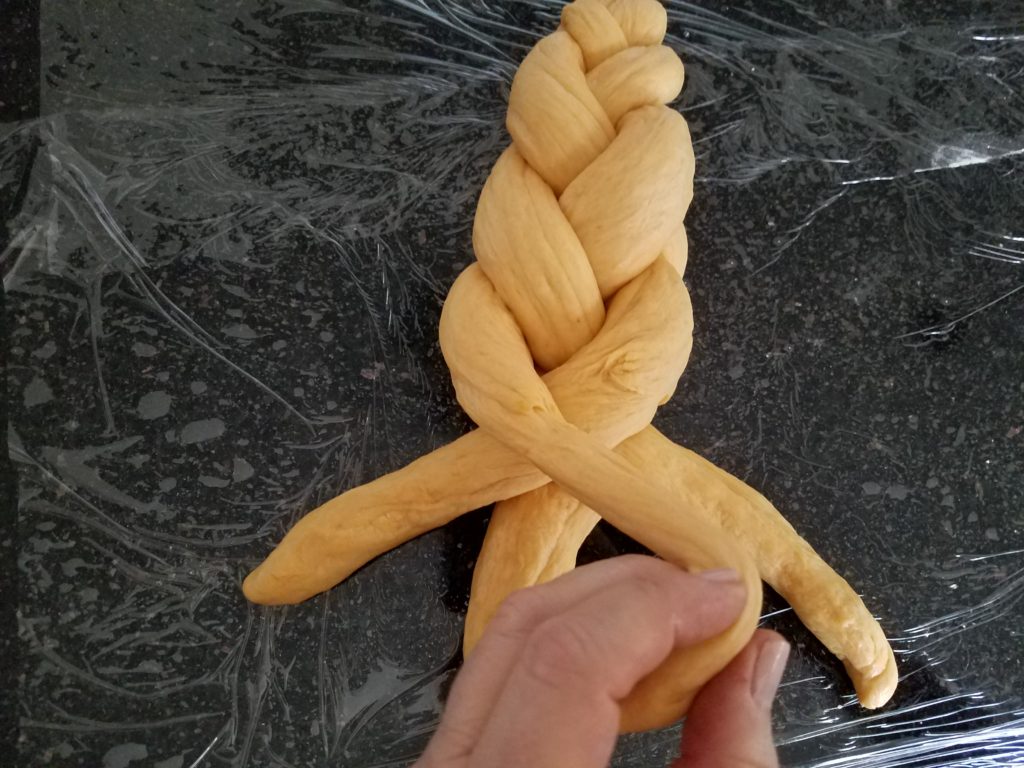
3 strand single challah: divide the dough into 3 equal pieces. Roll each out into snake about 16” long. For 2 challahs divide the dough into 6 equal pieces. Roll each out into snake about 12” long. Or make a 4 strand single challah: divide the dough into 4 equal pieces. Roll each out into a snake about 14” long. For 2 challahs divide the dough into 8 equal pieces and roll out into a 10’ snake.

For each challah, line them up and pinch them together at the top then braid. Place the braided challahs onto a parchment lined cookie sheet and brush with the vegan egg wash. Let rise for 30 to 40 minutes. After it’s rising for about 15 minutes preheat your oven to 350 degrees

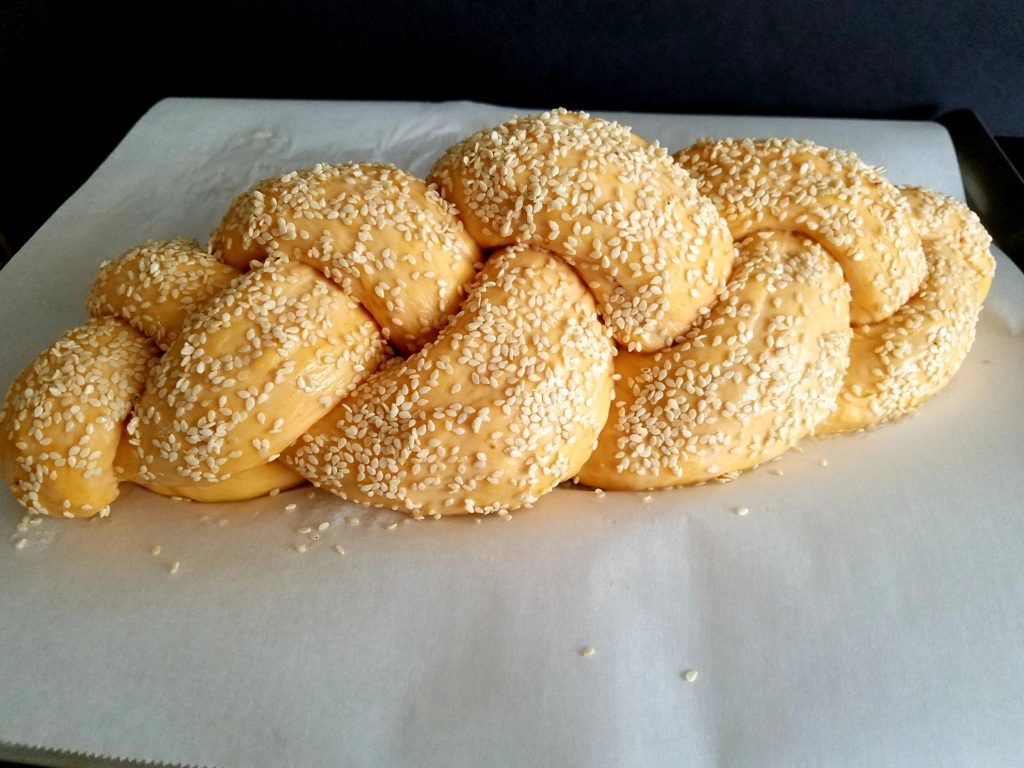
Before going into the oven, glaze challahs again and sprinkle with sesame seeds if desired. Bake for 25 to 30 minutes until golden brown on top. Time will vary according to challah size. It is done when a cake tester or toothpick comes out clean or, the underside is slightly brown and sounds hollow when tapped

* You can find date syrup in health food stores, most kosher groceries, international markets and of course on Amazon. If you can’t find date syrup aka Silan, replace it with additional maple syrup.

Have you ever Heard of a Schlissel Challah?


Have you ever Heard of a Schlissel Challah? Me either! Let me give you the 4-1-1…

Last year I had the good fortune to meet a new friend named Yael and she introduced me to this unique challah. She is quite an amazing baker. I believe we met sometime around Passover and I started to follow her on Instagram, drooling at each and every photo of bread she created – every one of them a masterpiece. Check her out on https://www.babysbread.com/ and her Instagram @babys_bread and you’ll see what I mean. She was telling me about a key shaped challah she was making and even though it is a tradition dating back hundreds of years, I had never heard about it and was so intrigued.

Before I get to the recipe, here is some information I found online… The week after Passover it is customary to bake a key shaped challah also known as Schlissel Challah. The word schlissel means key in Yiddish and the significance is to bring “segulah for parnassah” or a blessing to your home. Some say the shape will bring financial blessing as well. I’m all in for that! There are a few people who still wrap a real key in aluminum foil and bake it right into the bread. When I asked my friend if she does this, she reminded me that’s a great way to break your teeth! There is so much more information online if you are interested, I have included a couple of places you may find interesting: http://kitchen-tested.com/2012/04/20/shlissel-challah-key-challah/ and  https://www.kosher.com/lifestyle/shlissel-challahs-why-how-102
Today I made my first attempt and I have to say, I’m very proud of the results!  Of course you can use your favorite challah dough recipe, but I have included one here which is very easy to handle, especially for the beginner.

It makes three 1 pound challahs or two larger ones. Tonight, one bread is for my Shabbos table, one is for a friend who could really use some good fortune and the other to a new friend I met last night. When you bake this challah, may your key open the doors to bring you and your family good fortune and many blessings.  Enjoy!

Ingredients
1 ¼ cups lukewarm water
1 ½ tablespoon active dry yeast
1 teaspoon sugar
4 ½ to 5 ½ cups bread flour (I use King Arthur or Bob’s Red Mill)
2 whole eggs (I use extra-large but large will be fine too)
1 egg yolk
1 tablespoon kosher salt
2/3 cup sugar
¼ cup extra light olive oil (or other vegetable oil)
Sesame seeds (optional)

Egg wash
1 egg
1 pinch salt
1 pinch of sugar
dash water

Directions
The temperature of the water used to bloom yeast should be warm like a baby’s bath. Add the yeast and 1 teaspoon sugar to the warm water. Mix it and set it aside for 5 or 10 minutes or until if foams up.

Into a large bowl, add 4 cups of bread flour and set aside.

I find it easier to use a large glass measuring cup for the wet ingredients so that I can pour it into the flour a little at a time. Add the eggs, sugar, salt, and oil and mix together well. Add the foamed yeast mixture and just stir once or twice. This helps to get the sugar off the bottom.

Make a well in the center of the flour and pour some of the egg mixture mixing slowly. Keep adding the wet ingredients into the flour until it’s all incorporated.  This will make a doughy slurry. Now add ½ cup flour at a time until you have dough that pulls away from the sides of the bowl and holds its shape. At some point it will be easier to mix with your hands.

I like to knead the dough directly in the bowl but you can turn it out onto the counter if you like. Once it feels like nice plump dough, you are done. Pour a little oil in the bowl and put the dough back in.

Cover the bowl tightly with plastic wrap and put it in a warm place to rise for 1 ½ to 2 hours, or until it has doubled in size. After it has doubled, punch the dough down and divide into 2 or 3 pieces depending on how many breads you want to make. This recipe makes approximately 3 one pound challahs.

Line a sheet pan with parchment paper and set aside. Into a small bowl add the egg, salt, sugar and water and beat well. This is the egg wash.

I made two different key shapes. One with basic braids and the other with rolls. There are many tutorials online if you need help. Here is how I did it…

For the rolls: Depending on how big you want your challah, will determine how many rolls you use. For mine I made 8 larger 1 ¾ to 2 ounce challah rolls plus two 1 ounce rolls (for the teeth of the key). To make the rolls, take your small dough ball and roll it into a snake about ½” thick by 5” long, tie it into a little knot. Place them as shown below
  
For the braided key: I used 9 ounces of dough for the shaft of the key, 6 ounces of dough for the head of the key, and 2 ounces for the teeth. These are estimates for the breads I made. You can make them larger or smaller as you like. Then I added a smaller braid to the center, but you can leave it an open key if you like as well.

Brush with a little of the egg wash and set it aside for the second rising -about 45 minutes.

Heat oven to 350 degrees with your rack in the center of the oven. Before they go into the oven, brush the challahs with egg wash one more time. Sprinkle with sesame seeds at this time if you like.

Place in the oven and bake for 25 to 30 minutes or until the loaves are golden brown. I like to set my timer for 15 minutes then turn the baking sheet and set it for another 10 minutes. You can use a cake tester or toothpick to make sure they are dry in the middle.

Enjoy!


Pumpkin Muffins with Crumb Topping… Top of the Muffin to Ya!


This morning I made pumpkin muffins with crumb topping. Why? Because it’s pumpkin season plain and simple. I was not in the mood for pumpkin muffins, but I found a can of pumpkin in my pantry (which I tend to always have) and decided to make them. Why I always have a can of pureed pumpkin is a mystery, but I think most bakers do. At least I hope I’m not alone in this! Isn’t the weekend always made better with a basket filled with muffins on the table and the smell of cinnamon in the air?

Maybe it’s all the subliminal messaging I feel I’m getting. Every time I walk into the grocery store (especially Trader Joe’s) right in the front display are the pumpkin Jo-Jo’s and everything pumpkin spice. It doesn’t stop there; pumpkin and pumpkin spice has found its way into coffee and tea, cereal, granola, ice cream, cookies, tortilla chips, salsa, biscotti, cream cheese, bagels, candy, and even challah bread! When did this happen? And what ever happened to the good old pumpkin muffin? Why has it been pushed aside? Shouldn’t it play a leading role in pumpkin season? I think so. That’s why I set out to make what I think is the most perfect, moist, and delicious pumpkin muffin with crumb topping.

I went through a lot of cookbooks and websites searching for the perfect muffin. Then I wrote down everything I love about them. I made about 4 batches before hitting on the perfect marriage. These are not too sweet and they stay nice and soft for a few days.* Raisins add a nice surprise and you know I’m crazy for crumb topping so both have a major role in my final version. I also used the whole can of pumpkin to see what would happen, and it was perfect. I just hate having a smidgen of pumpkin left in my fridge.

I also made a tray with sunflower seeds sprinkled on top which are very worthy of a mention here. If you prefer to skip the crumb, by all means sprinkle them with sunflower or even pumpkin seeds – both add a nice crunch to the top. I’m including the photo above so you can see how tender the cake is and how cute they are with sunflower seeds! Am I right?

I almost forgot to share this fun little tidbit about Ohio life with you. Last weekend was the Circleville, Ohio Pumpkin Show. It’s a whole weekend dedicated to pumpkins. In 14 years I have never been. Thanks to my friend Andrea, I can share her photo of the 2 largest pumpkins this year. A 1,701 pound pumpkin would sure make a lot of muffins! Usually I would end with Enjoy! But this time I’m going to end differently… You’re Welcome!

Ingredients:
1 and 3/4 cups all-purpose flour spooned in and leveled
1 teaspoon baking powder
1 teaspoon baking soda
1 teaspoon salt
2 teaspoons ground cinnamon
½ teaspoon ground nutmeg
¼ teaspoon ginger
1/2 cup extra light olive oil,** or other vegetable oil
1/2 cup granulated sugar
1/2 cup lightly packed light brown sugar
1 – 15oz. can Libby’s 100% pure pumpkin***
2 extra-large eggs, at room temperature (large will work here as well)
1/4 cup milk (I used almond milk) at room temperature
1 teaspoon vanilla extract
¾ cup white raisins
confectioners’ sugar (optional)

Crumb topping:
1 cup all-purpose flour
½ cup sugar
1 teaspoon cinnamon
¼ teaspoon baking powder
¼ teaspoon salt
5 tablespoons unsalted butter melted (make these dairy free by using Earth’s Balance soy free sticks)

Directions:
Place rack in the center of the oven. Preheat oven to 350°F. Spray a 12-count muffin pan with nonstick spray or line with cupcake liners. This recipe makes 16 to 18 muffins, so prepare 2 muffin pans accordingly and set aside. total time including prep 30 minutes

Start with the crumb topping: whisk the flour, granulated sugar, cinnamon, baking powder, and salt together until combined. Using a fork, stir in the melted butter until crumbs form breaking up any big pieces. Set aside.

Make the muffins: In a medium bowl, sift the flour, baking soda, baking powder, cinnamon, ginger, nutmeg, and salt together until combined. Set aside. In a larger bowl, whisk the oil, granulated sugar, brown sugar, pumpkin puree, eggs and milk together until combined. If you are using raisins, add them at this time and mix in. Pour the dry ingredients into the wet ingredients, then fold everything together gently just until combined and no flour pockets remain.

Using a 2 ½ in cookie scoop, scoop the batter into liners. Spoon about 1 tablespoon of crumbs evenly on top of the batter and ever so gently press them down into the batter. Bake for 20 to 25 minutes total or until a toothpick inserted in the center comes out clean. I like to bake them for 10 minutes, then turn the pans and bake for another 10. After that I keep a close eye on them setting the timer for 2 minutes at a time. That’s what makes the difference between a moist muffin and one which is a little dryer. For mini muffins, bake for 11-13 minutes also at 350°F

Let cool in muffin pan and sprinkle with confectioners’ sugar if you would like.*I leave them out very lightly covered and suggest warming them in the toaster oven after day 2 (if they are still around). That will crisp up the top a bit and who doesn’t’ love a warm muffin?

**You may notice I use extra light olive oil, sunflower oil, or grape seed oil, in most of my baking when oil is called for. I think they are the perfect baking oils, and the healthiest. Any good vegetable oil would be a great sub.

***Different brands of pureed pumpkin will yield different results. I tried two others and felt Libby’s had the best flavor and end result. If you use a different brand, I can’t promise the same results so bake at your own risk!!!!!!!