How about an Everything Bagel Salad to get you through the week?


For days when you are missing your weekend bagel, how about an everything bagel salad to get you through the week? It’s getting close to the weekend and you’re craving an everything bagel with cream cheese. What’s a girl to do? Turn it into a salad of course! Why an everything bagel salad? There are a few reasons: I love everything bagels, I love salads filled with everything but the kitchen sink, it gets me ready for the weekend without all the guilt of a bagel on a weekday and I happen to have a jar of everything bagel seasoning in my house impatiently waiting to be sprinkled on EVERYTHING!

Here is how it all started… I was in Trader Joe’s a couple of weeks ago scanning their new food section for a great new find. If you are a Trader Joe’s junkie like me, you totally get this. There on the shelf was a jar of Everything but the Bagel Sesame Seasoning Blend (try to say that 5 times fast!). First of all, the label was adorable and really caught my eye. Second, I don’t know why I got so excited, but I did; ideas were flooding through my head on what to use it on. I bought 2 jars and posted a photo on Instagram immediately proclaiming my excitement for this new and wonderful treasure I found. Since then, I have topped challah rolls with it, used it on salmon before grilling, sprinkled it on green beans and of course my husband added it as a booster to his already everything bagel with lox and cream cheese! Ooh, I just thought of how great it would be on avocado toast – I’m so going to have to try that!


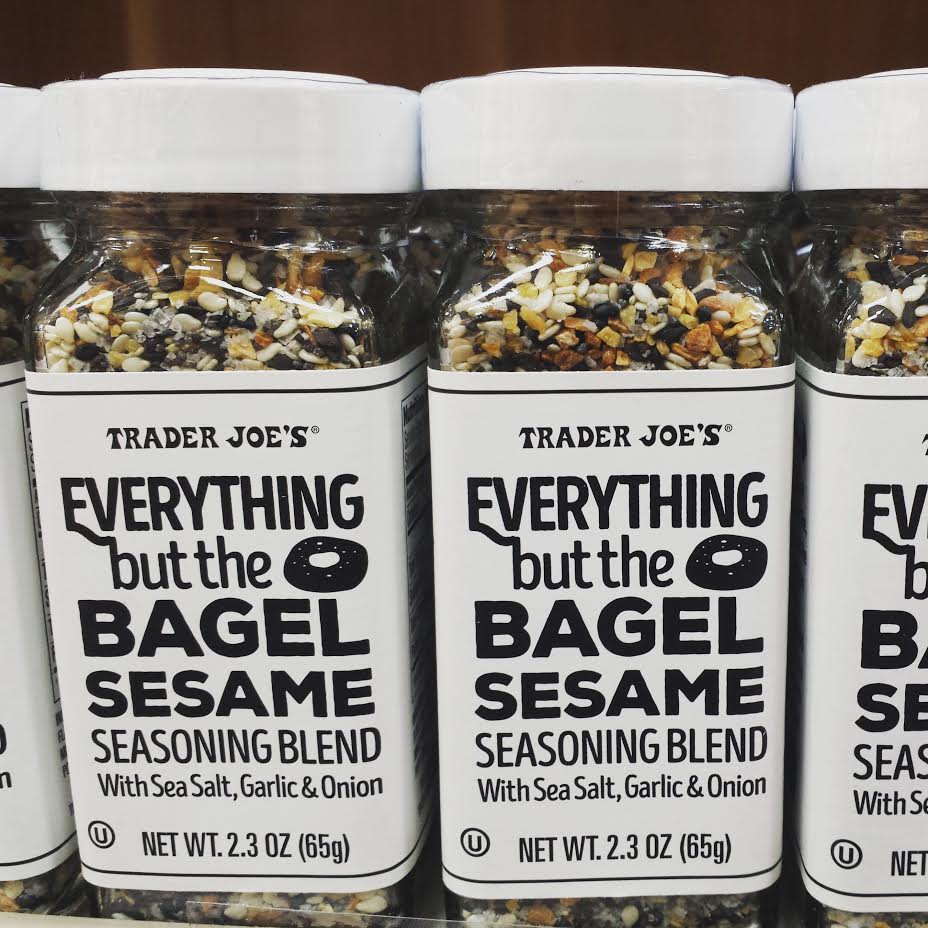
Not familiar with the everything bagel (click here to find out more)? The only thing you need to know about an everything bagel is it is the quintessential NY bagel. Sesame seeds, poppy seeds, minced onion, minced garlic and coarse kosher salt – that’s it. Five simple ingredients become a game changer to the average bagel; in this case the average salad. There must be a lot of fans out there for type of bagel since it has its own jar of seasoning mix on the shelf. I found it at Trader Joe’s, but King Arthur also has a great mix you can buy online. I’ll also share my recipe at the end so you can make your own at home. Every now and then you will come across an everything bagel with caraway seeds – I’m not a fan and think it should stay in rye bread where it belongs!

Here’s my favorite way to eat a bagel… Unless it’s fresh and hot out of the oven (which only happens in NY) I lightly toast it and then scoop it so there is less bread and you can add more toppings. Then of course there is the cream cheese, but not just any kind of cream cheese, for me it has to be vegetable cream cheese (follow this link for my recipe). Lox is a perfect addition and a couple of thick slices of a crisp tomato. Is your mouth watering yet?


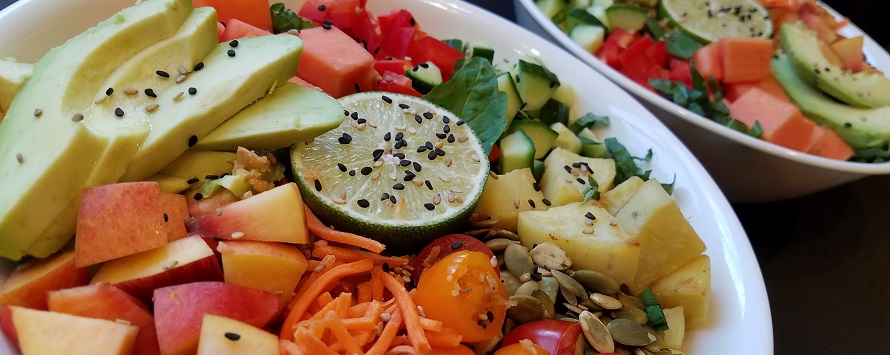
Now for the salad… I love a really good salad and I’m hooked on making salads fun and interesting. For me, a salad is at its best when there are a lot of goodies in them other than an overwhelming amount of lettuce. I like to think of the lettuce as the bread or bagel in this case, which holds a sandwich together. The lettuce will be the anchor here.

When I first set out to make the salad I thought of all the components from toppings to the base.  I knew the calories and carbs would be a fraction of what you get from a bagel, plus I wanted to keep all of the satisfaction. The fun of it is you can customize it to what you like on your bagel i.e. salad! If you love whitefish, buy smoked whitefish or smoked trout and top your salad with that. If you like capers, hard-boiled eggs, and onions, throw them in too.


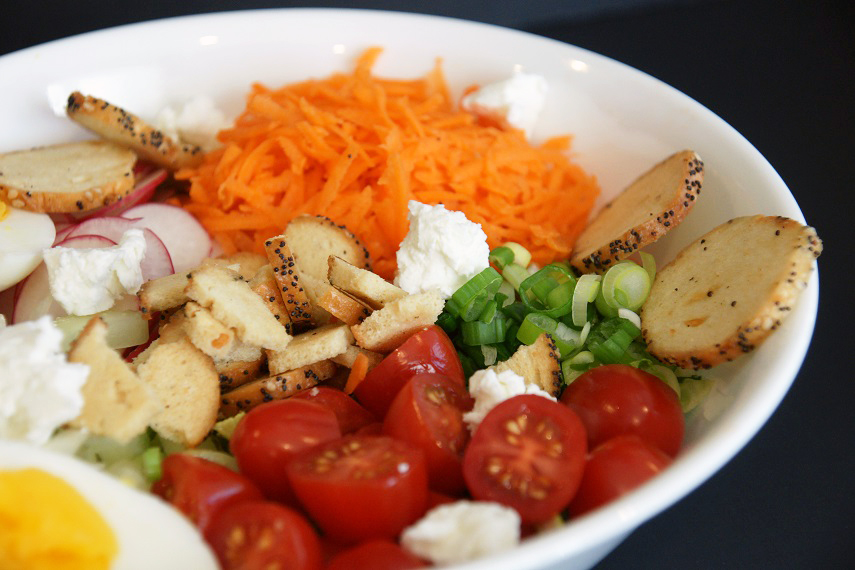
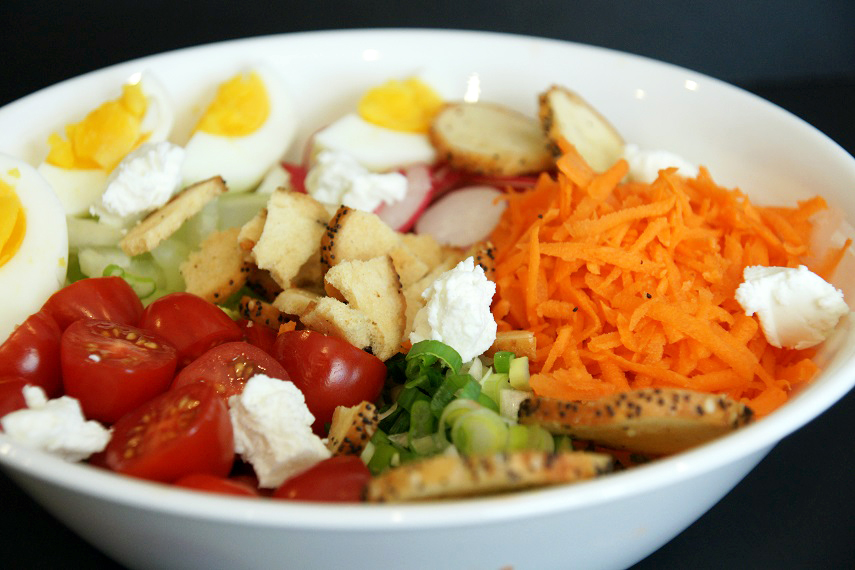
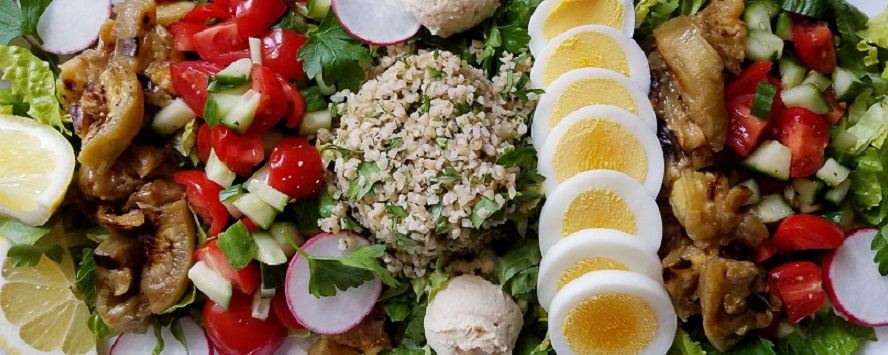
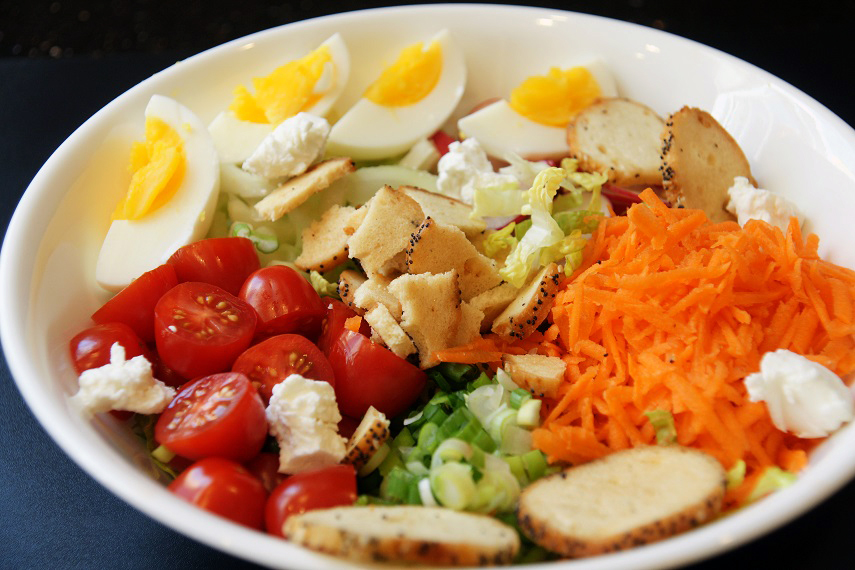
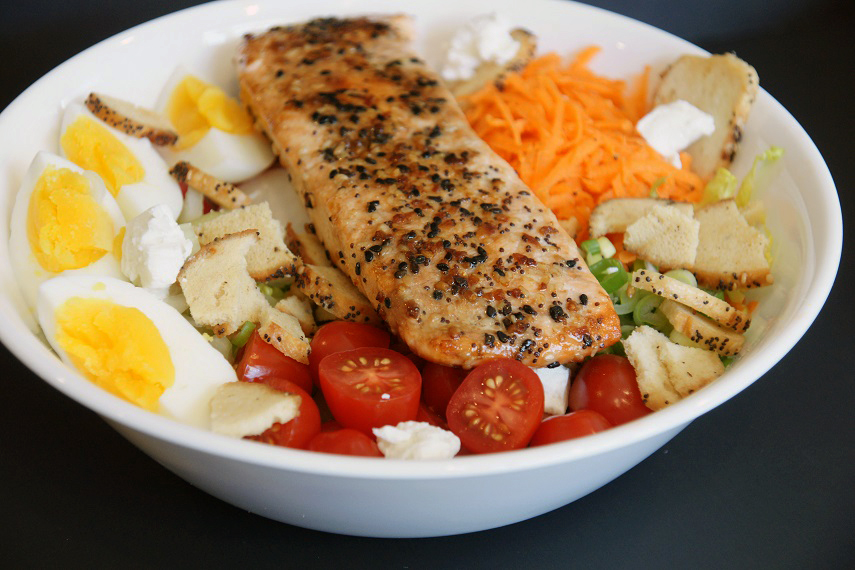
For this salad, I deconstructed the vegetable cream cheese and made the ingredients the toppings: radishes, carrots, and scallions. Of course, I had to include salmon in some way but didn’t think lox was the way to go, but if you try it, let me know how it is. I’m more of a baked smoked salmon girl anyway, which is difficult to find in Columbus. I decided on a piece of fresh salmon. I topped it with everything seasoning then seared it in a pan. Hard-boiled eggs also make an appearance in my salad for a few reasons: I love them, they are perfect on a bagel, and they go great in a salad!

It’s a very quick salad to put together as well. As the salmon was cooking, I assembled the other ingredients. I shredded some romaine lettuce, crushed up some everything bagel chips, added some goat cheese for that cream cheese texture and really good flavor. It was all coming together and I couldn’t be happier.

There you have it, a salad to get you ready for the weekend and for you diehards, a salad you can bring to work on Monday. Enjoy!

Ingredients for one salad
1 ½ cups shredded romaine lettuce
8 cherry tomatoes cut in half
1 carrot grated (½ cup)
1 to 2 perfect hard-boiled eggs cut into quarters
2 to 3 radishes sliced very thin
2 scallions sliced into thin rounds
1 ounce goat cheese
8 everything bagel chips broken into pieces
Dill (optional)
4 ounce salmon filet
everything bagel seasoning

Lowfat ranch dressing of your choice

Directions
In a medium bowl, combine the shredded romaine and next 8 ingredients. Arrange it nicely in the bowl by layering it, or placing the vegetables together.

For the salmon, rub it with about a teaspoon of olive oil, sprinkle the everything seasoning on both side then place it in a hot pan on medium heat. Cook about 4 to 5 minutes per side or until your desired doneness. Then add the cooked salmon on top of the salad.

For the salad dressing, I used a package of Concord Foods Ranch dip (which I find in the produce area of my grocery) mixed with a container of Breakstone’s reduced fat sour cream (nonfat plain Greek yogurt would work as well) plus one tablespoon of Hellman’s mayonnaise. Then I add water until is pour-able but not too thin. I am always on the lookout for a good ranch dressing in a bottle, but they all have msg in them. I like this brand because it does not contain monosodium glutamate (msg) and I can use a very low fat base. And yes, I do know this is a lot of dressing for one salad, but I think you’ll be making it again and again, so you might as well have dressing on hand! Of course, you can buy any kind of creamy dressing you like for this. Pour dressing over the salad and serve immediately.

How to make your own everything bagel seasoning (feel free to play around with this ratio)
1 tablespoon white sesame seeds
1 tablespoon black sesame seeds*
2 tablespoon poppy seeds
1 tablespoon minced dried onion
1 tablespoon minced dried garlic
1 to 2 teaspoons coarse kosher salt (this is optional if you don’t like salt, omit)

Mix it all together and store in a small jar until you are ready to use it.

*Use 2 tablespoons of white sesame seeds   if you can’t find, or don’t want to use the black.


hamantashen throw down!


Have you ever had a hamantashen throw down? I have! Every year in preparation for Purim, I have a throw down with a friend of mine. The only difference is there is no winner – just a really good time and delicious hamantashen to eat! Every year, my friend Marcy and I get together to bake hamantashen for Purim. Hundreds of hamantashen in fact! This is just one of those amazing recipes.

Hamantashen are the triangular cookies we eat during the holiday Purim.  Purim is a fun Jewish holiday which includes dressing up in costume, carnivals and drinking quite a bit! FYI, the drinking is so we can no longer tell the difference between good and evil – not such a bad thing once a year! As with all Jewish holidays, there is a retelling of the story of why we are celebrating and we always have very traditional and symbolic foods we eat. For Purim, hamantashen play a staring role. Let me set the scene… 6 different fillings on the counter, 5 dough recipes all chilled overnight and wrapped tight in plastic wrap, 4 fun hours of baking, 3 too many delicious hamantashen eaten which gave me a bellyache, 2 friends happily talking the morning away, and finally 1 house that smelled absolutely delicious – and still does! Did I forget to mention approximately 200 hamantashen were made?

Mine were baked, packed up and shipped out yesterday or handed out to local friends. Hers were frozen and will be baked today then brought to Connecticut for some very lucky people! Among the varieties: a cream cheese dough reminiscent of rugalach, a traditional dough, a secret recipe dough, a chocolate dough, and finally a new one I tried from the 2nd Avenue Deli Cookbook which calls for almond flour. I almost said my new favorite but then deleted it. Like my mother always said “I have ten fingers and I love them all the same – don’t ask me to choose!” That is how I feel about most hamantashen recipes I’ve made.
I’m not sure if I ever mentioned this before or not, but mother had some kind of obsession with hamantashen recipes. Not necessarily baking them – collecting them! For whatever reason, she included about 3 of them in the little 15 page handwritten cookbook she made me when I got married. The crazy thing is while she was an avid baker, I don’t remember her ever baking hamantashen when I was growing up except for the time with the sisterhood from our Temple. So it was very surprising she added so many into my book. This being said, I guess it should be no surprise I have inherited her obsession. I never really thought of it like that, but clearly after reading my own words, what else would you call it? The only difference is I don’t write about them and collect them, I actually bake them!

Today I’m sharing Carole Walter’s recipe which my friend Marcy brought with her. Oddly enough is extremely similar to my mother’s except my mom used shortening (which is exactly why I know she never made them – she never used shortening!) and she always baked with jumbo eggs. Carole uses butter in her recipe and large eggs. The preparation is a little different as well. Sorry mom, but Carole is the winner in this throw down not only because I’m not a fan of shortening – because I don’t think my mom ever made them! However, I do think my mom would approve and besides, there is always room for one more hamantashen in your life – and in my mother’s case, one more recipe to add to the list! I hope you try this recipe which is adapted from Carole Walter’s cookbook simply called Great Cookies! The name says it all, they are great cookies and very delicious, with a nice bit of crunch on the outside and soft on the inside. Whatever filling you choose… Enjoy!

Ingredients
3 cups all-purpose flour
1 cup sugar
2 teaspoons baking powder
¼ teaspoon kosher salt (I would add one tsp. like my mom next time)
1 cup (1 ½ sticks) cold unsalted butter or margarine cut into cubes
2 large eggs
2 large egg yolks
1 teaspoon pure vanilla extract
sanding sugar (optional)
Egg wash*
Fillings of your choice (I used cherry pie filling, lemon curd, and poppy seed)

This recipe makes 40 – 2” cookies


dough

Place the flour, sugar, baking powder and salt into the bowl of a food processor fitted with a steel blade and pulse two or three times to combine. Add the butter and pulse five times then process 5 seconds to form meal like crumbs.

Place the eggs, egg yolks, and vanilla in a small bowl and mix with a fork to combine. Pour the mixture into the processor and pulse four or five times, then process until the dough begins to clump together. Turn out onto a lightly floured surface and with floured hands, form into two disks, wrap with plastic, and refrigerate for at least 1 hour, or up to 3 days. (This dough may be frozen for up to 4 months)

When you are ready to bake, position the racks to the upper and lower 1/3 of the oven. Line cookie sheets with parchment paper and set aside. Preheat the oven to 350 degrees.

Roll the dough to a thickness of about 3/16”. My trick is to use paint sticks you get at the hardware store. I cover them with plastic wrap and use them as guides. I like that better than the rings you can put on your rolling pin. Using a 3” round cookie cutter, cut circles of dough and place them on the cookie sheets.

When all of the dough has been cut place about 1 ½ teaspoon of filling in the center of the circle. Brush the perimeter with the egg wash or a little water. To fold or to pinch? That is the question! Now you can either use the pinch method as I do and pinch 3 corners together, or use the folding method where you flap one side, then the next two till you form a triangle.


Brush the tops of the cookies with the egg wash. I sprinkled mine with some sanding sugar for that extra sparkle and crunch. Bake the hamantashen for 15 to 18 minutes or until the cookies are golden brown. To ensure even browning, rotate the pans top to bottom and front to back. When done, remove from the oven and let them rest for 2 to 3 minutes on the cookie sheet then remove to a wire rack.

Store in an airtight container with wax paper between layers for up to 3 days. These cookies may be frozen.

*When I make an egg wash I use the whole egg and put in a pinch of salt, a pinch of sugar, and a splash of water. Carole uses egg whites only. Either will work fine.

Couldn’t we all use some World Peace Cookies this Valentine’s Day?


Couldn’t we all use some World Peace Cookies this Valentine’s Day?

Every year I time things perfectly for Valentine’s Day. I make my famous sugar cookie dough, plan when I’ll be baking, spend the day baking and decorating the cookies and organize all of the packaging material ahead of time. Then I rush excitedly to the post office with more than a dozen boxes in tow all strapped to a luggage cart. Most of them for family and friends and usually a few extra for orders I get every year.

This year, things just didn’t come together for me. I didn’t have a plan. I never made the dough. The few orders I usually get fell though for various reasons. I had no packing material and on Friday night I tried to convince myself that it’s okay to skip a year. Then the guilt set in (Jewish mother’s guilt that is!). My boys are in college, how could I not send them cookies? So while watching a late night movie, I turned to my husband and said “okay, I’ll just make my mother’s thumb cookies and get them in the mail tomorrow.” They are the easiest cookie and they have a Hershey Kiss on top! What says I love you more than that? From a cookie perspective that is!

Now it’s Saturday. I wake up early and get caught up in a rerun of The Mary Tyler Moore Show (may her memory be a blessing). I laugh hysterically at the zaniness of the show (it was the Chuckles the Clown episode and if you have never seen it, you must). At 9:30am I decide I had better start baking knowing the post office closes at 2. As I head down the steps I’m now thinking if I end up with extra, I’ll put a few in a package for my niece and nephew; I always send them cookies too. But, are the thumb cookies enough? Amanda really loves chocolate… maybe I should make chocolate cookies also. I don’t know why I’m thinking this, but I am. I run upstairs and try to find a recipe I have for an easy cut out cookie. At this point, I still think I have time to make the batter, refrigerate the dough, roll them out, frost and decorate, pack them up, then pop them in the mail – all by 2pm. In the meantime, I put a pot of eggs on the stove to boil which are needed to make the thumb cookies.

Finally I start the cookies. I measure and sift the dry ingredients then I notice the recipe says must refrigerate for at least 3 hours. Somehow, I missed that part or maybe I thought by some magic I could still get all of this done. Most people might just scrap the whole thing, but not me! I grab Dorie Greenspan’s book Dorie’s Cookies and attempt to make her World Peace Cookies. It looks really easy, it’s a slice and bake and I can easily alter the ingredients I have already measured so it’s a perfect fit. I know what you are thinking, and yes, of course I know slice and bake cookies also need to be refrigerated! The recipe says it only needs a couple of hours in the freezer so I keep going.

The flour and cocoa needed for the 1st recipe was almost double that of Dories. I just had to add more cocoa powder to compensate for the world peace cookies. I cream the butter and then add the dry ingredients to the wet and think wow, this is so dry and crumbly – which she mentions in her recipe it might be. I look over the recipe again and now realize, I didn’t double the butter, or the sugar, or the vanilla!


New plan… I put everything away and Sunday I happily baked cookies, decorated cookies and packaged them to mail first thing Monday morning. If the cookies make it by today, what a surprise! If they make it by Wednesday then that will be perfect, I think you guys know where I stand on greeting card holidays! So here they are, some of the most delicious chocolate cookies I have ever tasted (and pretty indestructible if you don’t mind me saying!). They are a little soft with a nice chew, terrific texture and full of chocolate chips throughout! World peace cookies for everyone…  and Happy Valentine’s Day if you celebrate. For me, this is just another excuse to enjoy something chocolate! Enjoy!

Recipe is adapted from Dorie Greenspan’s book Dorie’s Cookies which is a fantastic book for anyone who likes to bake

Ingredients
1 ½ cups all-purpose flour
1/3 cup unsweetened cocoa powder (I used Hershey’s cocoa powder)
½ teaspoon baking soda
1 stick plus 3 tablespoons unsalted butter at room temperature
2/3 cup packed light brown sugar
¼ cup sugar
1 teaspoon kosher salt
1 teaspoon pure vanilla extract
5 ounces semisweet chocolate, chopped (I used Trader Joe’s semisweet chocolate chunks – already chopped)

Makes about 32 cookies

Sift the flour, cocoa and baking soda together and set aside.

I used a hand mixer and a large bowl to cream the butter and both sugars together on medium speed until soft, creamy and homogeneous, about 3 minutes.  You can also use a stand mixer with a paddle attachment. Beat in the salt and vanilla. Turn off the mixer; add all the dry ingredients and pulse a few times to start blending. Mix on low and beat until the dough forms big, moist curds. Toss in the chocolate pieces and mix to incorporate. The original recipe claims the dough is unpredictable. Sometimes it’s crumbly; sometimes it comes together and cleans the sides of the bowl. Lucky for me!

Turn the dough out onto a work surface and gather it together, kneading it if necessary to bring it together. Divide it in half and shape the dough into logs that are 1 ½ inches in diameter. Don’t worry about the length – get the diameter right and the length with follow. Mine came out to about 9” long. Wrap them tight in wax paper or plastic wrap and freeze them for at least 2 hours, or refrigerate for at least 3 hours.

When you are ready to bake, place a rack in the center of your oven and preheat to 325 degrees. Line two baking sheets with parchment paper and set aside.

Working with one log at a time, and using a long, sharp knife, slice the dough into ½ inch thick rounds. I found it was much too difficult straight from the fridge so I left mine out for about 15 minutes. When I sliced them, they tended to crumble; Dorie says to just push them back together onto each cookie. It worked like a charm!

Bake the cookies for 12 minutes – don’t open the oven. When the timer rings, they won’t look done, nor will they be firm. That’s just the way they should be. Transfer the baking sheet to a cooling rack and let the cookies rest until they are just warm, at which point you can munch on them or let them reach room temperature. They are amazingly delicious as is. The texture is just perfect, a little chewy and densely chocolate! I decided to frost a few of the ones that did not come out as nicely and sprinkled them with Valentine decorations. World Peace out!

jarred’s holiday layered applecake

SONY DSC
I find the need to repost this recipe every year as is it is a timeless classic. It’s similar to so many out there who claim theirs is the best (but of course, mine is!). What makes mine so different you ask? I don’t add orange juice like most apple cake recipes, instead I prefer using pineapple juice, It gives it a bit of a tropical twist. I also add a dash of almond extract – you know me and my almond obsession! Just these two little changes really set apart from the rest of the pack.

Since I always find myself with a plethora of apples in the fall, this is the perfect cake to make. If you’ve been following my blog, you know I go apple picking every year. I find myself adding apples to almost everything that I bake. There are apple pancakes, my mother’s applesauce, apple pies, crumbles and crisps, and my baked apple doughnuts, among the top contenders. However, if you’re looking for something very special and easy – it’s this apple cake.

“Jarred’s Holiday Apple Cake” has been in my recipe binder for the past 24 years. I know the exact amount of time because it was 24 years ago when I sent out holiday cards to family and friends with a personalized recipe inside the card. It’s not an old family recipe that was handed down to me, it was personalized and printed by the card company and titled “Jarred’s Holiday “Layered Apple Cake” after my then one year old son. Oddly, in all of those 24 years, I never made the cake!

SONY DSC

I figured it was something made up for show by the card company. Several years ago, my sister-in-law Barbara was telling me about the delicious apple cake she made and how easy it was. I asked her for the recipe and she  laughed outloud and said, it’s Jarred’s apple cake. I was very confused. Had my son become a baker and I didn’t know it?

Apparently, she had been using the recipe from the card for years and loved it! I guess it really worked after all and she was right; it’s terrific and super easy! It also freezes great if you want to make it ahead of time. I don’t think it would make it to the freezer in my house, but it’s good to know! It’s so good I make it year round but to make it extra special around the holidays I decorate the top with thinly sliced apples. You could also cut wedges and place them on top in a circle around the cake. So here it is, straight from the card (with my splash of course) which reads… Best wishes for a New Year filled with all of the ingredients for good health, happiness, and peace. Enjoy!

SONY DSC
For the smaller versions, I used 6 one pound aluminum loaf pans. These are nice to give as gifts, or to freeze for a later date.
SONY DSC
These could not be cuter! When using the smaller loaf pans, I only made one layer of apples in the center.

Ingredients:
1  1/2 cups sugar
3 cups all-purpose flour
1 teaspoon salt
3 teaspoons baking powder
1 cup vegetable oil (I use sunflower oil)
4 eggs
1/4 cup pineapple juice (orange would be fine too)
2  1/2 teaspoons vanilla extract
1 teaspoon almond extract (optional but highly recommended)

Now for the apples:
4 to 6 apples* peeled and sliced (yield about 6 to 7 cups)
1 tablespoon lemon juice
5 teaspoons sugar
2 teaspoons cinnamon

Directions:
Preheat the oven to 350 degrees. Generously grease a 10″ tube pan** and set aside. I sprayed the pan generously with canola oil but you can use butter if you are not keeping it dairy free.

In a small dish, mix 5 teaspoons of sugar with the 2 teaspoons of cinnamon together and set aside. This will be used in the layers over the apples.

Peel and slice the apples, mix with lemon juice to keep the apples white and set aside. I use an apple slicer that cores, peels and spirals the apple into rings then chop it from there. I reserved one apple to decorate the top.

Beat together until smooth the sugar, oil, eggs, orange juice and vanilla. In a separate bowl whisk together the flour, salt and baking powder. Add the dry ingredients to the wet and mix together just until incorporated.

In the tube pan, pour a layer of batter, then place a layer of apples, and sprinkle about 2 tablespoons of the cinnamon sugar mixture. Repeat layering pattern until all of the batter and apples are used. I ended up with 2 layers of apples and 3 layers of batter. Try to keep the apples in the center of the pan, so they don’t stick to the sides. The original recipe says to top with sugar and cinnamon mixture which is what I did for my smaller cakes. The big cake I topped it with rings of apples and sprinkled it with about 1 to 2 tablespoons of plain white sugar. You can do it either way – both delicious and pretty.

Bake at 350 degrees for 1 1/4 hours to 1 1/2 hours or until a cake tester comes out clean.  I like to check it every 30 minutes and turn it 1/2 way through the baking time.

*I used a combination of granny smith, jonathan and golden delicious because that is what I had on hand. Any good baking apple of your choice will work very well in this recipe.

**This recipe will also make 6 miniature loaf pans (1 pound size) or 3 regular size loaf pans (2 pound size). I only made one layer of apples in these versions and they bake in about 40 to 55 minutes.

SONY DSC

Is it Possible I Own Over 100 Cookbooks?

Is it possible I own over 100 cookbooks? Apparently it is, and I can’t believe I put it out there for everyone to read! Before I sat down to write today, I didn’t know what I wanted to talk about; I just knew I wanted to start a dialog about cookbooks. But what do I want to talk about? Do I want to tell you about my favorites. Do I want to share how and why I got the books I did. Do I want to share a recipe from one of them. Should I be like Julie Powell from the famed Julie and Julia Blog and cook my through one of my books? Where do I begin? Maybe I should start by explaining how my cookbooks multiplied like rabbits!

At some point when I moved to NYC, I became a cookbook collector. Maybe it was all the hours I spent at the Strand Book Store http://www.strandbooks.com/ at the corner of 12th and Broadway. With an iced coffee in hand I could easily spend the day leafing through the art and design books, poetry books, and biography’s, but somehow I always ended up by the cookbook section. My collection grew as the years went by. When I got married, my mother gave me 3 cookbooks plus one she had handwritten just for me with some of her famed recipes. That little cookbook she gave me was the start of something really great.

Over the years, many became gifts from family and friends. My husband was a business consultant and wherever he traveled, he came home with a cookbook. Still not sure what I’m going to do with that Mormon Cookbook from Utah! There was also the cookbook of the month club I joined and a new one would show up every month. Then I found Kitchen Arts and Letters http://kitchenartsandletters.com/bookstore/ a bookstore which sells only cookbooks! Can you hear the ethereal music playing in the background? I can! Lucky for me, Columbus has it’s own special book store called The Book Loft http://www.bookloft.com/  It has 32 rooms of books, three of them containing cookbooks!

Over the years I realized I enjoy reading cookbooks the same way other people read novels. Right now the books on my nightstand are Modern Jewish Cooking by Leah Koenig, Cookie Love by Mindy Segal, Martha Stewart’s Appetizers and Clear Your Clutter with Feng Shui by Karen Kingston. Since I counted over 100 cookbooks on my bookcase, that Feng Shui book is looking like a must read and will remain on the top of the stack!

Do I have a favorite? Well I’ll have to channel my mother here and say no, I have 10 fingers and I love them all the same! The same can be said for my collection. They each have a reason for taking their place on my shelf. Whether it’s the style of cooking, a chef I like, history, a particular region, or technique; they all have a place in my heart. I do have a soft spot for any cookbook with beautiful photography. Some are so stunning, they warrant a special place on my coffee table! I treasure the ones I have from my mother and mother-in-law with their handwritten notes and newspaper clippings of recipes used as place markers. Both great cooks and bakers who never needed a cookbook but, like me, enjoyed reading them cover to cover like a novel.

This past winter, I signed up to be part of a cookbook swap. I guess I thought I needed yet another cookbook! It was so much fun to get a cookbook in the mail and if you’re keeping track, this book makes the count 101!  I’ll share more about the swap in another post. In the meantime…

Tell me about your favorite cookbooks so we can start our own cookbook of the month club! We can call it What are you “Reating” unless you think that’s way too corny! I think it could be fun to find out what cookbooks you, my fabulous readers are using. Until then, happy cooking… and sweet baking.