Avocado Deviled Eggs for the Win!


Alex, I’ll take “foods Sherri’s mother never cooked” for 400 please. Originating in Italy, this round food is often filled with a mixture of egg yolk, mustard, and hot sauce.* Alex… What are deviled eggs? That is correct!

If this was a real episode of Jeopardy I would be $400 richer right now. Aside from my opening little joke, I have no cute story to tell for these eggs. All I have to offer is a beautiful photo and delicious recipe. They were not part of my mother’s recipe box or mine for that matter. It was found quite accidentally sitting in a basket, next to the avocados at my local grocery with no name or website attached.

The minute I saw it, just knew I had to try it. I don’t like regular deviled eggs. I’m not a fan of the filling. This recipe seemed perfect and while I was supposed to add the egg yolk to the avocado and mash them together, I must have missed that step somehow. I’m glad I missed it; I think it would have been too rich and mellowed the flavor of the avocado. The original recipe called for a sprinkling of paprika on top. I love the flavor of Za’atar and thought the sesame seeds would add a nice texture. I was right! These are the perfect little bite.

They make a great quick breakfast, light snack, or very deserving as an appetizer. All that’s left my friends is to Enjoy! Let me know what you think.

3 hard-boiled eggs (I like to use extra-large)
1 large avocado
3 teaspoons lime juice (lemon will work as well)
¼ teaspoon garlic powder
Pinch of salt and pepper
dash of hot sauce (optional)
sliced scallions
Sprinkle with Za’atar (or other spice you like)

Boil the eggs using my method. Click here for the instructions. Cook, cool and carefully peel the eggs. Use a sharp knife and cut the eggs in half vertically. Remove the cooked yolk from the egg and put aside.**

Add the avocado into a wide flat bowl and mash. Add the lime juice, garlic powder, a drop of hot sauce, salt and pepper. Mix together and spoon into each half. You can sprinkle them with any seasoning but I really like the flavor Za’atar adds. Place a couple of scallions on top and that’s it!

*FYI… the hot sauce gives it heat, which is why deviled eggs are called “devil”ed
**Instead of discarding, you could put them aside and make my mom’s thumb cookies with them! Or, if you want, add them to the avocado.


Pumpkin Pancakes with Maple Yogurt Cream and Pumpkin Seed Brittle


As if I even need a reason, one of my favorite things about these pancakes beside the obvious (hello – they are PANCAKES!), is they use a whole can of pumpkin puree! No smidgen of pumpkin left behind in the fridge for weeks until it’s unrecognizable. Despite all of your good intentions to make something spectacular with ¼ cup of pumpkin, it always goes unused – but not anymore! Topping them with a maple yogurt cream (of course you could use a maple whipped cream too – I won’t tell) and a pumpkin seed brittle puts them over the top. They are so light, fluffy, and delicious you will want them every day of the week.

So why did I decide to make them? Yesterday morning I looked in my pantry and found I had 6 cans of pumpkin, which for some reason have no memory of purchasing! There must have been an after Thanksgiving sale, or like rabbits – they are just multiplying. Nevertheless, I was extremely happy to find them. Gone are the crisp days of autumn, when everything was made with pumpkin and I miss that. Plus, pumpkin has so many health benefits. They are rich in vitamin A, fiber, beta-carotene, have more potassium than bananas, and some studies say they keep your skin looking young, In addition, the pumpkin seeds may help elevate your mood – what’s not to love about that? Maybe I should call these happy pancakes – they did make me happy!

Years ago, I came up with a basic pancake mix which has just a few ingredients. I have never liked using pancake mix from a box; it contains so much sugar and salt. I took that recipe and tweaked it by adding pumpkin and spices to it plus a healthy addition of yogurt for a little extra protein. They are ready in less than 30 minutes start to finish – which is a plus. If I plan ahead and measure out my dry ingredients the night before, when I wake up in the morning, I’m that much closer to eating these mouthwatering, and healthy pancakes. Let me know what you think. Enjoy!

This recipe makes 20 delicious 4” pancakes or 16 delicious 5” pancakes

Ingredients
2 ½ cups all-purpose flour
1 tablespoon baking powder
½ teaspoon baking soda
2 teaspoons pumpkin pie spice
2 teaspoons cinnamon
1 ½ teaspoons salt
½ teaspoon ginger
1 ¾ cups regular milk at room temperature (I used almond milk*)
1 – 15 ounce can pumpkin puree (I used Libby’s)
2 extra-large eggs (at room temperature)
¼ cup fat free vanilla Greek yogurt (can be omitted to be dairy free)
3 tablespoons real maple syrup (honey or sugar would work too)
2 tablespoons of unsalted butter melted (or sub a healthy oil to make them non-dairy)
2 tablespoons of unsalted butter to butter the griddle (or spray oil)
2 teaspoons vanilla extract

Toppings:
Maple syrup spiked Greek yogurt cream
½ cup vanilla fat free Greek yogurt
1 tablespoon real maple syrup

Pumpkin seed brittle
½ cup pumpkin seeds (also called pepita seeds)
1 tablespoon maple syrup
pinch of salt

Directions

Before prepping your ingredients, heat a non-stick griddle or large frying pan on medium heat.

In a medium size bowl add all the dry ingredients, whisk together and set aside.

In a larger bowl, add the wet ingredients and mix until well blended. One notable tip, when using a spoon or spatula, make sure not to use one which is clear or white. The pumpkin will turn it orange. I learned this the hard way!

Add the dry ingredients into the wet about 1 cup at a time until combined. Then let the mixture sit for a couple of minutes. Butter or spray your pan and pour the batter onto the hot griddle. So they come out the same size, you can use a measuring cup or I like to use a large ice cream scoop (aka a disher). Depending on the size of the pancake you want, use a 1/3 cup for a 4” pancake and ½ cup for a 5” pancake. I think I have every size scoop and some doubles to keep one parve and one dairy. They are the best kitchen investment you can make.

The pancakes are ready to flip when they brown slightly around the edges and you see bubbles starting to form. They are pretty thick and may brown before they bubble so keep an eye on them. It should take about 2 or 3 minutes per side. Flip, plate, top with the yogurt and brittle and enjoy!

For the yogurt topping, mix together ½ cup plain nonfat Greek yogurt. For the brittle, place the pumpkin seeds in an 8” frying pan on medium/low heat. Stir them around until they toast lightly about 4 minutes. Add the pinch of salt, maple syrup and cook until the liquid evaporates, about 2 minutes. Pour them onto parchment paper to cool.

*I have made these pancakes so many times and tried different milks, they all work well. I generally use almond milk as I did with this recipe.

Sabich is My New Favorite Breakfast Sandwich!


Who am I trying to kid with that title? Sabich is my new favorite breakfast sandwich. It’s also my favorite lunch AND dinner sandwich – could I be as bold as to say a snack as well? I wouldn’t say I’m addicted, but today I started to feel like I might have a little problem. When searching on Google, I realized, I’m not alone. Words used to describe this sandwich are obsessed, devoted, hooked, can’t live without, and the best sandwich I ever ate! So don’t say I didn’t warn you.

Until a couple of weeks ago I had never heard of it and then I watched the show Brunch at Bobby’s. His show was all about celebrating the breakfast sandwich. In addition to the usual eggs on a biscuit, he made a Sabich. As he listed the ingredients, I couldn’t figure out how this consortium of ingredients could possible go well together. Then I tried it, and after eating it three days in a row, I was sold!

What is it you ask? It’s a Middle Eastern pita sandwich filled with fried eggplant, hard boiled eggs, hummus, Israeli salad, tahini, amba sauce (which is a pickled mango sauce), sometimes potatoes and pickles. If you like eggplant, this is for you. Actually, even if you don’t like eggplant, you’ll love this!
In all the recipes I found, the eggplant is fried, but Bobby roasted it instead and that sounded perfect to me. I think you get the same great taste without all the extra oil. He also used a mango hot sauce; I couldn’t find that or amba sauce with is traditionally used, so I subbed regular hot sauce and it was delicious. Reading that amba is similar to chutney (which is like a spicier savory cousin to jam), I bought Major Grey’s and ultimately ended up making a mock amba sauce which by the way, my husband really liked. If you like mango this is the way to go, if you are allergic like me – skip it!

I know it seems like a lot of ingredients, but if you plan correctly, the whole thing should only take about 30 to 40 minutes (less if make the components ahead of time). Here’s a quick snapshot… first put your eggplant in the oven. While that’s roasting, put the eggs in water to boil. Then while they are both cooking away, make the Israeli salad. To make things a little easier, I purchased ready-made hummus and tahini (total time saver).

I promise it is so worth it. This sandwich is creamy from the eggplant and hummus, it’s crunchy from the Israeli salad, the eggs put it over the top with richness, the amba or hot sauce gives it a little tangy kick, and the warm pita just brings it all together. If you find like me you are in need of a sabich support group, just reach out… I’m here for you! Enjoy!

Ingredients
1 to 2 eggplants, peeled and sliced into ½ inch thick rounds (about 1 ¾ – 2 lbs.)*
2 tablespoons extra-virgin olive oil or olive oil spray (my fav is from Trader Joes)
4 large or extra-large hard-boiled eggs
Israeli salad, recipe follows
1 cup hummus
1 cup finely shredded red cabbage (I used romaine and radicchio)**
Tahini
My recipe for mock amba sauce or hot sauce or (optional)
if you can find true amba, go for it!
4 pita either white or whole wheat, warmed
salt and pepper

Israeli Salad
1 cup finely chopped tomato (approximately 2 tomatoes)
1 cup finely diced English cucumber
2 tablespoons freshly chopped parsley
2 tablespoons lemon juice
1/2 tablespoon extra-virgin olive oil
½ teaspoon Kosher salt
freshly ground pepper to taste

Mock Amba Sauce
2 tablespoons of Major Grey’s Chutney
1 tablespoon cider vinegar
A few dashes of hot sauce

Preparing the eggplant:
Preheat the oven to 425 degrees f.  Place the eggplant slices on a sheet pan lined with parchment paper. Brush or spray the eggplant slices with olive oil and season with salt and pepper on both sides. Roast until golden brown and soft, about 30 minutes, turning after 15 minutes.

Preparing the eggs:
Put the eggs in a saucepan and cover with cold water by an inch. Bring to a boil and lower the heat to a simmer for 3 minutes. Turn the heat off, cover the pot and let it sit for 9 minutes. Drain immediately and cover with cold water and ice. Let it sit for a few minutes. Peel and thinly slice the eggs.

Israeli Salad:
Toss the diced tomatoes, cucumber, parsley, lemon juice, olive oil, salt and pepper in a medium bowl. Make sure to save the juice from the tomato and add that as well. Mix to combine.

Mock Amba Sauce:
I used 2 tablespoons of Major Grey’s Chutney. I mashed it with a fork to break up the larger mango pieces then added added 1 tablespoon of cider vinegar and a couple dashes of hot sauce (to your personal taste). You could also put it in a mini food processor.

To Assemble the Sabich:
Use the freshest pita you can find, it really makes a difference. Cut an opening at one end of the pita bread to make a pocket. Spread some of the hummus on the bottom of the pita (and the top if you like). Add the ingredients in layers. First, add a few slices of eggplant, then a couple tablespoons of the Israeli salad, on top of that the sliced eggs, some cabbage or lettuce, a few dashes of hot sauce or amba sauce, tahini and then open wide!

*When choosing eggplants, look for firm, smooth and uniform in color. If there are any brown or soft spots, you don’t want it! I like to buy thinner eggplants that are light in weight. The lighter the weight, the less seeds and the seeds are what makes them bitter.
** Bobby added cabbage which doesn’t really like me very much, I used romaine and radicchio instead. While they are not interchangeable, it gave the sandwich a beautiful color contrast and peppery bite to it. I thought it was a perfect substitution. Feel free to use shredded cabbage.

Pumpkin Muffins with Crumb Topping… Top of the Muffin to Ya!


This morning I made pumpkin muffins with crumb topping. Why? Because it’s pumpkin season plain and simple. I was not in the mood for pumpkin muffins, but I found a can of pumpkin in my pantry (which I tend to always have) and decided to make them. Why I always have a can of pureed pumpkin is a mystery, but I think most bakers do. At least I hope I’m not alone in this! Isn’t the weekend always made better with a basket filled with muffins on the table and the smell of cinnamon in the air?

Maybe it’s all the subliminal messaging I feel I’m getting. Every time I walk into the grocery store (especially Trader Joe’s) right in the front display are the pumpkin Jo-Jo’s and everything pumpkin spice. It doesn’t stop there; pumpkin and pumpkin spice has found its way into coffee and tea, cereal, granola, ice cream, cookies, tortilla chips, salsa, biscotti, cream cheese, bagels, candy, and even challah bread! When did this happen? And what ever happened to the good old pumpkin muffin? Why has it been pushed aside? Shouldn’t it play a leading role in pumpkin season? I think so. That’s why I set out to make what I think is the most perfect, moist, and delicious pumpkin muffin with crumb topping.

I went through a lot of cookbooks and websites searching for the perfect muffin. Then I wrote down everything I love about them. I made about 4 batches before hitting on the perfect marriage. These are not too sweet and they stay nice and soft for a few days.* Raisins add a nice surprise and you know I’m crazy for crumb topping so both have a major role in my final version. I also used the whole can of pumpkin to see what would happen, and it was perfect. I just hate having a smidgen of pumpkin left in my fridge.

I also made a tray with sunflower seeds sprinkled on top which are very worthy of a mention here. If you prefer to skip the crumb, by all means sprinkle them with sunflower or even pumpkin seeds – both add a nice crunch to the top. I’m including the photo above so you can see how tender the cake is and how cute they are with sunflower seeds! Am I right?

I almost forgot to share this fun little tidbit about Ohio life with you. Last weekend was the Circleville, Ohio Pumpkin Show. It’s a whole weekend dedicated to pumpkins. In 14 years I have never been. Thanks to my friend Andrea, I can share her photo of the 2 largest pumpkins this year. A 1,701 pound pumpkin would sure make a lot of muffins! Usually I would end with Enjoy! But this time I’m going to end differently… You’re Welcome!

Ingredients:
1 and 3/4 cups all-purpose flour spooned in and leveled
1 teaspoon baking powder
1 teaspoon baking soda
1 teaspoon salt
2 teaspoons ground cinnamon
½ teaspoon ground nutmeg
¼ teaspoon ginger
1/2 cup extra light olive oil,** or other vegetable oil
1/2 cup granulated sugar
1/2 cup lightly packed light brown sugar
1 – 15oz. can Libby’s 100% pure pumpkin***
2 extra-large eggs, at room temperature (large will work here as well)
1/4 cup milk (I used almond milk) at room temperature
1 teaspoon vanilla extract
¾ cup white raisins
confectioners’ sugar (optional)

Crumb topping:
1 cup all-purpose flour
½ cup sugar
1 teaspoon cinnamon
¼ teaspoon baking powder
¼ teaspoon salt
5 tablespoons unsalted butter melted (make these dairy free by using Earth’s Balance soy free sticks)

Directions:
Place rack in the center of the oven. Preheat oven to 350°F. Spray a 12-count muffin pan with nonstick spray or line with cupcake liners. This recipe makes 16 to 18 muffins, so prepare 2 muffin pans accordingly and set aside. total time including prep 30 minutes

Start with the crumb topping: whisk the flour, granulated sugar, cinnamon, baking powder, and salt together until combined. Using a fork, stir in the melted butter until crumbs form breaking up any big pieces. Set aside.

Make the muffins: In a medium bowl, sift the flour, baking soda, baking powder, cinnamon, ginger, nutmeg, and salt together until combined. Set aside. In a larger bowl, whisk the oil, granulated sugar, brown sugar, pumpkin puree, eggs and milk together until combined. If you are using raisins, add them at this time and mix in. Pour the dry ingredients into the wet ingredients, then fold everything together gently just until combined and no flour pockets remain.

Using a 2 ½ in cookie scoop, scoop the batter into liners. Spoon about 1 tablespoon of crumbs evenly on top of the batter and ever so gently press them down into the batter. Bake for 20 to 25 minutes total or until a toothpick inserted in the center comes out clean. I like to bake them for 10 minutes, then turn the pans and bake for another 10. After that I keep a close eye on them setting the timer for 2 minutes at a time. That’s what makes the difference between a moist muffin and one which is a little dryer. For mini muffins, bake for 11-13 minutes also at 350°F

Let cool in muffin pan and sprinkle with confectioners’ sugar if you would like.*I leave them out very lightly covered and suggest warming them in the toaster oven after day 2 (if they are still around). That will crisp up the top a bit and who doesn’t’ love a warm muffin?

**You may notice I use extra light olive oil, sunflower oil, or grape seed oil, in most of my baking when oil is called for. I think they are the perfect baking oils, and the healthiest. Any good vegetable oil would be a great sub.

***Different brands of pureed pumpkin will yield different results. I tried two others and felt Libby’s had the best flavor and end result. If you use a different brand, I can’t promise the same results so bake at your own risk!!!!!!!

Rainbow Salad with Citrus Dressing… It’s like a Party in a Bowl!


One thing I can promise you, if you make this rainbow salad with citrus dressing, it’s like a party in a bowl! I’ve never said this before about a salad, but it will make you feel like you are on vacation in the islands. How did I come up with a rainbow salad? While I do love creating new and interesting salads, I can’t really take full ownership. I first saw it at a restaurant and it’s the only time I can think of when I had salad envy – if that’s even possible!

Okay, here’s the whole story… I was visiting my friend Susie in Pittsburgh, and we went out to lunch. She took me to a Caribbean restaurant in the Strip District called Kaya. We hadn’t seen each other in a while and I was so happy to see her and catch up, the menu definitely took second place. I quickly ordered a salad with green apples, goat cheese, and candied walnuts with salmon on top – delish – right? I was quite happy with my choice… until our salads arrived!

Susie ordered the most glorious and colorful rainbow salad I had ever seen. I somehow felt my salad was inferior and I was a little jealous. While mine was very good, it certainly wasn’t a rainbow! For a few moments, I couldn’t concentrate on the conversation. I wondered how I could have let this happen. Did I miss reading all of those ingredients on the menu?

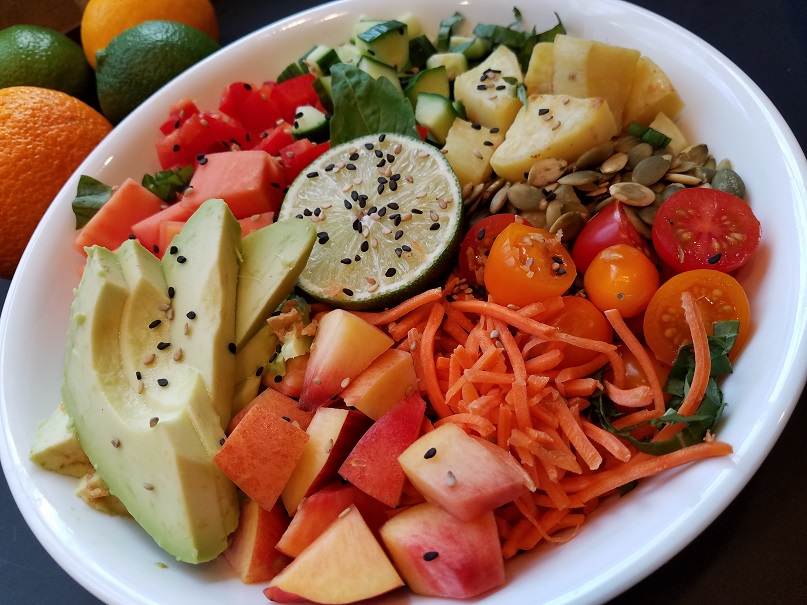
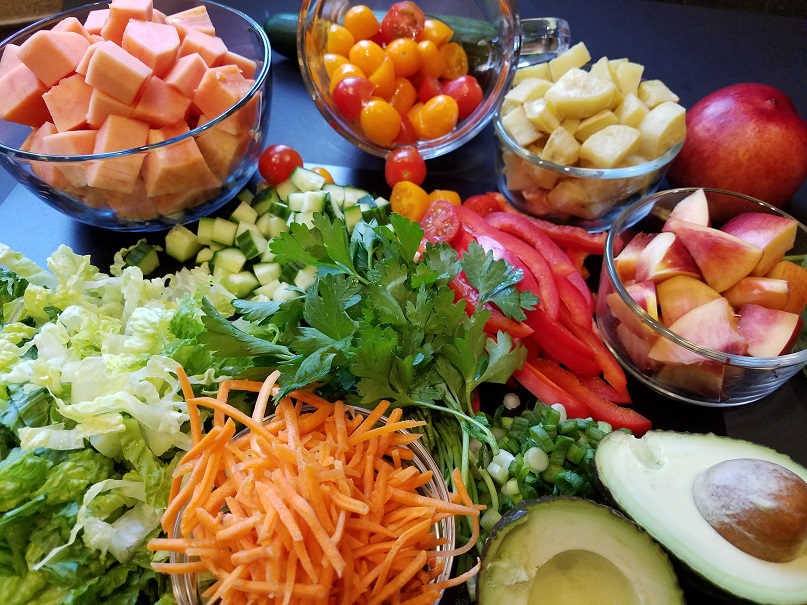
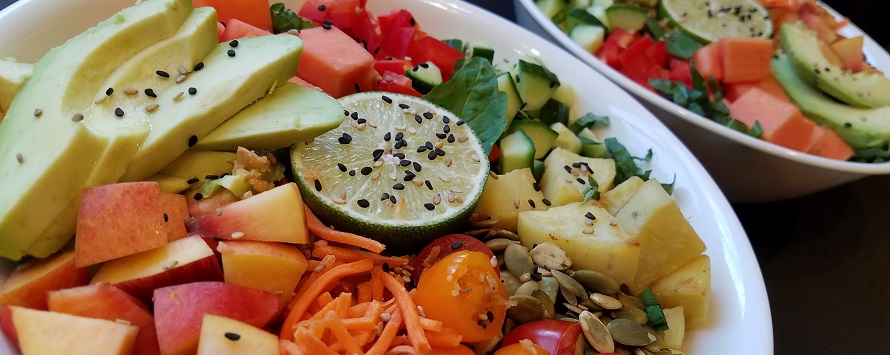
The salad was arranged like a color wheel and as an artist, I felt I let myself down. Facing me was the papaya, I LOVE papaya! There were tomatoes, plantains, pepita seeds (pumpkin), red pepper, avocado, you name it – a feast for the eyes! I love a salad that is not lettuce heavy, and contains a lot of different fruits and vegetables. This salad certainly did that. Susie offered we share both of our salads, but I decided to stick with mine and enjoy the rest of our visit.

That was a couple of months ago and in true Sherri form, I haven’t stopped thinking about it. My mission now was to recreate it. How do I begin? With any recipe I create, there are various ways I go about getting started. In this case, I made a list of ingredients from Kaya’s menu online. Next, in a Google search I checked to see if there were any images. I remembered how it was arranged, but needed a refresher. I found a couple of great photos and started from there. With this information, I made the first version and it was delicious! I knew I didn’t have all of the ingredients it called for, and probably not the right quantities, but it didn’t matter. Below is a photo of the first attempt. I prepared it in a large bowl and it was a great presentation.

This week I found myself in the mood to make the salad again. I went online again and this time, I found a recipe from the restaurant itself – jackpot! http://bigburrito.com/eatbig/15/06/fuller_kaya_rainbow_salad.pdf

About some of the ingredients… My first attempt wasn’t too far off from the original even quantity wise. One of the ingredients I subbed is the Malanga. It’s not an easy vegetable to find unless you are in the Strip District where the variety of fruits and vegetables are in abundance! The first time, I used jicama and it was delicious adding a nice juicy punch. This time I did a little more research and found out Malanga is a root vegetable from South America. It is likened to a potato so I tried a white sweet potato as to keep the color of the original salad. While very different from each other, both jicama and the sweet potato are delicious in the salad. If you can’t find either, you can also use a regular sweet potato.

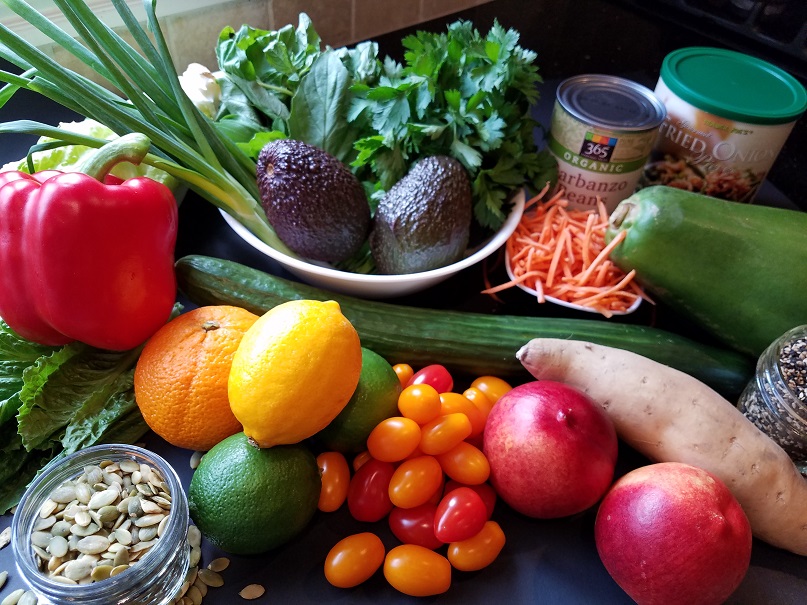
I’m allergic to mango so I subbed nectarines which were a perfect exchange. Feel free to use 1 cup mango if you like it. I also omitted the jalapeno and red onion. I don’t care for either in a salad –personal preference. I did amp up the green onion, and added a pinch of cayenne in the dressing to compensate for their omission. The original salad also had toasted garlic. I made garlic chips for the first salad, but felt it overpowered the rest of the ingredients so omitted for this version.

Before you get started, don’t be afraid of the list. I know it seems like a lot of ingredients. One quick stop to Trader Joe’s should get you just about everything you need including a bag of already julienned carrots and the plantain chips! From start to finish, it only took about 40 minutes including grilling a protein. It’s really worth the time and truly is a vacation in a bowl. Who doesn’t need that every now and then?

It has so many different flavors and textures that make it really amazing. Of course you can alter it to how you like (as I did) and change things around a bit. One thing for sure, it’s a real showstopper. It’s great for lunch or dinner, would be perfect for a dinner party and at this time of year, a great salad to eat in the Sukkah! Enjoy!

For underneath the rainbow of vegetables:

1 head romaine lettuce for each salad, washed very well, dried well and chopped
about 2 cups in each bowl
Add to the lettuce:
1 handful parsley or cilantro, leaves only
1 handful basil cut in a ribbon (roll the leaves into a cigar and slice)
1 cup green onions (scallions) finely sliced
1 handful mint (optional)
make sure to wash these ingredients very well. If you want, you can reserve a little of each to sprinkle on top.

For the top of the salad:
1 cup julienne carrots (shredded would be fine too)
2 nectarines cut into chunks (or 1 cup mango)
1 cup cherry or heirloom tomatoes cut in half
1 cup fresh papaya peeled and diced
1 cup English cucumber diced (you can peel it if you don’t like the peel)
1 cup red pepper diced
2 cups white sweet potato
1 cup cooked chickpeas (canned are great too, rinse and drain)
1 cup plantain chips (left whole or crushed and sprinkled)
2 avocados sliced
¼ cup sesame seeds (I used black & white because I had it on hand)
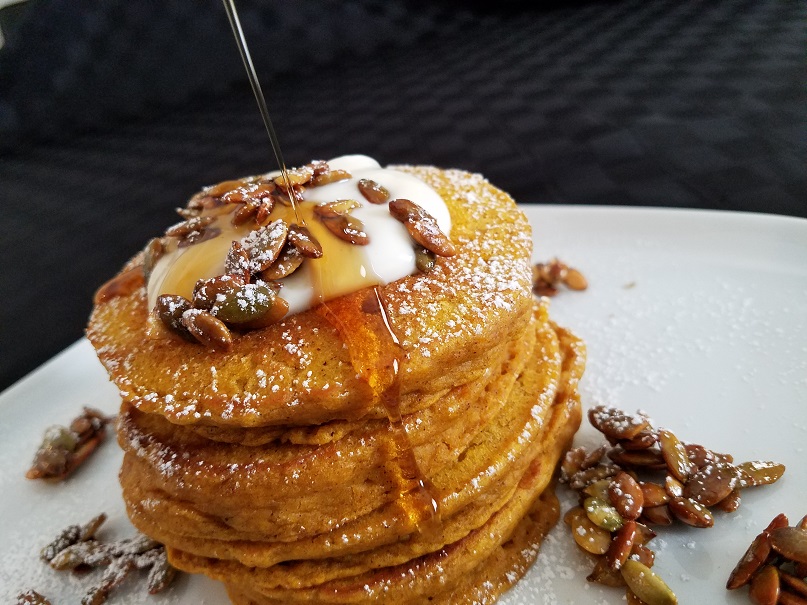
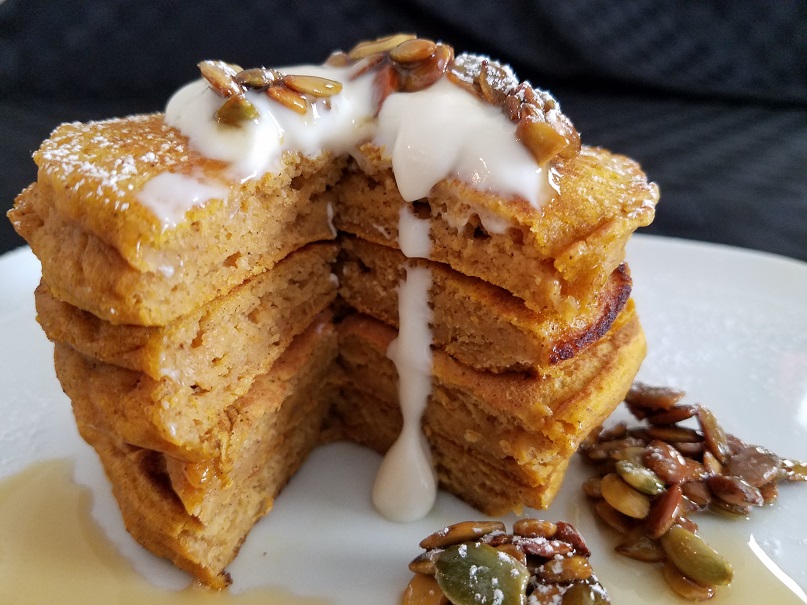
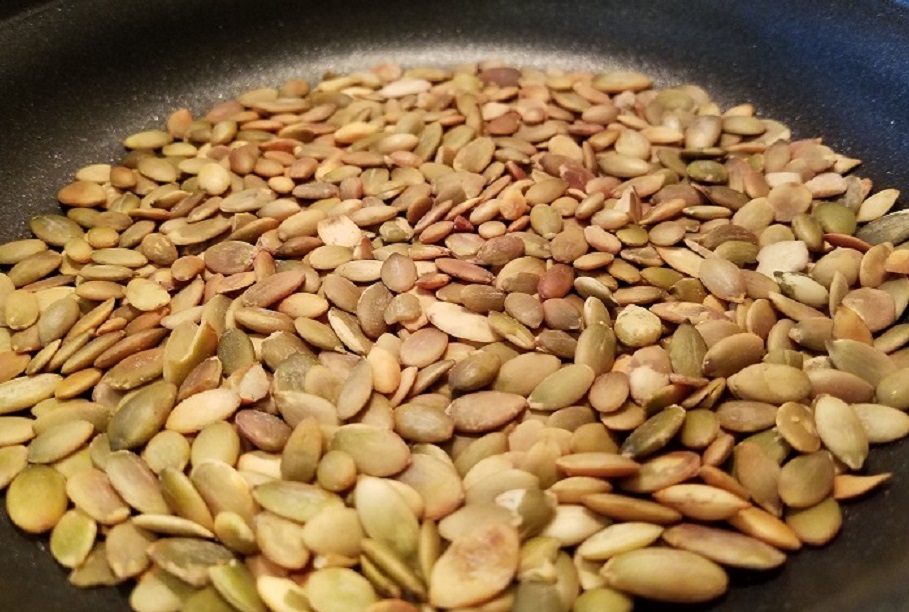
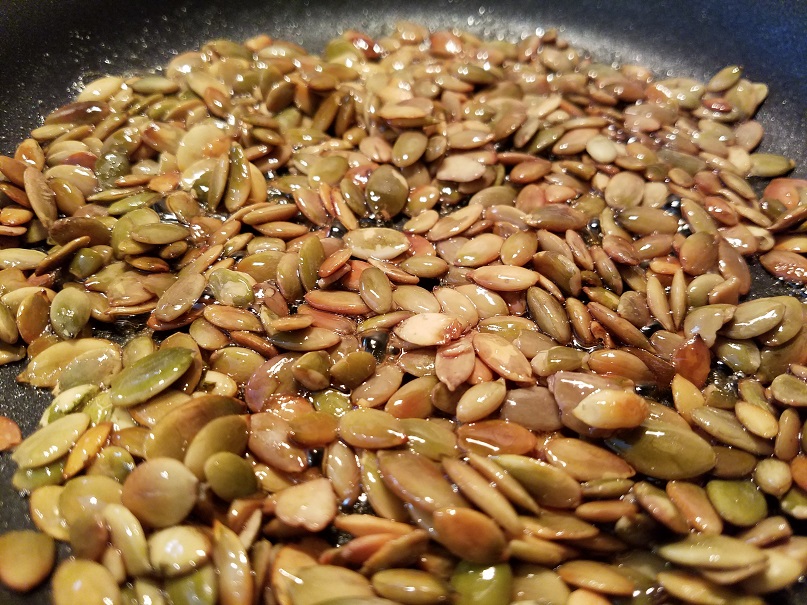
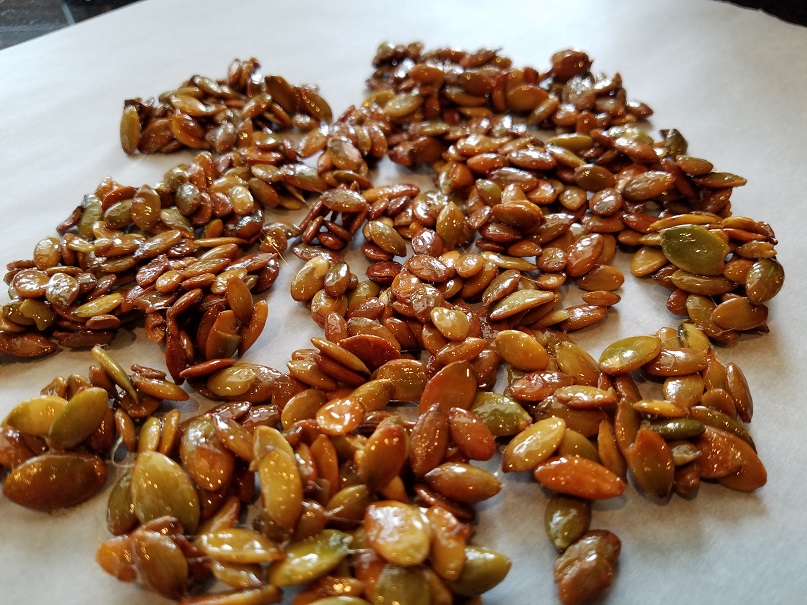
1/2 cup pepita seeds (pumpkin seeds)
fried onions (optional)
2 limes cut in half to be served with each salad

Optional:
Grilled Chicken, Salmon, or Steak (I grilled the chicken and salmon while I prepped the vegetables)

Citrus Vinaigrette:
Zest and juice of 2 oranges (pineapple juice can be subbed here)
Zest and juice of 1 lemon
juice of 1 lime
2 roasted garlic cloves (1 raw finely grated would work well)
1 to 2 tablespoons of maple syrup
¾ cup good extra virgin olive oil
Salt and pepper to taste (I used 1 teaspoon of each)
pinch of cayenne pepper (optional)

Add zest and juices with garlic into a blender or food processor. After the citrus is blended, while pureeing, drizzle in the oil to emulsify. Add salt and pepper to taste. I also added a pinch of cayenne pepper for a little kick.

To Begin:
There are a couple of ways you can cook the sweet potato. You can steam it, sauté or roast it like I did. Heat oven (I used a toaster oven) to 350 degrees. Peel and dice sweet potato, toss in a little olive oil and put it on a sheet pan. Bake for about 25 minutes, or until you can pierce it with a fork.

If adding a protein:
Get your grill or grill pan hot. Season the meat or fish with salt and pepper and grill until done.

While that is cooking, prep all of your other ingredients.

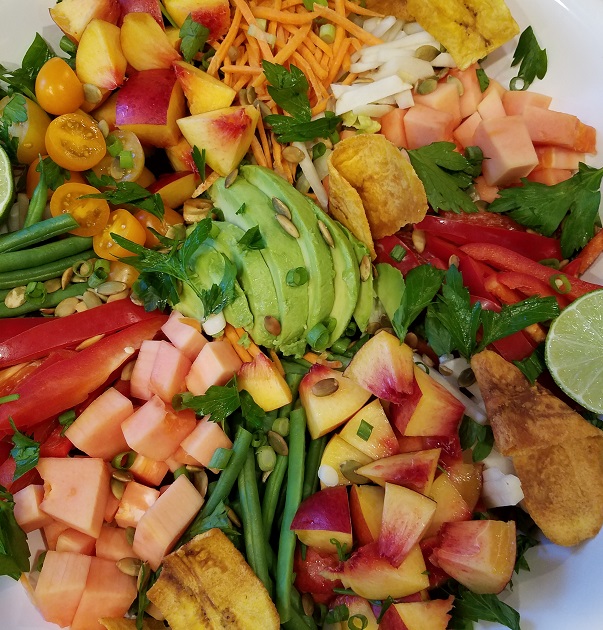
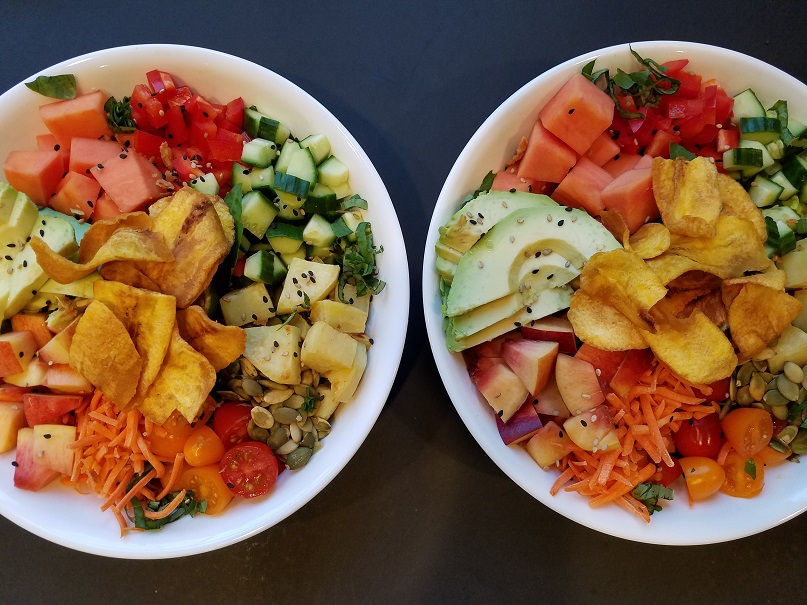
Toss the lettuce base with some of the vinaigrette, just to season. Place in the middle of 4 plates or large bowls. Arrange the other ingredients on top – around the bowl. Sprinkle the sesame seeds and plantains on top. Serve with ½ lime for each salad. I hid it under the  pile of plantains! The restaurant link I have included actually gives a diagram on how to arrange the salad. I did my own thing. It was complicated enough with all of the ingredients. However you place the ingredients, it will be beautiful! I’m so excited for you to try it!