midwest salad

midwest salad

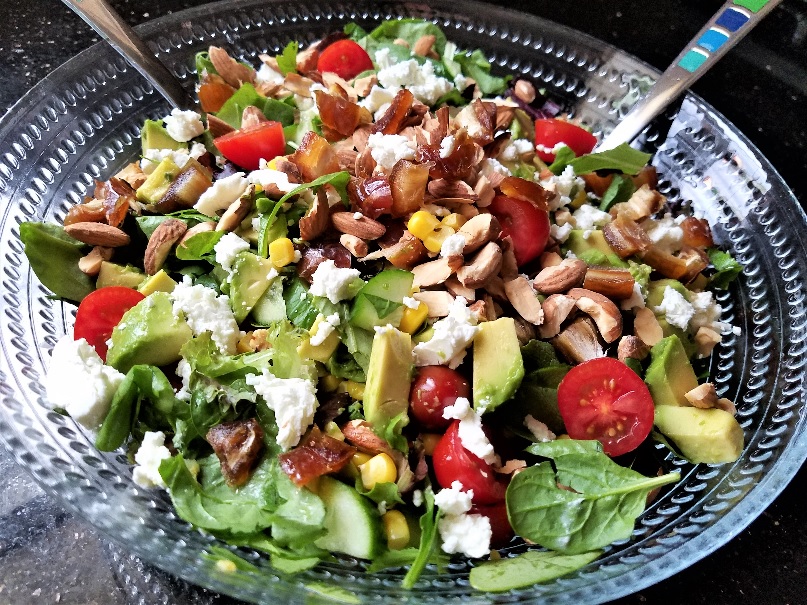
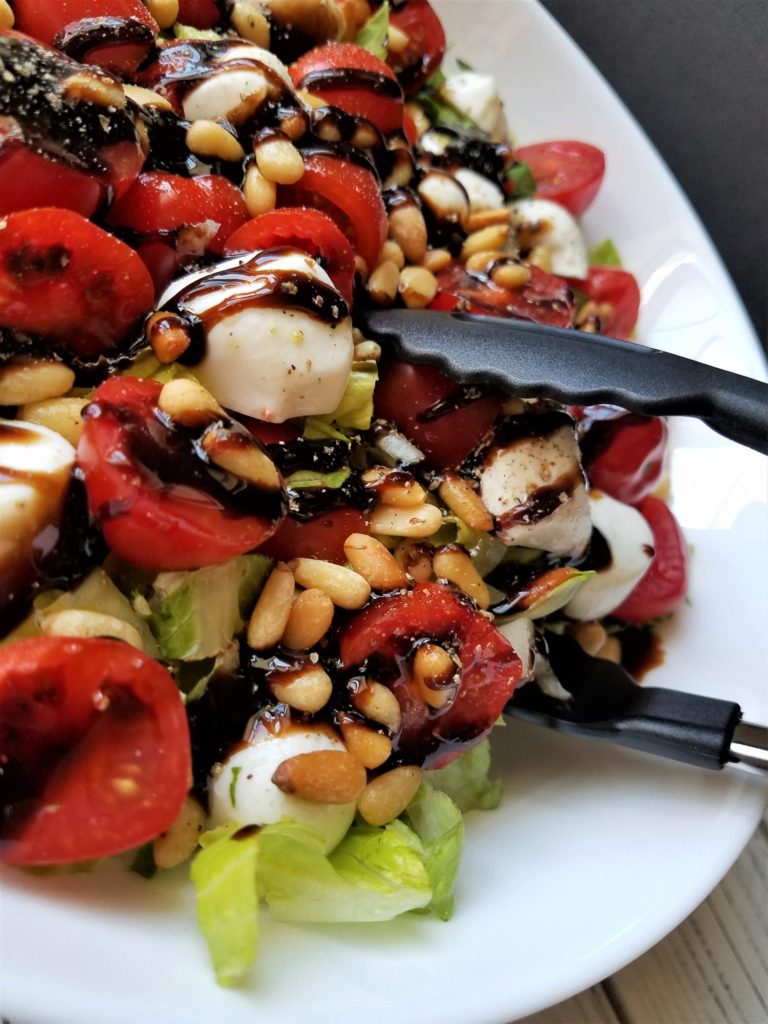
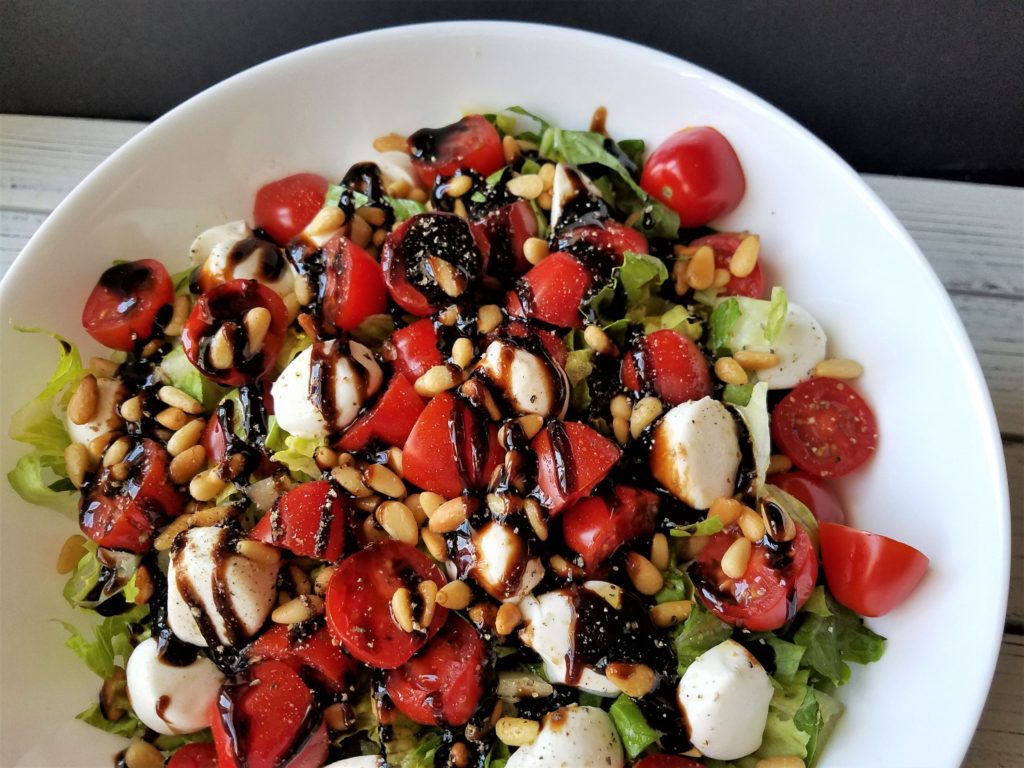
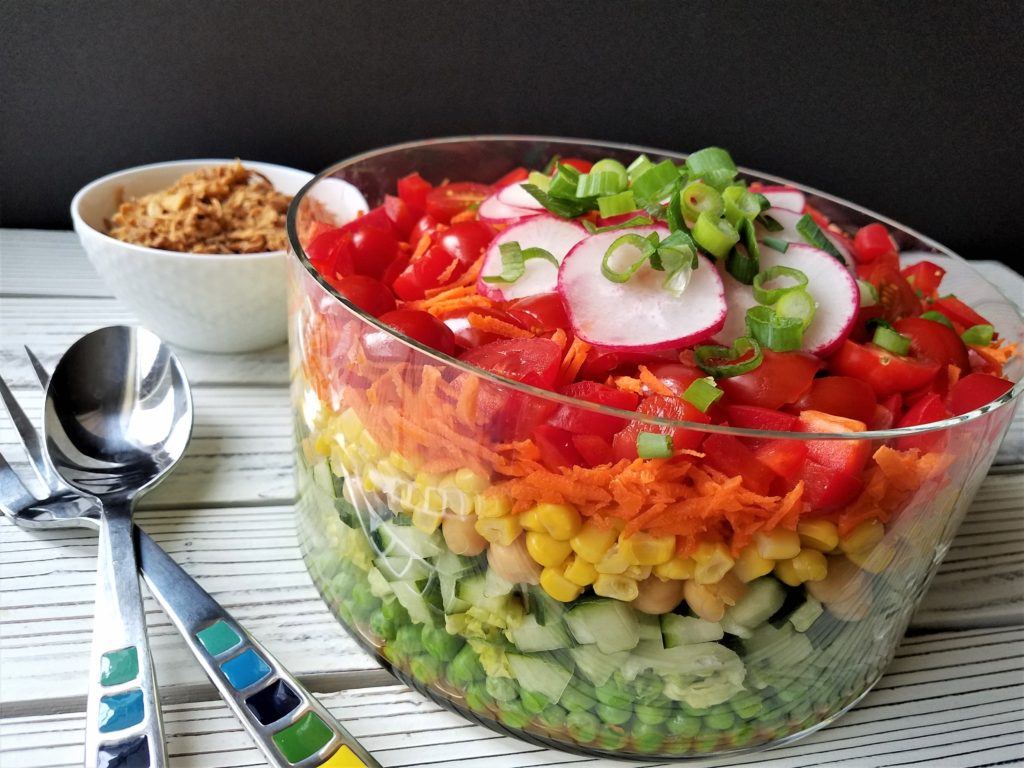
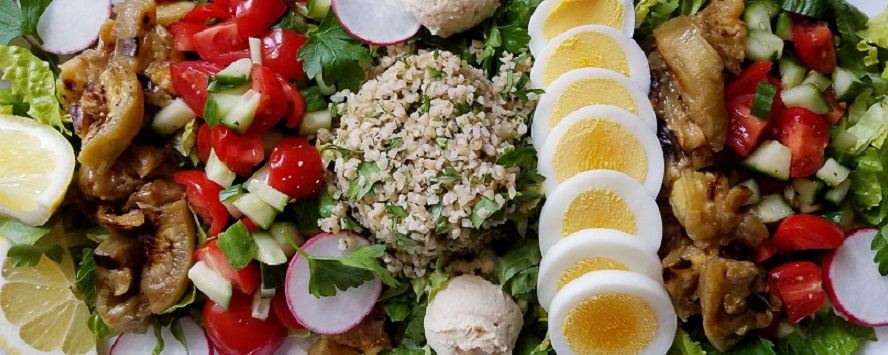
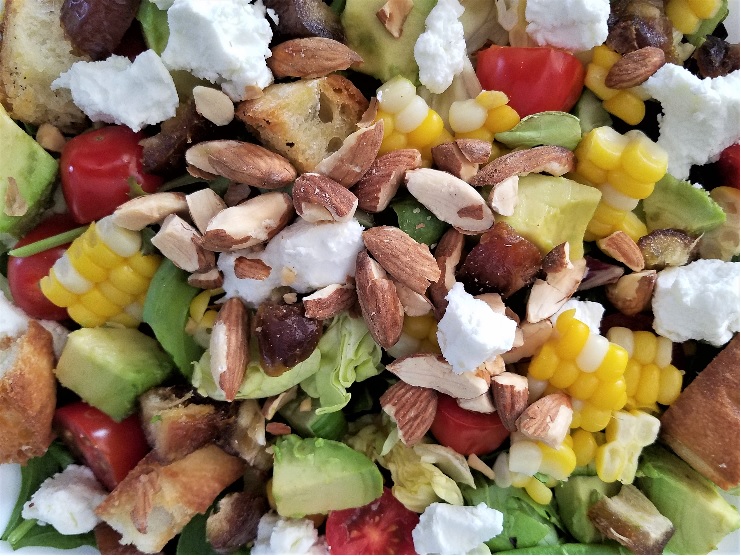
Show of hands… who loves salad? See me waving over here – two hands up? Few things make me happier than a large bowl filled with a kaleidoscope of fresh colorful vegetables like this amazing Midwest salad. Why do I call it a Midwest salad? For one thing, I live in Ohio, so CORN! You’ll have to keep reading to find out the other reason. I like when there is something unexpected like corn, almonds, dates or goat cheese added in. Nothing like the element of surprise in a meal! This salad has them all and is bursting with a variety of tastes and textures and dressed in a heavenly dressing.

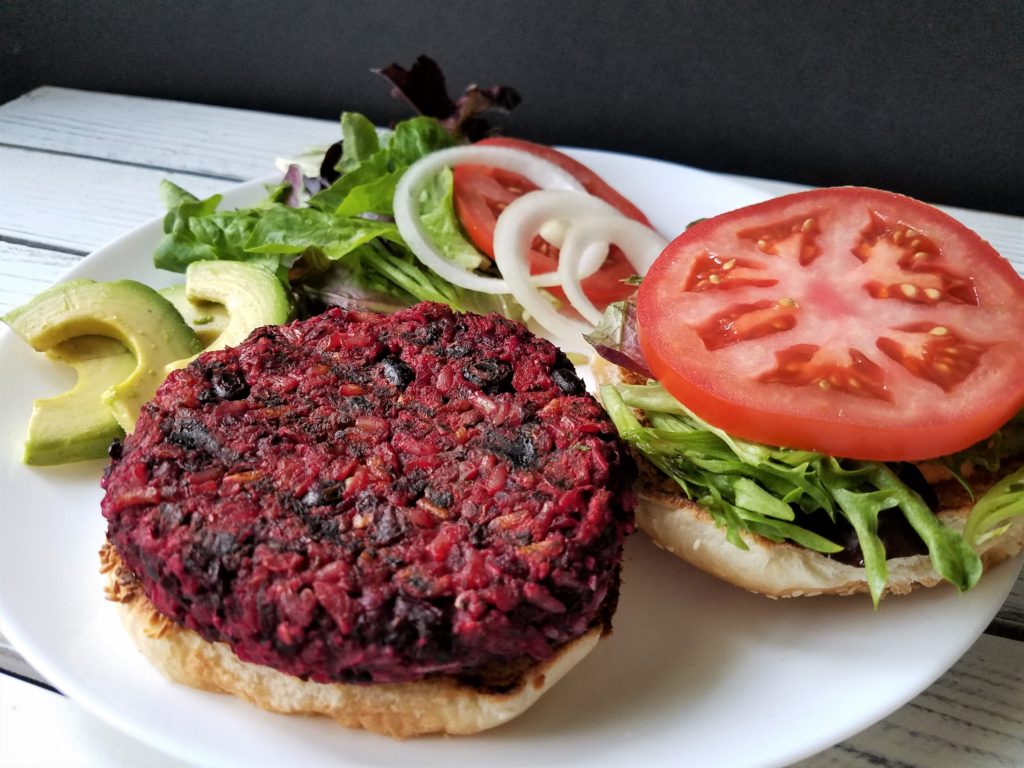
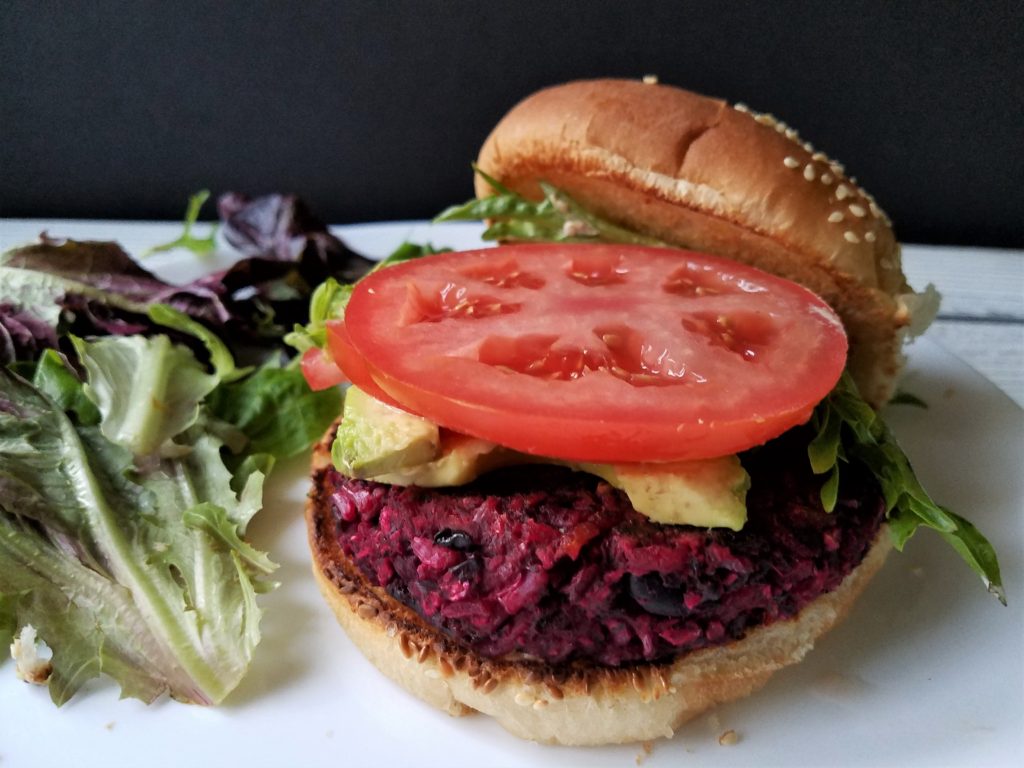
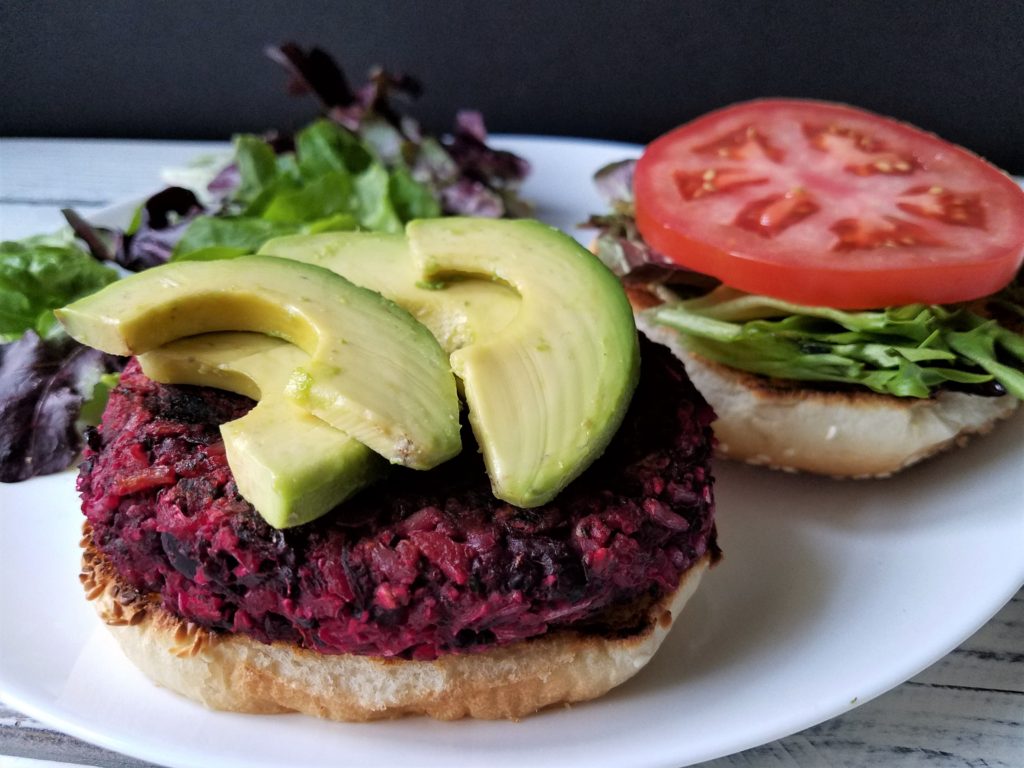
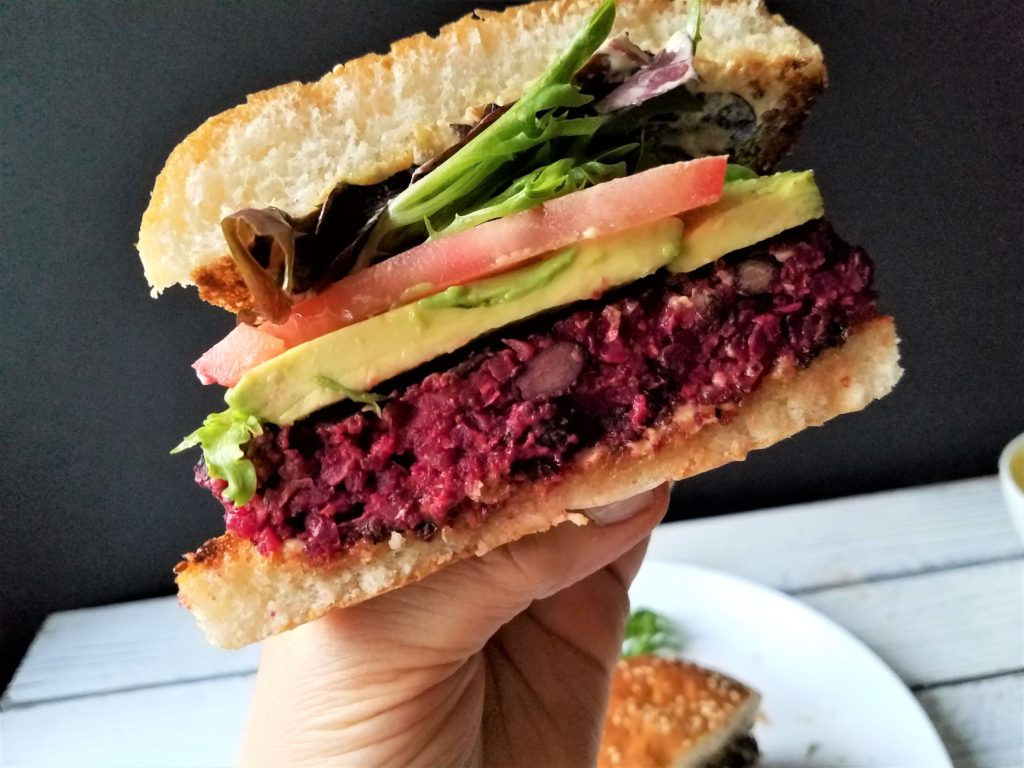
It is a little tangy from the crumbles of goat cheese, juicy from the tomatoes, has sweetness from dates, creamy from the avocado, crunchy from the almonds, and crispness from the fresh corn. I like to cut everything bite size so you get a little bit of everything in every bite. Topped off with a perfect vinaigrette and there’s nothing better. I wish I could take credit for coming up with it but I can’t. It’s another Northstar Café creation, the same place as my beet and black bean burger. They serve amazing salads and this one is our family favorite. It’s the type of salad you dream about.

midwest salad take 2

One fun note about this salad… at each of their locations they name it something different according to the town or locale they are in which is pretty cute. There’s the Beechwood, the Townsfair, the Village, the Uptown, and the Liberty salad – I told you – cute. At my house we call it the Midwest aptly named for our location and an homage to where the salad originated.

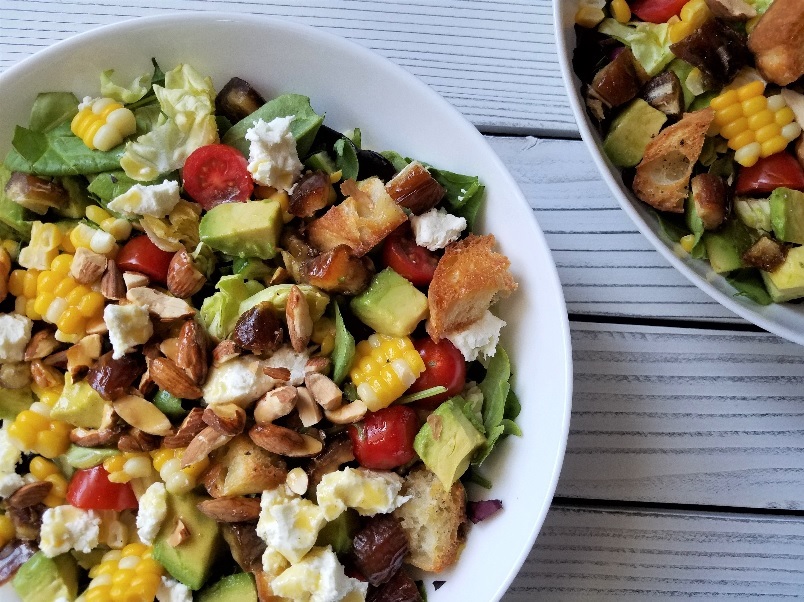
I don’t think you can ever have enough of what I call toppings on this salad so I’ve amped it up a bit. I’ve taken liberty and added Persian cucumbers, my new favorite salad addition. I also made homemade croutons from ciabatta bread which when tossed in the vinaigrette = perfection! The restaurant uses a mix of greens with kale and some cabbage; I prefer a spring mix with some romaine and radicchio added – get creative here an make it your own.

full picture salad

Use whatever types of lettuce you like it’s really the toppings and dressing that make this salad sing. It serves two as a main dish as is or with the addition of a protein like salmon, cubed grilled tofu or chicken (omit cheese if adding chicken if you keep kosher). It also makes a great starter for 4. FYI, I know this is a really big salad – it’s just the way we like them. Am I right? Enjoy!

ingredients
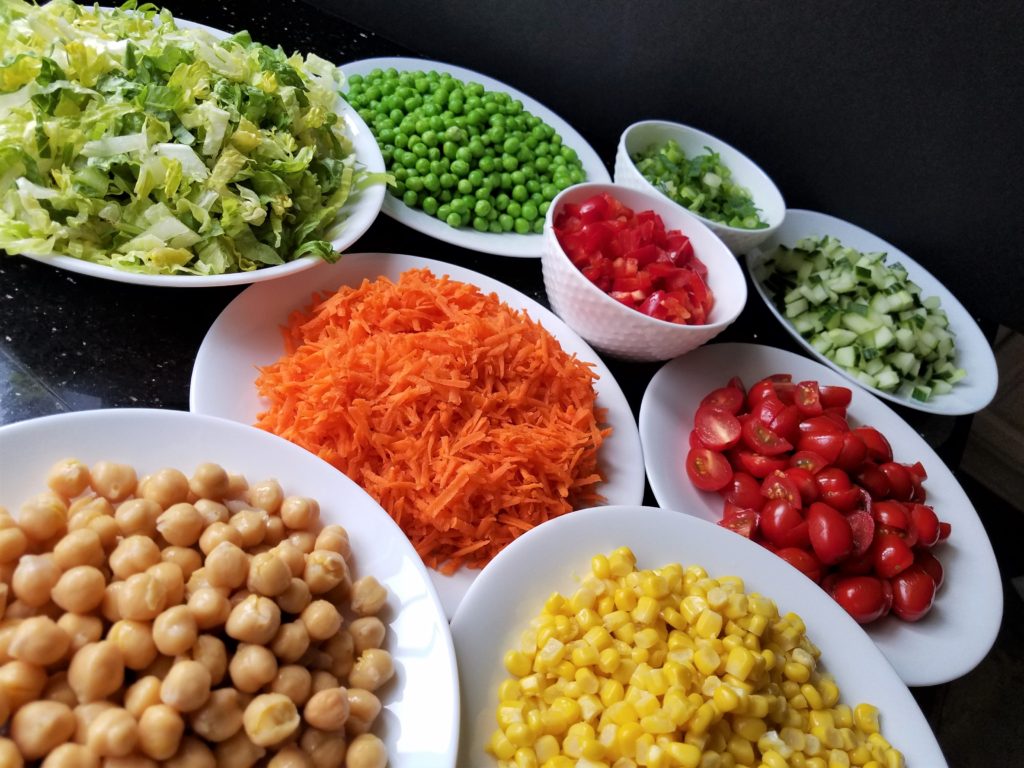
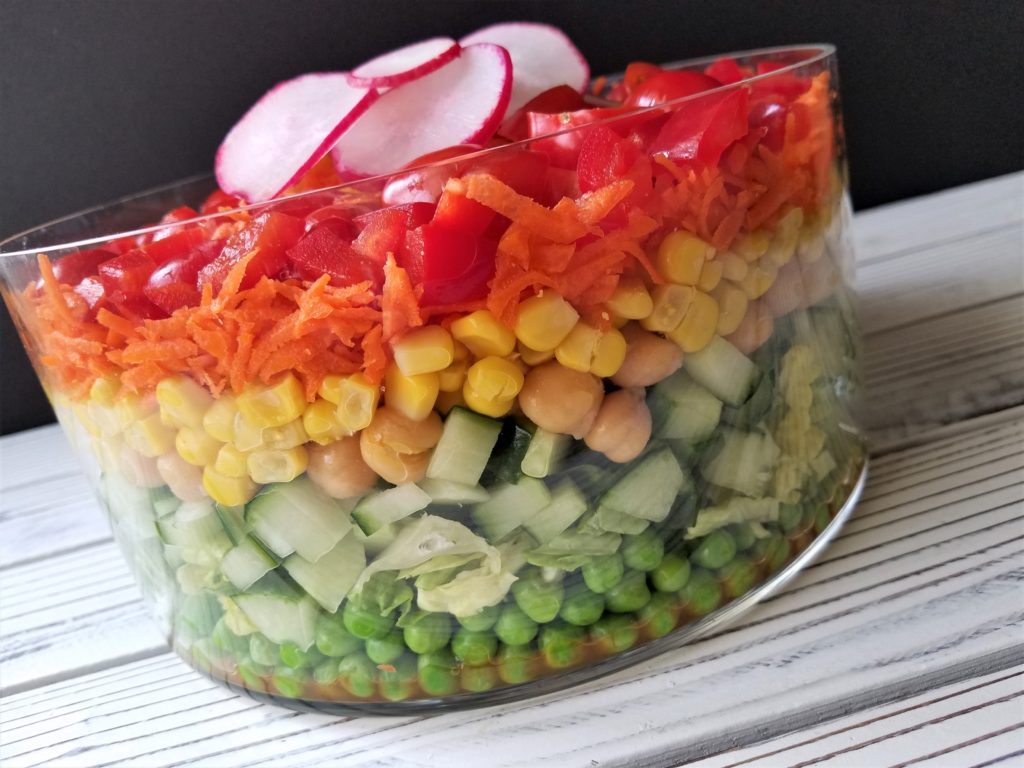
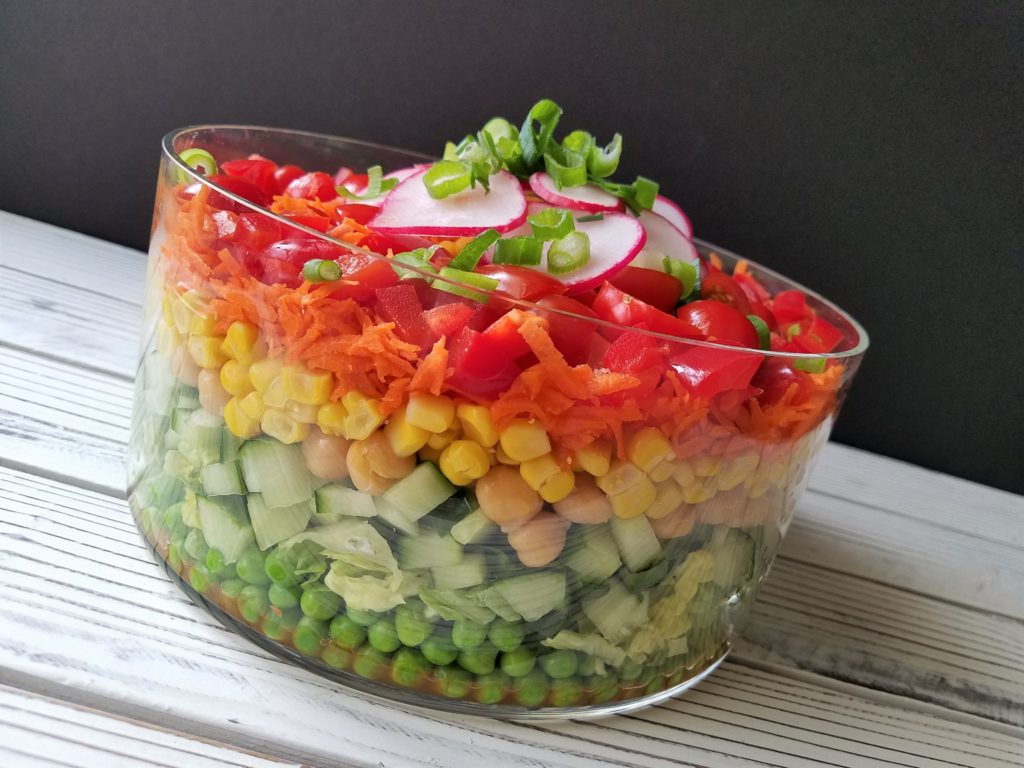
7 cups any combination of lettuces: spring mix, romaine, radicchio, endive
1 cup cherry or teardrop tomatoes cut in half (or ¼’s if on the large side)
1 medium avocado cut in ½” cubes
2 Persian cucumbers diced
¾ to 1 cup fresh steamed corn* cut from the cob (you can also use canned/or frozen in a pinch)
½ cup goat cheese
4 large Medjool dates cut into ¼” pieces
1/3 cup lightly salted almonds very roughly chopped
1 cup homemade croutons (recipe follows)
optional added proteins: grilled salmon, tofu, diced cooked chicken (if kosher omit cheese if adding chicken)

café vinaigrette
¼ cup champagne, white wine vinegar, or apple cider vinegar
1/3 cup good extra virgin olive oil
2 teaspoons Dijon mustard (I like Maille brand)
1 tablespoon maple syrup or honey
pinch salt
¼ to ½ teaspoon freshly ground black pepper

directions for vinaigrette
Add all ingredients into a mason jar and shake vigorously. Alternatively you can put all ingredients in a blender. Set aside until ready to use.

directions for salad
Add greens to the bowl and using kitchen shears (or sharp knife on cutting board) cut the lettuce into bite size pieces. Add the rest of the ingredients in the order written. Toss lightly and dress with vinaigrette.

directions for croutons
Preheat toaster oven or conventional oven to 350 degrees.
I like to use ciabatta bread but you can use any bread of choice like a hearty French bread or focaccia. Cut the bread into 1” cubes. Place on a cookie sheet. brush (or spray) with olive oil and sprinkle with a pinch of salt and a freshly ground pepper. Place in the oven and bake until lightly toasted, about 6 to 8 minutes tossing ½ way through the baking time. You can also quickly toast them in a frying pan.

directions for corn
I prefer steaming the corn, it maintains the vitamins. To steam: put 1 to 2 inches of water in the bottom of a pot. Put steamer basket in and bring water to a boil. Place corn in the basket and cover the pot. Steam for about 6 minutes depending on the size of the corn and how many you have in the pot. If you don’t have a steamer, you can take a deep pot add 1 inch of water in the bottom, break the corn in half and place cut side down in the pot so it’s standing up. Cover and steam.

midwest salad with serving spoons

cherry, tahini, date smoothie

cherry tahini date smoothie

Sometimes I make myself something that’s so delicious I can’t wait to share it with everyone. Last week I blended up this cherry, tahini, date smoothie at least a dozen times! My family loves smoothies and this one is a win, win for more than just breakfast or an after workout energy boost. It’s not only delicious and refreshing but super healthy and has three of my favorite ingredients blended together.

Cherries are my number one favored fruit, always have been. The sweet taste of cherries are not only irresistible but nutritious and contain a ton of health benefits. Some studies say they can reduce inflammation, improve sleep, boost heart health, and help you recover faster after exercise. I use frozen cherries to add to the frostiness and since they can be purchased all year, you can enjoy summer in a glass 365.

cherry tahini date smoothie

Tahini is like liquid gold and I add it to everything from dressings, and hummus to baked goods (check out my tahini chocolate chip cookies), and of course smoothies. It’s a puree of pure sesame seeds and tastes like a less sweet peanut butter with a sharper flavor. Aside from its appealing nuttiness, it’s a healthy and yummy way to add antioxidants, anti-inflammatory properties, vitamins, minerals, and healthy fats to your diet. I’m a big fan of Soom Foods Tahini, but when I can’t get it, I like Whole Foods brand, or any of the Israeli brands I find in the kosher or mediteranean section of my local grocery.

cherry tahini date smoothie

Dates have become my preferred way to add natural sweetness without adding processed sugar to many baked goods and definitely smoothies. They’re great on their own as a snack because they are so sweet and chewy plus a little goes a long way. When added to a smoothie, they add little bursts of sweetness throughout, are high in essential nutrients, fiber, nutrients and said to improve digestion.

My cherry, tahini, date smoothie is a great way to the start, middle, or end your day! Blend these three powerhouses together and you have a unique, balanced, and nutritious smoothie that hits all the marks. Enjoy!

ingredients
1 cup frozen cherries
4 ice cubes
½ cup low-fat Greek yogurt (vanilla or plain)*
½ to ¾ cup almond milk** (depending on how frozen you like it)
1 tablespoon tahini***
2 medjool dates (make sure to take the pits out)

simplest directions ever
Place all ingredients into a blender and blend until smooth. Enjoy!

*if you want to make this vegan, you can sub nondairy yogurt or omit and add extra ice cubes
**feel free to sub any milk you like. I adore the taste of almond and oat milk so those are always my first choice.
***if you strongly dislike tahini, feel free to substitute cashew, almond, or peanut butter.

cherry tahini date smoothie

black bean and beet veggie burger

black bean and beet veggie burgers

Looking for an amazing veggie burger recipe? Meet my black bean and beet veggie burger; it’s a triple B – beans, beets and brown rice. It’s my riff on the Northstar Café veggie burger, a Columbus favorite to both vegetarians and meat lovers alike. If you live in Columbus and haven’t had one yet you might not be able to call yourself a true Buckeye – just kidding – not really kidding! Northstar Cafe is our “go to place” not just because of this burger, but that’s the big draw. It’s always on the itinerary when friends and family come to visit which makes me wonder if they are coming to see us, or if it’s the veggie burger they’re after! We have literally driven straight from the airport to Northstar more times than I can count!

veggie burger

Wonder why these burgers are so popular and crave able? First off they are served on a buttered and grilled brioche bun and topped with white cheddar cheese. They’re hearty from the rice and beans, sweet and juicy from the beets, and have a warm smokiness from the chilies. The prunes are the one ingredient you wouldn’t think belongs, but boy do they! They add a sweet caramelized flavor which is surprising and delicious. It’s tender on the inside and has the texture of a regular burger. Once grilled, the burger forms a nice smoky charred outer crust. It’s this combination that make an amazing burger. together all of these ingredients give the burgers that umami* you want in a really good burger.

veggie burger

My take is so close to the original I even surprised myself! I have always had a thing for recreating food from restaurants and bakeries. Remember my copycat of the Little Eater root vegetable couscous? More recently I posted my version of NYC’s Levain chocolate chip cookies – I hope you have tried them! They should both give me some street cred. Replicating a recipe is like a food puzzle and I love puzzles! I take the original, break it apart, write down all of the ingredients I can see and taste, then try to put it back together again kind of like humpty dumpty. Then through trial and error plus many, many versions, a winner emerges and this is it.

veggie burgers

There are so many reasons to love these burgers: they are super easy, extremely tasty, plant-based, vegan, gluten free (if you use gluten free oat flour), hearty, very satisfying and they have everything you look for in a regular burger with the added bonus of being vegetarian. My husband said it would be fun to call them a triple B burger because they contain beans, beets, and brown rice. What do you think?

veggie burgers
veggie burgers

If you’re ever in Columbus definitely check out Northstar Cafe and see for yourself why they are so famous. But in the meantime, give my black bean and beet veggie burger a try and you just might earn honorary buckeye status… Enjoy!

This recipe makes 12 – 5 to 6 ounce burgers.

ingredients
1 ¼ cups dry brown rice cooked according to package. Yields 5 to 6 cups cooked
1 pound roasted red beets or precooked**
2 cans black beans drained and rinsed (set 1 cup aside)
½ to 1 cup oat flour (directions to make your own below)***
2 cups fresh parsley leaves (will yield about ¼ cup minced)
1 heaping cup prunes (careful to check there are no pits)
2 tablespoons chipotle chilies in adobo sauce (I used Goya chipotle chili peppers in adobo and used 2 peppers and purred them with the mustard)
1 to 2 tablespoons Gulden’s spicy brown mustard
1 to 2 teaspoons salt (or to taste)
optional toppings: white cheddar cheese, field greens or shredded romaine, tomato, diced sweet onion, pickle, avocado
mustard sauce
5 tablespoons mayonnaise
3 tablespoons Gulden’s mustard

directions
Before you get started: Take a large 5 quart glass or metal bowl and set aside. All of the ingredients will go in there as they are ready. Prep all of the ingredients individually in a food processor (except the rice) then mix them all together. It may seem like there are a lot of steps but some ingredients are canned, and you can cook the brown rice and roast the beets a day beforehand.

ingredients for black bean and beet veggie burger

Cook the rice according to package directions, cool and add 5 1/2 cups to the bowl. Set 1 cup aside for later use if needed.

Beets: Cut roasted beets into quarters and place into the food processor. Pulse about 5 or 6 times or until you have pieces a little smaller than a pea. Place in the bowl. Roasting directions follow at the end.

Drain 2 cans of beans and rinse. Reserve one cup whole beans and add to the large mixing bowl. Put the rest of the beans in the food processor and pulse about 18 to 20 times or until it’s broken up but still has some bean pieces. Add the beans to the bowl.

the rest of the ingredients
Check for pits in the prunes then place them in the food processor and pulse until broken up to about the size of a raisin and add to the bowl with the beets and beans.

Puree the 2 tablespoons of chilies and sauce with 1 tablespoon of mustard. You could just use the adobo sauce if the chilies are too spicy. Mince the parsley and add to the bowl.

Add the rice to the bowl and pour the rest of the ingredients in as well. Using gloves, mix everything together. Season with salt and pepper then add the oat flour ½ cup at a time. You only need enough to hold everything together. Use ¾ to 1 cup depending on how wet the other ingredients are.

Mix thoroughly and make 11 to 12 (5 to 6 ounce) patties. When making the patties, try not to compact them. Form them firm enough to just hold together. If not using right away, wrap them individually in plastic wrap. They freeze beautifully in the uncooked stage.

to cook
Heat a grill pan on medium high heat. Spray the pan with cooking spray. Place the patty in the pan and cook about 4 to 5 minutes on each side. If you want cheese, add it after you flip the burger. Cook until you have nice grill marks.

to serve
I like to serve the burger on a nice soft bun toasted in a pan on the cut side. Then put the mustard sauce on both sides of the bun (sometimes I use guacamole – also delicious) place the patty on the bottom, lettuce, sliced tomato, pickles, and diced onion – However you like to have your burger. If you’re not eating bread carbs, try a roasted sliced sweet potato bun. I think that would taste great.

recipe notes
*umami is called the 5th taste added to sweet, salty, sour and bitter. Real Simple magazine says umami usually describes indescribable deliciousness making something savory, rich, yum.

I like the taste of roasting the beets but, in a pinch using precooked beets are perfectly fine. Aside from canned beets, you can usually find the Love brand shrink-wrapped in the refrigerated area of most groceries this would be my second choice if I can’t roast them. Just make sure they are plain beets in water – definitely not pickled!

roasted beets

**how to roast the beets, preheat the oven to 400 degrees.
Heat oven to 400 degrees. Cut the beets off close to the stem. Set the leaves aside for another use. Scrub the beets well and wrap loosely in aluminum foil. Place the beet packets into a rimmed baking dish to roast in case any juices escape. Roast for close to an hour. Check them in 30 minutes and then every 15 minutes to see if a fork or sharp knife will slide through easily. Smaller beets will take less time to roast and may be done in 45 minutes. Larger ones will take closer to 60 minutes. Let them cool.

I wear gloves to take the skin off so not to stain my hands and I use aluminum foil as my base so I can throw all the skins and trimming away after. Cut the ends of the beets off, hold in a paper towel and use a portion of the towel to rub the skin off. It should peel off easily. For more beet roasting info check out this link from the kitchn.

***how to make oat flour Place 2 ½  cups of oatmeal in the food processor pulse a few times until you get a coarse flour it will yield a little over 1 cup. Set aside, this will be used as the binder at the end. My sister used almond flour in lieu of oat flour and said it was very successful. I think grinding walnuts would be really good as well.

ingredients for black bean and beet veggie burgers
ingredients for the black bean and beet veggie burger – very simple ingredients

If you don’t have a food processor use a potato masher or fork for the beans and beets (wear gloves), dice the prunes to a little smaller than pea size. For the chilies, you can use just adobo sauce the chilies are packed in or if you have a blender use that.

mini mozzarella caprese salad

When it comes to summer salads, I live fast and loose – especially when I don’t have a lot of time or ingredients. That’s when I throw something so utterly simple like this mini mozzarella caprese salad with tiny tomatoes and I think you’ll laugh at me if I post it so I often don’t. It’s a salad where I just throw things into a bowl and hope for the best.

Then I put it on the table and my husband says WOW what a great looking salad and asks if I’m going to put it on my website. That’s the game changer and dinner is delayed. The salad is swept off the table and onto my photo board ready for its close up.

This is one of the easiest and most impressive salads to put together so of course I have to share it with you. Five simple ingredients: my favorite sweet and juicy teardrop tomatoes, soft and creamy mini mozzarella balls (also called bocconcini), the addition of fresh crisp romaine, a sprinkle of pine nuts and a drizzle of sweet and tangy balsamic glaze. It’s what I like to call a 1-2-3 kind of salad because it takes about that long to assemble and has just about that many ingredients which I usually have on hand.

If you’ve never had balsamic glaze (also called a reduction) it’s a must. It’s sweet, tangy and great to have on hand to drizzle on everything from pizza and vegetables to salads, pasta, sandwiches, meats, cheese, fish, and even fruit. It just wakes things up and adds that extra something to take your dish over the top. You might become obsessed with it! You can make your own very easily (recipe at the end), but I always have a few different flavors on hand like classic, raspberry, and fig.

It serves two as a main, or four as a side dish that pairs perfectly with eggplant parmesan and pasta dishes. Some fun ways to shake it up a bit is by swapping in arugula instead of romaine, adding orzo, olives, artichokes, roasted red peppers, and sundried tomatoes for a whole new salad. The possibilities are endless – Enjoy!

ingredients
Two heads of romaine lettuce sliced into shreds (about 3 to 4 cups)
1 pint of teardrop tomatoes cut in half (or more if you like)
1 – 8 ounce container of mini mozzarella balls or mozzarella pearls
2 to 4 tablespoons toasted pine nuts (optional)
raspberry or fig balsamic glaze
1 tablespoon extra virgin olive oil (optional)
salt and pepper to taste
recipe for the balsamic glaze follows below

directions for salad
Wash romaine lettuce very well and dry very well. Cut into small shreds and place in a large bowl. Drain mozzarella leave whole or cut in half and add to the top of the salad. Wash and dry tomatoes, cut in half and add to the salad. Drizzle salad with extra virgin olive oil and balsamic glaze.

I prefer to serve the salad at room temperature so the cheese is soft and the tomatoes are sweet and juicy.

balsamic glaze recipe
2 cups balsamic yields ½ cup glaze
½ tablespoon maple syrup (optional)

directions for balsamic glaze
Pour vinegar and maple syrup into a small saucepan and bring to a boil over medium-high heat. Reduce to medium and simmer stirring occasionally for about 20 to 25 minutes. You’ll see after about 15 minutes the vinegar will look like it’s starting to thicken.

Cook until it’s reduced by about ½, coats the back of a spoon and looks like warm honey. The glaze will thicken a little more as it cools. It can be stored in an airtight container in the fridge for about 1 month (if it lasts that long!). I suggest storing it in a glass jar or a squeeze bottle.

Variations: you can use any fruit flavored balsamic or white balsamic. Some variations: add 1 tablespoon honey, date syrup or brown sugar

levain bakery’s chocolate chip cookies (my version)

Levain Bakery in NYC makes one of my all-time favorite chocolate chip cookies. Today they are opening a location in Brooklyn, NY which happens to be my birthplace. Since It’s officially my birthday week, it seems bashert (Yiddish for meant to be) that I was already planning to share my version of their very famous chocolate chip cookie with you today – happy coincidence!

Why is it so famous? For one thing each cookie weighs a whopping 6 ounces, that’s a big cookie! It’s chock full of chocolate chips and walnuts more than any other CC cookie I’ve ever had. The center is soft and gooey like cookie dough, and the outside is just a bit crispy where the little knobs of nuts and chips are trying to escape.

I don’t usually like nuts in cookies, but these are a whole different ballgame. They add a nice texture and sweetness to the cookie if you lightly toast them in the oven (see recipe notes below). It transforms them from a light and almost waxy texture with a hint of bitterness to a sweeter, and crunchier tasting walnut. As for the chocolate chips, 3 1/2 cups of chocolate chips sounds like too many chips – said no one ever! That’s what makes them so ooey gooey good!

A couple things to know about this recipe before you start out. When you take them out of the oven they will seem just a little underdone in the middle. That’s okay, it’s what you want so you’ll get that cookie dough middle, they’ll set up a little when they cool. As long as they are nice and golden, you’re golden too! Some recipes call for cold butter, but I don’t think that’s what they use. I take the butter out 1 to 2 hours before I’m going to bake them just so they come to room temperature. After the directions I have included a few tips for success about storage, toasting walnuts, and about cake flour.

I’m really excited they are opening another location and wish them mazel (luck)! What I’m even more excited about is to being able share and celebrate this recipe with all of you – especially my Midwestern friends! Enjoy!

ingredients
1 ¾ cup all-purpose flour
1 cup cake flour* (I prefer King Arthur)
1 ½ teaspoon baking powder
1 teaspoon baking soda
1 ½ teaspoons kosher salt
1 cup (2 sticks) plus 1 tablespoon unsalted butter softened*
¾ cup light brown sugar packed lightly
½ cup granulated sugar
2 extra-large eggs
2 teaspoons vanilla extract    
2½ cups semi-sweet chocolate chips
1 cup semi-sweet chocolate chunks (chopped chocolate or another cup of chips)
2 cups lightly toasted walnuts**

directions
Preheat oven to 410 degrees and set rack in the top 1/3rd of the oven. Prepare two cookie sheets with parchment paper and set aside.

In a large bowl add both flours, baking powder, baking soda and salt. Use a whisk to mix and set aside.

Use either a stand mixer or hand mixer for this next step. If you don’t have either, you can whisk it by hand but will need to do it for at least 2 minutes. Into another bowl add the softened butter and sugars and mix until light and fluffy for about 2 minutes. Add the eggs and vanilla and mix well to combine.

Add the flour mixture in 3 additions on a low speed and mix until just combined. Stir in chocolate chips and walnuts by hand making sure they are well distributed. Some recipes suggest turning the dough out onto a board and mixing by hand like Levain Bakery. This is a much smaller batch of cookies then they make and a spatula does the job.

DO NOT use a cookie scoop to portion the dough or shape them into a smooth ball. Using your hands or two tablespoons drop round mounds onto a scale to weigh out 5 or 6 ounces of dough. Then drop them onto the prepared cookie sheet. If making 6 ounce cookies, bake 4 on a pan and yield 9 cookies. If making 5 ounce cookies, bake 5 or 6 on a pan to yield 11 cookies.

Bake for 10 to 12 minutes or until golden brown on top making sure to turn the pan ½ way through the baking. Don’t overbake, they will set up a little bit more as they cool. Let them rest on the cookie sheet about 15 minutes before serving.

To store the cookies, wrap each one individually with plastic wrap and then store in a sealed container. if you pop them in the microwave for 5 to 10 seconds the chips will melt slightly and come back to an almost baked taste.

recipe notes:
*Cake flour can be found by the regular flour. It’s usually on an upper shelf and sold in a box. I prefer King Arthur brand because it is unbleached, but can not find it in the stores right now. Swans Down is fine too in a pinch. If you can’t find cake flour, you can make your own very simply. For every cup of all-purpose flour, take out 2 tablespoons and replace with cornstarch. So for this recipe you would measure 2 ¾ cups all-purpose flour, take out 6 tablespoons of flour and replace with cornstarch.

**To toast walnuts preheat oven to 300 degrees. Place walnuts onto a rimmed cookie sheet lined with parchment paper. Place in the oven for about 8 to 10 minutes or until they become fragrant and lightly toasted. Take them out of the oven and leave on the pan to cool. Roughly chop them before adding – you want big chunks of walnuts. I just break them in half.

If you don’t want to add walnuts you have to sub something in its place or you won’t have the girth of the cookie. You can add an additional 1 ½ cups chocolate chips for texture. In that case, I would choose 2 different types of chips, maybe 2 cups semisweet, and 2 cups chocolate chunks or Ghirardelli 60% chips. Refrigerate the dough for 30 minutes before baking.

Levain Bakery doesn’t add vanilla extract to their cookie. I added it to mine because I always add it to my CC.

My recipe is adapted from A bountiful Kitchen and Modern Honey Both really nice blogs. Thanks ladies for the head start!

funfetti challah with sprinkles

What do you get when you mix a ton of colorful rainbow sprinkles with challah dough? A funfetti challah with sprinkles that’s as delicious as it is beautiful, perfect for Pride Shabbat (or any Shabbat really!) and to keep the party going made even more delicious on Sunday when turned into French toast! When you slice into it, there’s a gorgeous watercolor effect that happens where the sprinkles melt into the dough. Don’t you just love sprinkles and the magic they create? Not to mention the smiles they bring!

I’d like to tell you I have a great story for why I added sprinkles to my challah like maybe my bubbie worked in a sprinkle factory, but I don’t. She did work in a bakery though. I was asked to make a video for a rainbow challah for Pride Shabbat, but it’s such a potchke (Yiddish meaning something that’s fussy). I suggested doing a demo for a funfetti challah with sprinkles instead. I knew most of the people viewing would be first time or novice bakers and I wanted them to have a successful experience they would feel proud of. Baking bread can be a little intimidating, and I didn’t want to overwhelm anyone.

That’s what inspired me to make this gorgeous watercolor challah for Pride and of course anytime you want to put a smile on someones face. It’s a fun and colorful way to grace your table. Fyi, the sprinkles I use are from Sweetapolita.com. They are crisp and crunchy, not waxy like store bought. Full disclosure, I’m a sprinkle snob! More about that later, in the meantime – Enjoy!

ingredients
1 cup warm water
2 teaspoons active dry yeast
1/3 cup sugar plus a pinch for the yeast
¼ vegetable oil (I use extra light olive oil)
2 extra-large eggs* plus 1 additional egg yolk (large will be fine too)
2 teaspoons vanilla extract
4 to 4 ½ cups all-purpose flour
3/8 cup rainbow sprinkles plus more for sprinkling on top
1 tablespoon fine kosher salt
egg wash
1 egg, splash of water, pinch of salt and pinch of sugar beaten together.

directions:
In a large mixing bowl (or bowl of a stand mixer with the paddle attachment) add 1 cup warm water and yeast plus a pinch of sugar and stir. Let sit 5 to 10 minutes or until it bubbles. If your yeast doesn’t bloom (bubble), it is not fresh and your bread won’t rise.  Start again if this happens.

Add the sugar, eggs, oil and salt and mix. Gradually add the flour 1 cup at a time and mix after each addition. After the addition of 3 ½ cups, add in the sprinkles. Then continue to add flour until the dough comes away from the sides and is no longer sticky. That’s when you know it has enough flour.

I mix the dough by hand and then when it’s time to knead it, I knead it right in the same bowl. That’s the way I learned and it keeps the mess down. Knead the dough for 5 minutes or until the dough springs back when touched.

Add a little oil around the sides of the bowl and rub a little on the dough, cover the bowl with plastic wrap, and let the dough rise for at least one hour or until doubled in size.

Punch down the dough to get the air bubbles out and divide into 2 pieces. Divide each piece into 3 pieces (you will have 6 pieces total) roll each piece into a snake-like shape. Braid 3 strands together to make one loaf and place on a sheet pan lined with parchment paper. Brush each challah with egg wash and let rise for 1 hour in a warm place.

30 minutes before ready to bake, set oven rack to the center of the oven and preheat to 350 degrees. Before placing in the oven, brush with egg wash again and sprinkle the top with rainbow sprinkles.

Bake at 350 for 20 to 25 minutes or until light golden brown. It’s done when golden brown and sounds hollow when you tap on the bottom. You can also use a cake tester or bamboo stick to check for doneness.

*I always bake with extra-large eggs. My mother did and I find I get great results. Ina Garten, the Barefoot Contessa, does as well and if it’s okay with Ina, it’s okay for me! If you only have large eggs, that will be just fine. Your recipe may take a bit less flour.

banana bread waffles

I’m about to turn your breakfast world upside down with my creation of banana bread waffles! You read that right Banana bread WAFFLES! It’s no secret banana bread was the official baked good during Covid-19 and hand up – I’m guilty and have baked dozens. At one point, when my son saw me about to bake yet another banana bread, I think he went pale! After splashing a little water on his face I asked “what am I going to do with all of these bananas?” Of course I freeze a lot for smoothies, but at the rate I have been buying them I still had plenty left over.

banana bread waffle

Since I already had the ingredients out for the bread, I said okay, how about banana bread waffles? His eyes lit up and this is how a recipe is born! I took my mom’s banana bread recipe (which we love) and tweaked a couple of things. I grabbed my waffle iron to see how they would come out, SUPER YUMMMMMMMY – that’s how! The waffles have everything you love about banana bread; they are naturally sweet from the bananas, soft and cakey like banana bread on the inside, and slightly crispy on the outside like a waffle.

banana bread waffle

When I served them I turned it into a party and set out a topping bar with sliced bananas (because why not?), fresh blueberries, toasted walnuts, sliced almonds, chocolate chips, strawberries, and maple syrup. Toppings always make everything better, don’t you think? Get creative with yours and set out what you like. You can also add finely chopped walnuts or mini chips right to the batter.

banana bread waffles

Here’s the best part, now that little by little we are all taking steps to get back to life outside our homes, you can have your banana bread in a fraction of the time. Start to finish breakfast is ready in less than 30 minutes. If you’re still looking for something special to make Dad for breakfast/brunch today this is it! These are perfect anytime you want to make breakfast or brunch a little bit more special. The recipe makes 8 waffles depending on your waffle iron, you can them warm in the oven until ready to eat, and they freeze great, but I don’t think there will be leftovers! What are you waiting for? Start mashing some of those bananas on your counter! As always, Enjoy! And happy Father’s Day!

banana bread waffles

ingredients
1 ½ cups all-purpose unbleached flour
1 ½ teaspoon baking powder
½ teaspoon baking soda
3/4 teaspoon salt
2 to 3 large ripe bananas (1 cup mashed a little more will be fine)
2 extra-large eggs at room temperature
¼ cup sugar
½ cup Greek yogurt or low-fat sour cream
2 tablespoons melted butter
1 teaspoon vanilla extract
chopped walnuts (optional)
mini chocolate chips (optional)

directions
In a large bowl add all the flour, baking powder, baking soda and salt. Whisk to blend together and set aside. If you are going to add any of the optional ingredients like the walnuts or chocolate chips, add them to the flour mixture.

In a second bowl add the mashed banana, yogurt, eggs, sugar and butter and mix until well blended. Fold the dry ingredients into the wet and mix just until blended. Do not over mix.

I used a waffle iron with four squares using about a half cup batter in each well and yielded 9 waffles. Follow your waffle iron directions and cook accordingly.

spinach and cheese pie

I have made over 300 spinach and cheese pies in my lifetime! This is just a rough estimate after some fast math. I wasn’t too surprised at that number, it’s a little more! It’s one of those recipes that’s not only a winner in my eyes, but also gets rave reviews from everyone who tries it – especially my family! If you have been to my house for brunch or Yom Kippur break-fast, chances are you’ve had it. If you invite me to brunch and ask me to bring something, this is what comes with me. It’s a lower calorie version of quiche but is rich and delicious with added cheesy goodness!. By using only egg whites it’s also lower in cholesterol, but you definitely don’t miss anything.

Spinach pie came into my life by way of my husband’s Aunt Cynthia. Whenever we would visit, the minute you stepped onto her porch you could smell it baking. It quickly became a favorite of mine and definitely a 10 with my family. With only 6 ingredients it comes together so quickly. I use store bought pie crust but if you want to bake yours from scratch, go for it. The pie is loaded with spinach or as Aunt Cynthia calls them, luscious greens, and that’s something I always have in my freezer. The only cooking is caramelizing the onions which takes about 35 to 40 minutes. Caramelized onions are my addition to the pie from the original recipe and they add a nice sweetness.

This recipe is a winner! It’s perfect for new cooks, super easy, a great vegetarian main dish, looks beautiful, freezes well and everyone loves it! Even the non-spinach fans enjoy it. It’s a family favorite any way you slice it – get it? Any way you slice it!!!!!! If you celebrate the Jewish holiday of Shavout* one of the customs is to eat dairy foods. My spinach and cheese pie will definitely be on my table tonight and I hope on yours! Enjoy!

pies before baking
if you don’t have pie shields (which I don’t) to protect the crust from burning,
cut thin strips of aluminum foil and crimp it around the pie.
delicious pies hot out of the oven

ingredients
2 pre-baked 9” pie shells
2 (16 ounce) bags of frozen chopped spinach defrosted
2 large onions finely diced and sautéed
1 tablespoons olive oil (to sauté onions)
16 ounces low fat cottage cheese
8 egg whites from extra-large eggs (if using large eggs, use 10 egg whites)
1 cup shredded low-fat Swiss cheese (or regular if you like)
1 cup shredded low-fat cheddar cheese (or regular if you like)
Salt and pepper to taste (I use approximately 1 tsp. salt and 1 tsp. pepper)

directions
Into a large pan on medium heat, add onions and sauté in olive oil with a pinch of salt until golden (not brown) and then let them cool a little. This should take about 35 to 40 minutes.

Bake the pie shells according to directions on the package.

Take the defrosted the spinach and squeeze out any water. Drain in a strainer and press as much liquid out as possible. A cheesecloth works really well for this step. If you don’t have cheesecloth, paper towel will work as well. Place it in a large 5 quart bowl and set aside.

To the spinach, add the onion mixture and cheeses. In a separate bowl, add the egg whites and beat with a fork to break them up then add to the spinach mixture and stir well. Add salt and pepper to taste. Mix thoroughly and divide evenly into the pre-baked pie shells.

Use aluminum foil to create a tent around the rim of the pie crust so it doesn’t burn. Bake at 350 degrees for 45 minutes or until the filling is set and firm in the center of the pie. 

*Shavout is more than a holiday we eat a lot of dairy foods! For more information about the holiday of Shavout check out one of my favorite websites My Jewish Learning

incredible chocolate chip coffee cake

incredible chocolate chip coffee cake with a ridiculous amount of sour cream

Recently I posted a photo of my mom’s incredible chocolate chip coffee cake on Instagram. I didn’t share the recipe at the time because I hadn’t taken many photos of it, then before I knew it, it was gone! So, I had to bake another one (tough job writing a food blog – right!). FYI… the name “coffee cake” implies it’s something to go with coffee, and just like that we are given permission to eat cake for breakfast! One thing I know for sure, my mom never needed an excuse to eat cake – or permission!

incredible chocolate chip coffee cake

She made THE BEST chocolate chip coffee cake ever. It has a lot of cinnamon, it’s moist and delicious, decadent, loaded with a ridiculous amount of chocolate chips, and sour cream. It was something she always had in her freezer, ready for company and definitely her friends. They were all amazing ladies and bakers who definately ate a lot of coffee cake – of that I’m sure! She and her friends were always baking and exchanging recipes as if they were trading cards – they were adorable. My sisters and I lovingly referred to them as the Golden Girls, just like the sassy women of the tv show with the same name. Instead of cheesecake, their vice was coffee cake!

incredible chocolate chip coffee cake

On the corner of the recipe card my mother wrote “incredible” and “everyone loves this”. She told me everyone wanted her coffee cake recipe but she wasn’t sure she wanted to share this one, she liked being a local celebrity and didn’t want to share the spotlight! My mom was so funny, and always right! I debated sharing it as well!

It’s just the right Maj Jong snack cake, something to bring to a neighbor or these days when your hair salon re-opens! It’s picture perfect for a brunch buffet, quick, easy, and very versatile. I’m so glad I baked this for myself on Mother’s Day. It brought my mom right into my kitchen where we enjoyed a cup of coffee and her delicious cake! Enjoy!

incredible chocolate chip coffee cake

ingredients
1 ½ sticks unsalted butter at room temperature
1 ¼ cups granulated sugar
3 extra-large eggs at room temperature
1 ½ cups sour cream left out on the counter at the start of prep
1 tablespoon pure vanilla extract
1/2 teaspoon almond extract (optional)
2 ½ cups all-purpose flour (or cake flour)
2 ½ teaspoons baking powder
½ teaspoon baking soda
½ teaspoon kosher salt

the streusel filling and topping
1 cup semi-sweet chocolate chips (optional)
½ cup chopped pecans or walnuts (optional)
½ cup brown sugar
3 teaspoons cinnamon
2 teaspoons cocoa powder (I use Hershey’s)
¼ teaspoon salt

important note before we get to the directions:
1. You have to cream the butter and sugar until light and fluffy – that’s key. If you don’t have a mixer, use a whisk and get to work! 2. Sift the dry ingredients, it really makes a difference in the crumb and lightness of the cake. If using cake flour, skip this step.

directions
Preheat the oven to 350 degrees F. prepare with parchment and spray a 10”springform pan, or 10-inch tube pan (spray only) or two loaf pans, or a 9 x 13 rectangular pan*

for the streusel
Into a medium size bowl add the brown sugar, cinnamon, cocoa powder, salt and chopped pecans (if adding) mix together and set aside.

Divide the chocolate chips into two bowls, one containing one cup which will be added to the center of the cake, and in the other ½ cup which will be sprinkled on the top.

In a medium size bowl, sift together the flour, baking powder, baking soda, and salt and set aside. In the bowl of a stand mixer cream the butter and sugar for 3 to 4 minutes, until light in color and fluffy. Add the eggs 1 at a time, then add the vanilla and sour cream. With the mixer on low, add the flour mixture to the batter until just combined. Finish stirring with a spatula to be sure the batter is completely mixed. Don’t overmix, it will deflate the batter.

Spread ½ the batter into the prepared pan and lightly spread it out with a spoon. Sprinkle with 3/4 cup streusel. Scatter 1 cup of the chocolate chips on top. Spoon the rest of the batter in the pan, spread it out, and scatter the remaining streusel and chips on top. Bake for 50 to 60 minutes (depending on the pan size) or until a cake tester comes out clean. I break it down at the end of the recipe – see below

*My mom always made it as a cake in a 10” spring form cake pan which is how I like to do. But I have baked it in every pan listed below with great success. Let cool in pan on a wire rack for at least 30 minutes. Carefully transfer the cake, streusel side up, onto a serving plate.

Prepare baking pans with cooking spray and line with parchment paper. Baking times vary per pan size but in all always test for doneness with a cake tester or wooden skewer

recipe notes:
I have baked this recipe in various sized pans,* tried it with low-fat and regular sour cream, with and without nuts, and recently with cake flour instead of all-purpose only because that’s all I could find in the grocery (p.s. it turned out AMAZING!). The cake is so rich and delicious I don’t notice that much difference between the regular and low-fat sour cream, so if you want to save some calories, go for it. But you decide and let me know what you think. The only change I made to her original is adding a little almond extract, because I love it, but feel free to omit for a more traditional cake.

optional pan sizes
10” spring form or cake pan lined with parchment on the bottom, sprayed with cooking spray bottom and sides – bake for 50 to 60 minutes
10” Tube pan spray with cooking oil – bake for 55 to 65 minutes – let it cool completely so it will still look pretty on top when you take it out.
2 (9”x5”) loaf pans sprayed with cooking spray bottom and sides – bake for 50 to 60 minutes – let it cool completely so it will still look pretty on top when you take it out.
3 aluminum throw away loaf pans (3.75 x 8) – bake for 35 to 40 minutes no parchment liner needed
9×13 rectangular cake pan, line the pan with parchment both vertically and horizontally leaving a little hanging over to make it easy to take out, spray with cooking spray – bake 40 to 45 minutes

incredible chocolate chip coffee cake ingredients

perfect pizza dough

This perfect pizza dough has been my go-to for years. I love everything about it: minimal ingredients, easy to make, tastes great, and yields a tender but crispy crust. It holds up to the toppings and start to finish you can have delicious homemade pizza in less than two hours. If you’ve never made pizza dough before, you won’t believe how easy it is and you’ll be hooked.

When we first moved to Columbus we missed our NY pizza so much, we started having make your own pizza parties almost every Sunday night. This was always followed by an ice cream sundae bar! It was my way of ending the weekend on a high note before the hectic school week began.

Now my boys are grown and we are empty nesters. Our pizza parties went by the wayside. A couple of months ago, I decided to bring the party back! So now when my husband and I want to do something really fun on a Saturday night, we make pizza!

I have adapted this recipe from Kathleen Daelemans’ easy pizza dough recipe. She was on the Food Network and made it look so easy I had to try it. 16 years later I’m still using her recipe. I’m glad it’s very forgiving because sometimes I use a mixer and sometimes I mix it by hand. I have used both all-purpose flour, and bread flour. The bread flour yields a bit more tender crust, but not significantly. I use a pizza stone but if you don’t have one, you can use a rimless sheet pan.

While the dough is rising I set up all of the toppings and then the extravaganza begins. I steam spinach, roast mushrooms and peppers, shred mozzarella cheese, cut up olives, and halve teardrop tomatoes. Any topping you like will work. Just make sure you don’t load up the pizza too much. I use 1/3 cup sauce for each pie, and about 1/2 cup vegetables, and 1/2 cup cheese.

The next time you’re looking for something really fun to do with your spouse, your kids, or your friends, this recipe is the one you should try. It makes four 10” to 12” inch pizzas or 2 – 14” pies. You can also use a sheet pan and stretch the dough to make one rectangular pizza. Whatever shape you go with Enjoy!

ingredients
3 1/2 cups unbleached, all-purpose flour
3 teaspoons fine kosher salt
2 teaspoon extra virgin olive oil plus a little for the bowl
½ teaspoon sugar
2 packages dry active yeast (4 teaspoons)
1 ½ cups lukewarm water
Extra flour, for the work surface

toppings
Use whatever sauce is your favorite. I like to use a good jarred sauce like Rao’s Pizza Sauce’s. You can top it with shredded or fresh mozzarella cheese or both, and vegetable toppings of your choice.

directions
Dissolve the yeast in 1 ½ cups warm water with ½ teaspoon sugar; after about 5 minutes it should look cloudy and have bubbles on the surface.

There are two ways to make this dough. Option 1: In a mixing bowl fitted with a dough hook, place in flour, and salt. While mixer is running, gradually add the yeast-water mixture and knead on low speed until dough is firm and smooth, about 5 minutes. Option 2: you can do this all by hand which is my preferred way to make this dough. It comes together so easily. Place the flour and salt in a bowl, make a well in the center, pour in the yeast water mixture in the middle, and the olive oil. Mix with a fork to combine, then use a spoon to mix it together. when it forms a ball, it’s ready to knead. Knead the dough for about 5 minutes.

When dough is ready, shape into a ball, pour a little oil down inside of bowl. Cover bowl with plastic wrap and let dough rise in warm spot until doubled in bulk, about 45 minutes to 1 hour.

After it has doubled, punch it down to get the air bubbles out and divide into 2 or 4 equal pieces depending on the size pizzas you want. Form the dough into balls and place on a lightly floured board covered with foil or parchment. At this point, if you don’t want to use them all right away, you can place the balls into individual bags and refrigerate for up to three days. Cover the dough balls with a damp paper towel. Let the dough rise again for an additional 30 minutes.

Preheat oven to 500 degrees F. set oven rack to the lowest position in the oven and place your pizza stone in if using. You want to put your pizza stone in the cold oven – never in a hot oven, it will crack. If you don’t have a stone, you can put the pizza onto a cookie sheet.

Working with one dough ball at a time, on a lightly floured work surface, (I like to do this directly on aluminum foil or parchment paper) gently form a disk, press down and keep stretching the dough first with your hands and then using a floured rolling pin, gently roll dough into a 10 to 12 inch circle until very thin. Don’t worry if your circle isn’t perfect or if you get a hole just pinch the edges back together.

If the dough feels a little sticky, sprinkle with flour. Add toppings keeping them 1/2 inch in from the edge. Using a pizza peel, or flat sheet pan, transfer the pizza onto the stone while still on the foil or parchment. Alternatively you can place the pizza on a cookie sheet and slide that onto the bottom rack of the oven.

After it’s been in the oven for about 2 minutes, slide the foil or parchment out from under the pizza. You have to do this quickly and carefully especially if using parchment. Alternatively you can use a little cornmeal under the dough and slide it onto the stone or sheet pan directly. I’m not successful at that and find this to be the easiest way for me. In the past flour and cornmeal got all over my oven.

Keep an eye on it when it bakes; it cooks really quickly.. Bake 8 to 10 minutes or until golden and the cheese is bubbling. Checking after 5 minutes.

manischewitz blackberry wine sangria

manischewitz blackberry wine sangria

How do we sangria at my house? With Manischewitz wine of course! I guess you can call this a Cinco de Mayo – de Mani! While it’s typically our Friday night wine, tonight alongside my tacos (in their fancy egg carton holder) will sit two glasses of sangria made with Manischewitz blackberry wine. If you have never had this wine before, think grape juice with a little kick! It’s a sweet wine and truly the perfect choice as a base for sangria. Concord grape is the most popular and well known flavor of their brand, but the blackberry is my favorite.

manischewitz blackberry wine sangria

I created this refreshing and delicious drink one Friday night when I had the wine over ice. In that instant my Manischewitz (pronounced mani-she-vitz) got a splash of apple brandy, a little fizz, and some fruit thrown in. Friday nights have never been the same at my house since.

manischewitz blackberry wine sangria

We have it on Rosh Hashanah with lots of apples and I throw in a cinnamon stick for some spice. We have it in the summer filled with lots of peaches, berries, or both. Tonight I made it with whatever fruit I had on hand: apples, oranges, lemons, limes and lots of sweet blackberries. Whatever fruit combination you choose will be great. Just keep it simple and no bananas. Save those for your banana bread which I read is the unofficial baked good of Covid – 19. A new banana bread recipe to follow soon. In the meantime, stop baking and go make some sangria! The recipe makes 4 to 6 servings and can easily be cut in half, or doubled. Happy Cinco de Mayo everyone!

Now back to my sangria – Olé and Enjoy! 

ingredients
1½ cups  (½ bottle) Manischewitz blackberry wine (or concord grape is fine)
1 – 8 ounce can Izze blackberry sparkling juice (or other sparkling juice or seltzer)
3 ounces apple brandy
¼ cup orange or pineapple juice
1 medium to large apple cored and cut into ½ inch dice
1 orange cut into wedges or rings
1 small lime sliced into rings
blackberries or other fruit on hand
lemon wedge to garnish
ice to serve (optional)

directions
Place all ingredients into a pitcher except for the sparkling juice and place in the fridge for 30 minutes to an hour or overnight. When ready to serve, add the sparkling juice and serve over ice or straight up. It’s that easy.

homemade taco holder

Taco Tuesday + Cinco de Mayo + Tip Tuesday = a quick and easy homemade taco holder using an egg carton. When Cinco de Mayo and Taco Tuesday fall on the same day you have to acknowledge it – am I right? For me it’s a triple header because I’ve been trying to launch Tip Tuesday on my website and today seems like the perfect day to do it.

I make tacos a lot and when I do it’s impossible to get them to stand up so they look pretty and the filling doesn’t fall out. If you’re like me and don’t have a taco stand, here’s my tip: turn over an egg carton place your tacos in between the grooves and there you go! Pretty cool right? I left the top of the carton on so you can see what it looks like as a whole carton, but you can certainly cut the top off if you like.

As for the tacos, no measured recipe here – use any shell you like corn or flour, crunchy or soft, fill with shredded lettuce, top with grilled fish (or chicken or steak) seasoned with chili and lime, diced tomatoes, corn, avocado or guacamole, and finish it off with your favorite salsa. Place them in your new fancy homemade taco holder and you’ll be the hit of the party. Next up… my favorite way to sangria! Olé!

israeli salad with couscous

israeli salad with couscous

You know how sometimes when you combine two already great foods together they create something wonderful? That’s what happened when I combined Israeli salad with Israeli couscous. It was a marriage of two already pretty terrific foods and when combined they brought out the best in each other. Just like a real marriage – amiright?

First the salad
According to Adeena Sussman who wrote the cookbook Sababa, Israeli salad is the most simple and most Israeli of salads. These words could not be more true. When I was in Israel a couple of years ago I ate plenty of Israeli salad. It was on the hotel breakfast buffet every morning, at the falafel stands, hummus eateries, and many of the restaurants I went to. The freshness of the ingredients and the brightness in flavor make it quintessentially Israeli. The base is simple: fresh juicy tomatoes, crunchy cucumbers, lemon juice, olive oil, salt and pepper. It’s like a garden in your bowl!

My recipe is adapted from one I learned in a cooking class given by Timor Dill. He is living here in Columbus temporarily with his wife Merav who is our Shlicha* (an emissary from Israel) and their children. He’s an amazing chef and taught an Israeli street food cooking class at Local Matters. I had just come back from Israel a couple of months prior and was so excited for the class. Timor shared his recipe for Israeli salad, and I have been making it ever since. I put my own splash on it by using sweet teardrop tomatoes and I use a sweet red pepper instead of green.  

now for the couscous
The addition of the pearl couscous was a happy accident. As things like this go, I happen to have both in the fridge and added them together. From there I have created endless versions adding one or more of the following: feta cheese, chickpeas, olives, tuna, grilled chicken, a drizzle of tahini sauce, pistachios, or diced rainbow carrots. It can be served as a hearty main dish over arugula, it’s perfect for vegetarians, and with the addition of canned tuna you’ll have a main dish pescatarians will love!

The secret is to toast the couscous in a little bit of olive oil which brings out the nuttiness. Once combined, the couscous absorbs the deliciousness of the dressing, the chew of the couscous with the crunch and sweetness of the vegetables is perfection. Mixed together with the Israeli salad it’s a perfect match.

I know I just shared a soup recipe with couscous but it’s Israeli Independence Day and in addition to the shawarma and falafel we are having for dinner, we are including the most Israeli salad with the addition of Israeli couscous. This is how we are celebrating – happy 72nd and Enjoy!

ingredients for Israeli salad
1 pint sweet teardrop tomatoes cut in half (about 2 cups)
1 English cucumber seeded and diced to ¼ inch dice (about 1 ½ to 2 cups)
1 red pepper cut into ¼ inch dice
1 to 2 scallions sliced fine (optional)
juice of ½ lemon (or more to taste)
¼ cup finely chopped parsley
1 to 2 tablespoons olive oil
salt and freshly ground pepper to taste

directions for the vegetables
Add all the vegetables to a large bowl. Toss in the parsley, green onion, lemon juice, olive oil, salt and pepper and mix gently. Adjust seasoning as needed.

Ingredients for the couscous
1 cup Israeli couscous
1 ¼ cups boiling water (or box recommendations)
1 tablespoon olive oil
salt optional

In a small pot bring the water to a boil. In a medium size pot heat the olive oil on medium heat, add the couscous and mix it around a little bit and allow it to toast for 3 to 5 minutes. The water and the couscous take about the same time. Add the boiling water carefully to the couscous, lower the heat to low, cover and allow to cook according to directions on the package. It usually takes about 8 to 10 minutes. Keep an eye on it so it doesn’t get too dry. Stir and set aside to cool.

Once cool it’s time to make the magic happen! Bring the two together in a large bowl and mix gently serve and enjoy!

*A Shlicha is an emissary from Israel. While here she facilitates connections to Israel with Israeli programing, Israeli experiences, and is dedicated to the Jewish people, our heritage and to Israel. To learn more click here.

quick & easy vegetable soup

A day like yesterday was perfect for my quick and easy vegetable soup with butter beans and Israeli couscous. A day that’s 40 degrees, cold, rainy, grey, and windy. A day where you want to stay in bed to watch old movies or binge watch something on Netflix. A day that would only be made better with a nice bowl of steamy hot soup. The kind of soup my mother would say that can warm your bones. This is that soup.

It seems I have soup simmering on my stove at least once a week – because I do, reason being I live in Ohio – the home of erratic weather, I can make it last minute and it’s hearty enough to be a complete meal. Keeping with the times, it’s filled with pantry and vegetable staples, and can be made start to finish in less than 45 minutes. I always have carrots (and if lucky like today rainbow colored carrots), celery, and onion on hand which is the best start for any vegetable soup. As for my pantry staples Israeli couscous (aka pearl couscous), butter beans (aka white lima beans) and a variety of lentils are always on hand.

A few months ago I bought a couple of cans of butter beans thanks to Vivian Howard and her show on PBS called A Chef’s Life. She uses them in a variety of ways, even making a veggie burger with them. I was so intrigued I just had to get them. What I didn’t realize is they are the same as the white lima beans which I grew up eating. Who knew? Vivian and my mom both used the dry beans and soaked them overnight. I love the convenience of the canned bean, especially for soup and when you don’t have time to plan ahead. The buttery and creamy white lima beans were a staple in my house growing up and my mom added them to various soups and stews. That could be why I like this soup so much.

http://www.splashofsherri.com/2020/04/29/israeli-salad-with-couscous/As for Israeli couscous, I always have that on hand because I just love it! They are nothing like their more well known couscous cousin which has a more sandy texture – fyi, they are not interchangeable. I use this little pearl shaped pasta it in a variety of side dishes and main dish salads like my Israeli couscous with root vegetables and my newest recipe for Israeli salad couscous. The addition to the soup adds a nice little surprise.

These two simple ingredients took my ordinary vegetable soup to a whole new level and I think you’ll love it! It’s so satisfying and nutritious, making it a perfect meal when you are seeking warmth, comfort and something delicious. This recipe makes 10 to 12 servings. Enjoy!

ingredients
1 large onion diced
6 carrots sliced into rounds – about a heaping 2 cups
6 stalks celery chopped – about a heaping 2 cups
2 containers of vegetable broth
1 – 26 ounce container Pomi chopped tomatoes (or other brand)
1 can of butter beans drained
½ cup dry red lentils (sorted and rinsed)
½ cup dry Israeli couscous
1 cup haricot vert or green beans cut into 1” pieces
1 cup fresh flat leaf parsley chopped fine (leaves only/yields approx.. 1/4 cup)
2 tablespoons olive oil
2 teaspoons Costco or other no-salt seasonings
2 teaspoons kosher salt or to taste
1 teaspoon pepper or to taste

directions
Heat an 8 quart pot on medium heat. Add 1 tablespoon of olive oil and onions. Sauté onion until translucent, about 10 minutes, and then add the celery and carrots. Cook for about 5 to 10 minutes stirring occasionally. Add the broth and tomatoes and bring to a light boil. Add the lentils and continue to cook for about 20 minutes. Then add the Israeli couscous and cook for 10 minutes. After 10 minutes add in the haricot vert or green beans. Drain and and add the beans, parsley and other seasonings to the soup. Cook for another 15 minutes or until the green beans are tender.  

substitutions:
I’ve become accustomed to adding in swap outs at this time so here goes…If you don’t have lima or butter beans add in a can of cannellini beans or chickpeas. No red lentils, add yellow or green. No vegetable broth, use chicken broth or water. No Israeli couscous you can sub orzo, acini de pepe, or even alphabet pasta. But do not sub regular couscous. You can sub 1 tablespoon of dried parsley for fresh.

my mother’s noodle pudding

My mother’s noodle pudding was always my favorite part of our Friday night dinner. Noodle pudding, also called kugel, was a staple in our house that showed up once a week adorned one of two ways. This depended on the time she had and the ingredients on hand. One was her simple pudding with just noodles, eggs, sugar, cinnamon, and vanilla. The other was a bit fancier with what appeared to be little red jewels on top. The only difference between the two was the addition of raisins, a can of fruit cocktail, and the maraschino cherries she added in. If I asked enough times, she would add extra cherries on the top and tell me they were just for me! This one was my favorite.

There are so many different versions and ways to make a noodle pudding. They can be savory or sweet and with or without fruit. They can be made with fine noodles or extra wide noodles. You can also add sour cream and cottage cheese to make a dairy noodle pudding. If I had to compare it to anything I would say it’s like a bread pudding but instead of using bread, we used noodles.

noodle pudding with fruit

When my youngest son was 3 years old, it was not only his absolute favorite thing to eat, but also one of the foods he associated with our Friday night Shabbos dinner. When it was time for the meal to be served he would cry out “newie, newie, newie” in excitement until a piece landed on his plate.  

One Friday I didn’t prepare it for dinner. That night he didn’t cry out “newie” he just cried! He cried so much I had to quickly whip one up and hold off dinner. No one should ever cry for a noodle pudding – especially not on my watch! After that night, we never had a Friday night dinner without it ever again!

Time has sure gone by fast. He is now home from college from what should be one of his lasts weeks as a senior. He has been home for a few weeks now and I’m finding it comforting yet bittersweet making my mother’s noodle pudding every Friday night again. Comforting because it brings back so many wonderful memories of when my children were small and also keeps my mother close in my heart. Bittersweet because I really wish things were back to normal and he was on campus with all of his friends where he belongs. Since he can’t be, the least I can do is to make sure my mother’s noodle pudding shows up on our Friday night table every week just as she always did. Shabbat Shalom and Enjoy!

ingredients
1 package of wide or medium egg noodles
8 eggs
½ cup sugar
½ cup raisins (black or golden)
2 cans of fruit cocktail in juice drained (I like the very cherry of course)
2 teaspoon vanilla
1 ½ teaspoons salt (1 tsp. to boil the noodles, ½ tsp. for the pudding)
2 tablespoons vegetable or light olive oil divided (one for the pudding and one for the pan)
Cinnamon sugar
maraschino cherries (optional)

directions
Preheat the oven to 400 degrees.

Boil noodles as per directions on the package, adding 1 teaspoon of salt to the water. While the noodles are boiling, prepare the rest of the ingredients.

In a large bowl add the 8 eggs, sugar, vanilla, 1 tablespoon of oil and 1/2 teaspoon of salt; whisk until well blended.  Add in the raisins and fruit cocktail. When the noodles are done, rinse in cold water, drain well and add to the egg mixture. Mix together.

Oil a 9 x 13 casserole dish on the bottom and sides. Add the noodle mixture and smooth out the top with the back of a spoon. Make sure everything is well distributed. If adding the cherries, cut them in half and place on the top. Sprinkle the top with cinnamon sugar. Bake for about 40 to 45 minutes checking after 30. If it looks like it’s getting too brown, cover lightly with foil. I like to bake it just until barely set in the middle – it’s a bit more custardy that way.

ingredients for noodle pudding

the new passover bagel

This year I tried a new Passover bagel recipe. It’s unlike any other I have tried before. Why is this bagel different from all other bagels? Sorry, but I think you knew I just had to go there! For one thing it’s made with almond flour making them gluten free. It’s not like a big crusty and doughy bagel made with flour and yeast, but it can’t be – no yeast or flour! However, using just a few Passover friendly ingredients I was able to bake something that was the perfect addition to our Sunday morning breakfast. It’s crusty on the outside and a little chewy on the inside which gives that bagel feel. You won’t believe it!

The Passover bagels we all know and love during this holiday are really more like rolls or popovers than a bagel. They are really good, but not a bagel as much as we try to convince ourselves they are! These are much more like a bagel and they are even boiled first. When I made them this morning I could not wait to share them with you. They get a big thumbs up from my family and if only we had lox in the house it would have be a win, win! But, we did have TempTee cream cheese so no complaints!

They are really easy to make and once you get the hang of it, the second time around is even easier. It took me about 20 minutes to get the dough ready and boil them so not too bad. Baking was under 30 minutes which was great. All in all worth the 45 minutes start to finish with an end result of 6 delicious Passover bagels. They are best warm from the oven, but what isn’t? I really liked it toasted (which I definitely recommend for any leftovers the next day). My son thinks they will be great as bagel chips, I’ll have to get back to you on that. The recipe only makes six and they all disappeared in minutes, so no leftovers today to try that out.

One of the fun things about Passover is we make different foods we don’t ordinarily during the year. This makes them more special and boy do we have to be creative about it! The new Passover bagel is proof of that! I hope you give this recipe a try – I think you’ll really like it. Happy Sunday everyone…..Enjoy!

Ingredients
3 cups blanched almond flour
1 cup potato starch (or tapioca starch)
2 teaspoons baking powder (kosher for Passover)
2 tablespoons. honey
2 tablespoons apple cider vinegar*
1 ½ teaspoons kosher salt  
2/3 cup warm water
1 egg (or yolk only)  – for egg wash
Toppings: everything bagel spice, sesame seeds, Poppy seeds, or other favorite bagel topping

set up
1. Line a baking sheet with parchment paper and set aside.
2. Set your rack in the center of the oven and preheat oven to 350° F
3. Set a large shallow pot of water filled ¾ full on the stove and bring to a boil. By the time you are done with the dough it should be boiling. Once it comes to a boil reduce the heat so you have a gentle boil.

time to make the bagels…
In a large bowl combine all the dry ingredients until well incorporated and there are no lumps. In a second bowl or large measuring cup, combine all wet ingredients (except the egg) and mix by hand until honey looks dissolved. Make a well in the center of the dry ingredients and mix in the wet until a smooth dough forms. It feels like a moist playdoh. Let it rest for a couple of minutes.

Divide the dough into 6 equal portions which will be a little over ½ cup each. Roll each piece into a ball and then flatten slightly. Press your index finger into the center and make a hole. The dough is pliable enough to pick up and form it from both sides. Repeat with each bagel.

Carefully drop bagels into the simmering water and wait until they float to the top. This takes about 30 seconds to a minute. Gently remove with a slotted spoon and arrange them on the prepared baking sheet. Continue with all of the bagels.

Bake the bagels for 10 minutes.

Remove bagels from oven and brush with beaten egg or egg yolk (whichever you are using) and topping. It’s best to brush and top one bagel at a time so the seeds will stick.

Return bagels to the oven and cook for 20-25 more minutes until golden brown. Remove from oven and allow to rest for 10-20 minutes before serving. Some sites say this allows for them to firm up a bit. If there are leftovers the next day, toasting is best.

*a few sites say you can omit the cider vinegar bit I think you need it. Speaking of sites, I have adapted this recipe from various sites all extremely similar or the same I don’t have a clue which one created it. So here is a shout out to just a few I looked at.   www.kiwiandcarrot.com  www.koshereveryday.com and www.healthstartsinthekitchen.com if you are the original creator, please take a bow!

flourless almond cake

This flourless almond cake is one of best cakes I have ever tasted and perfect for the Passover holiday. It has 8 ingredients doesn’t need any fancy equipment, is gluten free, extremely delicious, and comes together in less than 10 minutes plus baking time. If I had to compare it to anything I would say it tastes like a big moist almond macaron – and there’s nothing wrong with that!

I don’t usually change ingredients the first time I try a new recipe. However, I misread how much sugar to put in and used less than called for and it was perfect. I love when there are happy accidents! I also sprinkled one less tablespoon of sugar on top just because I was being frugal, and it tasted just right! The sugar and almonds on top add a nice crunch in contrast to the moist and dense cake. All-in-all my family gave this cake a 10 and I agree.

I adapted it from Christopher Kimball’s Milk Street. It’s a take on a Spanish Almond Cake (Tarta De Santiago) and originally contains citrus and cinnamon. On the show, they made two different almond cakes and the minute I saw them, I thought they would be perfect for Passover, and I was right. I can’t wait to try the other one – spoiler alert, it has chocolate in it!!!!!! Serve with lightly sweetened non-dairy whipped cream and some berries.  Have a sweet holiday and as always – Enjoy!

ingredients
1 scant cup sugar (meaning 1 tablespoon less than a cup)
3 extra-large eggs plus 3 extra-large egg whites
½ teaspoon almond extract
½ teaspoon vanilla extract
½ teaspoon kosher salt
2 ½ cups blanched almond flour
2 tablespoons turbinado or demerara sugar
1/3 to 1/2 cup sliced almonds
optional: serve with lightly sweetened non-dairy or dairy whipped cream and berries

Since it’s tough to get some ingredients, I’ve started adding substitutions and options on my posts at this time: large eggs will work fine too, I only keep extra-large in my house because that’s all my mom used so I do too. If you don’t have kosher for Passover extracts you can skip it all together but then when making it any other time of year, add it. If you don’t have turbinado or demerara sugar you can swap in white sanding sugar or 1 tablespoon regular table sugar. You can also use an 8” pan if you don’t have a 9” it will just be higher which is fine, just sprinkle with 1/3 cup almonds instead of 1/2 cup.

directions
Preheat oven to 350 degrees and set the rack to the center of the oven. Line the bottom of a 9 inch round cake pan with parchment paper and spray sides and bottom with cooking spray. You may also brush with oil if you would like.

In a large bowl, combine the white sugar, whole eggs and egg whites, salt and both extracts. Whisk vigorously (about 1 minute) until well combined and frothy. Add the almond flour and whisk until incorporated. Pour the batter into the prepared pan then sprinkle with the turbinado sugar and then the sliced almonds.

Bake 40 to 50 minutes or until the top is lightly browned and the crust feels firm in the center when pressed. Let the cake cool in the pan on a wire rack for 10 minutes.

Run a knife around the edges of the cake, then invert onto a place. Remove the pan and parchment then re-invert onto a serving plate. Let the cake cool completely before serving.

chopped salad

More than ever I need this beautiful chopped salad in my life. The weather in Ohio has been pretty gloomy the past couple of weeks. Even now, it’s raining as I type this, which sadly isn’t all that unusual. Don’t get me wrong, the sun has made an appearance, but like the rest of us, it seems to be social distancing – which it does often in Ohio!

It’s comforting to me at times of uncertainty and stress to cook and bake. That coupled with the grey and rainy days has me in the kitchen a lot. To take a break from making yet another banana bread, and make my life a little more colorful and definitely healthier, I made a big beautiful chopped salad. A really big salad, a layered chopped salad to help keep me on track and bring a smile to my face. A salad with big flavors that’s loaded with antioxidants, filled with vitamins and minerals, not to mention beautiful color and a variety of textures. The best part, you probably have many of these ingredients in your pantry and in the fridge. If you don’t, you can use what you have.

I like to think of this big beautiful chopped salad as “THE big salad” the one Elaine ordered from Tom’s diner. You know the one I mean right? The one from Seinfeld. I always loved that episode and like Elaine, you probably know by now how much I love a big salad! Remember the rainbow salad with citrus dressing of my dreams? This is a very different salad, but a rainbow nevertheless and everyone should eat the rainbow!

Is it a Jewish salad? No, not in the sense that my bubbie (jewish grandmother) made it, but I have adapted it from Susie Fishbein’s cookbook Kosher by Design. While this is pretty close to Susie’s original I changed it up using the things I like and had on hand, omitting those I don’t. I also used my favorite dressing. I don’t like cabbage so no purple in my salad. I’m not an iceberg fan so in goes the romaine. I love teardrop tomatoes so I used those but you can use whatever you like. No chickpeas, substitute another bean – no red pepper, use a jar of roasted. Just be mindful of your color combinations as you layer the ingredients into the bowl. Speaking of bowls, it looks really pretty in a trifle bowl or other straight glass bowl like I have used, but a regular glass bowl will work just fine.

I hope this salad brings a lot of color and joy to your table. It’s something you’ll want to share with family and friends – hopefully very soon. Until then, you can make 1/2 of it, or better yet, make the whole thing so you’ll have leftovers for lunch the next day, or two, or three! With everyone working from home, this is a nice thing to have in the fridge. Enjoy!

salad ingredients (makes 8 to 10 servings but can easily be cut in half)
1 head Romaine lettuce shredded
1 – 16 ounce bag petite frozen peas defrosted
1 English cucumber seeds removed and diced
1 – 15 ounce can chickpeas (or other bean)
1 – 15 ounce can of corn (I used no salt added)
2 large carrots shredded* (2 cups)
2 cups teardrop tomatoes
1 red pepper diced
1 bunch scallions
3 to 4 sliced radishes
optional but highly recommended: fried onions or toasted sunflower seeds
dressing
½ cup ketchup (I like Heinz)
1/3 cup Hellman’s mayonnaise (you could sub the light mayo)
¼ cup apple cider vinegar
1 tablespoon pure maple syrup (or honey)
1 teaspoon no salt seasoning

directions
First make the dressing. Mix together the mayo, ketchup, cider vinegar, maple syrup and seasonings. Place in a container and put into the fridge.

For the salad you can use a trifle bowl, or any other glass bowl so you can see the layers. Prep all of your ingredients first. Defrost the peas, Open the can of corn and drain in a strainer. Do the same with the chickpeas.

On the bottom of your glass bowl pour the peas in an even layer. Next add a layer of the romaine. Then add a layer of the cucumber, followed by the chickpeas, corn, then carrots, the tomatoes, the red peppers and top with the sliced radishes and sprinkle with 3 of the scallions. Reserve the rest to put on the side.

Serve toasted sunflower seeds, fried onions, and the reserved sliced scallions on the side.

*I prefer to hand grate the carrots but you could definitely use a bag of shredded carrots.

everyday challah

challah with sesame seeds

Last week I made an easy and delicious everyday challah. Nothing brings me more peace than baking challah on Friday morning. Last Friday was especially welcome and in some way much needed therapy. There are so many changes in all of our lives right now. Like everyone else, I am doing my best to find the constants that will keep my spirits up and some sense of normal in what we are all calling our new normal.

Baking challah every week is one of those constants. Imagine my frustration when I realized I was low on bread flour which is what I ordinarily use for my weekly recipe. http://www.splashofsherri.com/2014/03/29/whats-cooking-today/ It also calls for 6 eggs which I just couldn’t spare. I needed a recipe that would utilize all-purpose flour and fewer eggs. Then I remembered not only do I have one, but I created one that’s amazing!

A couple of years ago I was asked to create an easy challah recipe for a Shabbat Across America event here in Columbus. The parameters given to me were: it had to be something 500 people could effortlessly put together, utilize limited and simple ingredients, was easy to handle, and to keep in mind most people attending had never baked before.

I tested several recipes, baked and tasted many challahs (tough job!) then came up with something I adapted to fit the criteria. The result is what I call an everyday challah because it’s so easy, you will want to make it everyday! It’s so soft and cakelike, has a great chew, is easy and quick to put together, and is very delicious! FYI, the challah bake was a huge success. Everyone had an amazing time and went home with 2 delicious challahs to share with their family. That made me very happy.

Moral of the story, sometimes it’s okay to shake up your routine. It might even mean you will find an old favorite recipe to bake and enjoy. I’m sharing the recipe today (on a Monday) not only because I had a request to share it after posting it on Instagram, but because challah is comforting every day of the week and right now, we need all the comfort we can find, anywhere we can find it. I hope you will give this easy and delicious everyday challah a try, it’s sure to bring some comfort to your day. Enjoy!

*Just a quick note* If you don’t have the suggested ingredients here’s how you can sub…For the oil, you can use whatever oil you have in the house as long as it’s not flavored (that’s a whole different post!). Egg size is flexible too, you will just need to add a couple extra tablespoons of flour for larger eggs. If you only have honey in the house (no sugar) sub equal amounts but you will need to add an extra 1/8 to 1/4 cup of flour to compensate for the extra moisture.

ingredients
1 cup warm water
1 package or 2 teaspoons active dry yeast
1/3 cup sugar plus a pinch for the yeast
¼ cup vegetable oil (I always use regular or extra light olive oil)
2 large eggs
3½ to 4 cups all-purpose flour
2½ teaspoons fine kosher salt

Egg wash before baking: 1 egg, splash of water, pinch of salt and pinch of sugar beaten together and brushed on the bread. Alternative: in lieu of egg wash, you can brush the challah with oil
Sesame or poppy seeds (optional)

directions:
step 1: In a large mixing bowl, add 1 cup warm water and yeast plus a pinch of sugar and stir. Let sit 5 to 10 minutes or until it bubbles. Helpful tip: When the yeast bubbles, that is what is referred to as yeast blooming. If your yeast doesn’t bloom, it is not fresh and your bread won’t rise.  

step 2: Add the sugar, eggs, oil and salt and mix. Gradually add the flour 1 cup at a time and mix after each addition. If it’s too tough to mix with a spoon, you can use your hand until the flour has fully incorporated into the dough. When the dough comes away from the sides and is no longer sticky, it has enough flour.

step 3: Knead the dough for 5 minutes or until the dough springs back when touched.

step 4: Add a little oil around the sides of the bowl and rub a little on the dough, cover the bowl with plastic wrap, and let the dough rise for at least one hour or until doubled in size.

step 5: Punch down the dough to get the air bubbles out and divide into 2 pieces. Divide each piece into 3 pieces (you will have 6 pieces total) roll each piece into a snake-like shape. Braid 3 strands together to make one loaf and place in tin sprayed with oil. Alternatively you can place on a sheet pan lined with parchment paper.

step 6: Let rise for 1 hour in a warm place. Brush each challah with egg wash, leave plain or sprinkle with sesame or poppy seeds.

30 minutes into the rise time, set oven rack to the center of the oven and preheat to 350 degrees.

step 7: Bake at 350 for 25 to 35 minutes or until golden brown. When baking in a loaf tin, you can use a toothpick or cake tester to check if it’s done. If you place it on a sheet pan lined with parchment, it is done when golden brown and sounds hollow when you tap on the bottom. Now it’ time to enjoy your easy and delicious everyday challah!

Key lime pie for Pi day

Today I made key lime pie for Pi Day! I felt like I needed a little Florida sunshine to brighten the very snowy day here in Ohio so I baked one of my favorites. It’s also one of the easiest with only 8 ingredients total and takes less than 1 hour start to finish plus time to chill in the fridge. The pie is tangy but sweet, simple but has complex flavor, and it’s smooth and creamy on the inside, but has a crunchy and nutty crust. This pie has it all!

If you read my bio, you know I lived in Florida when I was a kid, so there was plenty of key lime pie! The first time I had it was on a trip to The Florida Keys http://www.thefloridakeys.com/ In the Keys (aka the Florida Keys, aka Key West) they take their key lime pie very seriously – almost as seriously as their rum runners! Every restaurant has their own version. Some have frozen key lime pie or key lime pie pops dipped in chocolate, key lime pie mousse, and of course traditional key lime pie which is piled high with meringue or topped with whipped cream. The debate of the topping is a whole different topic almost as much as the debate over where the pie originated https://www.southernliving.com/news/key-lime-pie-history  

graham cracker pie crust

I have been making key lime pie ever since that trip. Even though key limes are pretty easy to find in most groceries in Florida, not everyone lives in Florida. I have always relied on the famous Nellie and Joe’s key lime juice, it’s terrific and easy to find in most groceries. If you can’t find it, you can use limes, but it won’t taste exactly the same. For many years, I made the recipe that’s on the back of the bottle, and it’s a really good recipe.

My new recipe is adapted from Nellie and Joe’s and not as traditional because of the nuts in the crust and vanilla in the filling. I wanted to lighten it up so I tried using low fat condensed milk. It worked great and you couldn’t tell a difference so why not cut the calories where you can? I also added a splash of vanilla paste which compliments the lime and mellows it a bit which I like a lot. Then I added roasted pecans to the crust and it was just what it needed. Finally I topped it with homemade creamy and delicious almond scented whipped cream. The result – perfection.

I have a real soft spot in my heart for this pie because while my husband and I were dating, instead of cake for his birthday I baked him this pie and that night he asked me to marry him! So all you single ladies out there, get baking, this pie (aka engagement pie, aka will you marry me pie) could just do the trick! Happy Pi Day everyone and as always… Enjoy!

filling
½ cup plus 2 tablespoons Nellie and Joe’s Key lime juice* (or juice from fresh key limes)
1 can low-fat sweetened condensed milk
4 egg yolks
1 teaspoon vanilla paste (or you can use extract)

crust
I package Graham crackers (approx. 8 or 9 full sheets)
1 cup roasted unsalted pecans
1/3 cup unsalted butter melted
2 tablespoons sugar

whipped cream
1 cup whipping cream
3 tablespoons confectioners’ sugar
1/2 teaspoon almond extract.

Position the oven rack into the center of the oven and preheat the oven to 350 degrees. Recipe makes 1 – 9″ pie and serves 8 to 10

Start with the pie crust. In food processor pulse grahams until sandy in texture. If you don’t have a food processor, place cookies in a Ziploc bag and crush with a rolling pin. Add pecans, sugar and butter pulse just till blended. It’s okay to have pieces of pecan – that’s what we want. Press the mixture firmly into a 9″ pie pan and bake 10 minutes on 350 degrees.

While that’s baking put together the filling. Whisk the egg yolks with condensed milk until smooth and incorporated. Add vanilla and key lime juice and whisk until smooth. Pour into the cooled baked crust. Place the pie in the oven and bake 15 minutes on 350. Let the pie cool about 30 minutes on the counter, then refrigerate at least 2 to 3 hours. Top with whipped cream.

To make the whipped cream: in a tall cold bowl add whipping cream, confectioners’ sugar and almond extract. Using a hand held mixer, whip until stiff peaks form. This happens very quickly so be careful not to over whip, you’ll have butter. You could also use a large whisk and do it by hand if you don’t have a mixer. Put the whipped cream on after it cools.

*if you can’t find key lime juice, go ahead and use limes. It won’t taste exactly the same, but will still be good.

triple chocolate hamantashen

My triple chocolate hamantashen are all dressed up and ready for Purim! They are one of my most requested recipes and with good reason. It’s chocolate – on chocolate – on chocolate!!!!!!!!!! The chocolate dough is rolled out and filled with a rich chocolate ganache and then as if there’s not enough chocolate, I give them a drizzle of white chocolate which puts them over the top!

Usually when I decorate them I scatter mini chocolate chips and colorful sprinkles over the white chocolate. This year I tried something outrageous and topped a few of them with a piece of a rainbow cookie and then I drizzled them with white chocolate. They turned out AMAZING and are definitely ready for the Purim party!

They are so rich and chocolatey, super easy, and I like that it makes a small batch of 2 dozen – however, they are so good, I always end up doubling it! I have adapted the recipe from one I found on My Jewish Learning’s website and it was created by Victoria Sutton. For more Purim info go to https://www.myjewishlearning.com/article/purim-2020/ The ganache recipe is my tired and true from Ina Garten. – that’s quick, easy, and never fails.

I think I’ve kvelled (gushed over) these hamantashen enough. Now it’s time to get right to the recipe and start baking! I hope you love them as much as I do. Happy Purim & Enjoy!

ingredients
1 1/3 cups all-purpose flour
1/3 cup cocoa (I use Hershey’s Cocoa)
1 teaspoon baking powder
4 oz. unsalted butter, softened
3/4 cup granulated sugar
1 extra-large egg
1/2 teaspoon kosher salt
2-3 Tablespoons heavy cream
1 teaspoon almond extract (optional)
water to close the hamantashen

ganache filling (make ahead of time)
8 ounces good quality semisweet chocolate chips (I use Ghirardelli)
½ cup of heavy cream (half and half** will work too)
pinch of salt

toppings
white chocolate melting wafers, sprinkles, mini chocolate chips, and if you want to get crazy like me add sliced rainbow cookies, mini m&m’s or other candies

ganache
To make the ganache, place the chocolate chips, heavy cream and pinch of salt in a heat-proof bowl over a pot of simmering water. Melt the chocolate until it’s just melted and stir it until it’s smooth. Put it in a container, let it cool on the counter about 15 minutes, then cover and put in the fridge. This should be made at least 2 to 4 hours before you plan to bake so it can harden. It can also be done a day ahead of time. If you are rushed for time, pour it into a shallow dish, it will set quicker.

dough
Prepare two cookie sheets with parchment paper and set aside until ready to bake. Sift together flour, cocoa powder, baking powder, and salt and set aside. Don’t skip the sifting. With a spoon, cream together butter, sugar, and almond extract until light and fluffy. Add the egg and mix until incorporated. Add flour mixture to butter mixture in two stages, alternating with the heavy cream. More or less cream might be needed depending on the consistency of the dough. You don’t want it to be too sticky, and you don’t want it to be too dry. Divide the dough in 2 pieces and turn out onto plastic wrap, and form a flattened disc. Wrap tight and chill couple of hours or overnight.

To form hamantashen: lightly flour your baking surface, roll chilled dough ¼” thick. Using a round cutter or glass rim dipped in flour, cut circles about 3 inches in diameter. Add a little less than a teaspoon of ganache in the center of the circles.

Brush water around the edge of the circle and pinch the dough in three corners to seal and make the hamantashen triangle shape. Some people like to fold in the edges to form a triangular shape, if that’s your style, go with it!

If the dough seems a little soft, place the cookie sheet in the fridge for about 10 minutes to firm up then bake. This will ensure they stay closed.

Bake hamantashen at 350 F for about 12 – 14 minutes turning the cookie sheet half way through baking. They will be a little soft but will firm up a little after it comes out of the oven. Ganache will liquefy during baking, but will set as it cools.

*I usually have half and half in my fridge so I use that and it comes out perfectly.

easy homemade chicken kreplach

My easy homemade chicken kreplach recipe is here just in time for Purim but definitely something you’ll want to eat all year long! The Jewish holiday of Purim (which begins Monday night) commemorates the day Esther (Queen of Persia) saved the Jewish people from execution by Haman (advisor to the Persian King). During the holiday it’s customary to eat foods which look like the villain Haman’s triangular shaped hat or his ears! To learn more about the holiday check out one of my favorite websites My Jewish Learning https://www.myjewishlearning.com/article/purim-101/

If you are on Instagram or other social media, I’m sure you have been seeing a lot of photos and recipes of the ever popular hamantashen. Which I have also posted because, well, they are hamantashen and delicious! However, there are other traditional foods eaten during the holiday like kreplach, which sometimes go unnoticed. They are triangular shaped dumplings filled with ground meat or brisket. They can be simmered in chicken soup, or pan-fried with onions* and eaten as a main or side dish. I think it’s time to bring the kreplach front and center into the spotlight!

I’ll let you in on a little secret, I’ve always been TEAM KREPLACH! While I occasionally like a nice fluffy matzo ball in my chicken soup and of course noodles, I have always and will always be team kreplach! They are so yummy and delicious especially when they are lightened up with chicken and are a perfect addition to chicken soup. The filling is simple and so tasty and the wrapper becomes pillowy soft after it cooks in the soup.

Gefen wonton wrappers

To make it easy from the start, I use prepackaged wonton wrappers. These are simple to find in the grocery near the Asian food section. Usually it’s near the vegetables in a refrigerated case. If you can find the Gefen brand in your kosher market, I prefer them. Using premade wonton wrappers speeds up the process. The filling is a few simple ingredients most of which you already have in your pantry. It can’t get less complicated than that. Start to finish it takes about 2 hours to sauté the filling and fold the dumplings. If it seems overwhelming prepare the filling a day ahead of time and refridgerate. Day one cook the filling, day two fill the wontons, day three 40 kreplach waiting to be enjoyed!

So let’s stomp our feet, scream out, and make some noise for kreplach!  Who’s with me? Let’s get those groggers (noisemakers) shaking!  Enjoy!

ingredients
1 pound ground white meat chicken (or ground turkey)
1 small onion diced (about a cup of raw onion)
2 tablespoons olive oil
1 large garlic clove minced
1 large or extra-large egg
1 teaspoon salt
½ teaspoon pepper
1 package wonton skins

directions
Sauté the onion and garlic in oil with ½ teaspoon of salt. This should take about 10 to 15 minutes. When the onion is just starting to lightly brown, add in your ground chicken. Sauté the chicken until it is cooked through. Add remaining salt and pepper to taste. Chop it up a bit so there are no large burger sized pieces. Stir and set aside to cool.

When cool, add the mixture to a food processor fitted with the blade attachment and pulse about 10 times. Add the egg and pulse until it is ground. It should be the texture of small grains of rice. Not like baby food.

Line up your wonton wrappers a few at a time on a board. Wet the four sides of the wonton, add a teaspoon of the mixture to the middle and fold into a triangle. I try to press the chicken into the spoon so it’s compact. Then fold over into a triangle pressing the edges together very tightly and pushing the air out not letting any filling escape. 

Place them in a large container lined with a double layer of wax paper in between each layer. The recipe makes a lot but they freeze very well, and when ready to use they can be added to the soup frozen.

The other way I like to serve them is by pan frying* them in caramelized onions, then adding them to the pan to brown alongside. That’s the way my Bubbie (grandmother in Yiddish) made them.

*To pan fry them, sauté sliced onions in olive oil low and slow until caramelized and golden brown. Add the kreplach to the pan with the onions and pan fry until golden on the outside.

chicken kreplach soup

A big thank you goes out to my sister’s friend Amy. She gave me this recipe when I first moved to the Midwest and has become a staple in my house ever since!

hamantashen ice cream sandwich… it’s a match!

******************THROWBACK THURSDAY***************

To when I made a hamantashen ice cream sandwich!

Hamantashen + Ice Cream = The most delicious Hamantashen Ice Cream Sandwich… IT’S A MATCH! Everyone calm down, I’m not a real matchmaker; I’m more of a food matchmaker. I guess I could start with a corny joke like a hamantashen and a scoop of ice cream walk into a bar, yada – yada – yada… ba dum bump! But I can feel my family start to twinge, so I’ll put my comedic career on hold for a little while.

Yes, you heard me right and oh yes I put ice cream in the middle of my hamantashen! I hear you all out there judging me, with your “Oh no you didn’t.” But, oh YES I did. I know hamantashen can be a rich cookie with it’s pie filling, and chocolate but when you stop and think about it for a minute, it really sounds good doesn’t it? We put ice cream on pie. Isn’t hamantashen just a triangular little pie? Plus, didn’t 2016 bring us the babka ice cream sandwich from Russ and Daughters? And, what about the black and white cookie ice cream sandwich I recently saw on Instagram? If you ask me, hamantashen was just waiting for its turn to be asked to the dance. Hamantashen and ice cream, let’s tango!

How did I decide to make an ice cream sandwich using hamantashen? This happy union came about after trying a new hamantashen recipe this year. On Tuesday, the hamantashen softened up a bit because of the cherry pie filling. When I ate one, something just screamed out “HEY, HOW ABOUT A LITTLE ICE CREAM WITH THAT?” See what I did there with the caps? Obviously the trick is to have the right dough and filling for it. If you read yesterday’s post, you know I have tried quite a few different recipes in my time so you can trust me on this. For example, I make a cream cheese dough which tastes similar to rugalach, ice cream would not be a good match for that.

This recipe is adapted from the 2nd Avenue Deli Cookbook. It’s a hamantashen that definitely stands alone. When it is first baked, it is crisp on the outside and tender on the inside and is absolutely delicious. On the second day, it softened a bit and in my opinion making it even better! The addition of ice cream puts it over the edge and turns it into an elegant dessert that’s so much fun for Purim. Plus, I don’t know about you  but I absolutely love anything with almonds in it, and this has a double dose. I hope you will try this with your favorite ice cream and let me know what you think!  Happy Purim everyone! Enjoy!hamantashen ice cream sandwich
The recipe makes 4 dozen cookies using a 3” round cookie cutter, or 24 ice cream sandwiches

Ingredients
3 cups all-purpose flour
2 teaspoons baking powder
1 teaspoon kosher salt
1 cup finely ground almond flour* (I used Bob’s Red Mill)
3 extra large eggs
1 cup sugar
1 stick softened unsalted butter (or margarine)
1 teaspoon vanilla extract
1 teaspoon pure almond extract
sanding sugar
egg wash**
Cherry pie filling (or other pie filling of your choice)

Good quality ice cream
Sliced almonds (I used honey toasted almonds from Trader Joes)
Chocolate or caramel sauce (optional)
Whipped cream (optional)

Directions
In a large blow, sift flour, baking powder and salt. Add the almond flour and mix well then set aside.

In another large bowl, cream sugar and butter with mixer until blended. Add eggs, vanilla, and almond extract and mix well. Add the almond and flour mixture to the wet ingredients and mix just until the dough forms a ball and pulls away from the sides. If the dough is sticky, turn it out onto a lightly floured surface and knead the dough until it no longer sticks to your fingers. I did not do this step; I found the dough fine and then wrapped it in plastic wrap and put it in the fridge overnight. The original recipe says you can bake it without refrigerating first.

When you are ready to bake, position the racks to the upper and lower 1/3 of the oven. Preheat the oven to 375 degrees. Line cookie sheets with parchment paper and set aside.

Roll the dough to a thickness of about 3/16”. My trick is to use paint sticks you get at the hardware store. I cover them with plastic wrap and use them as guides. I like that better than the rings you can put on your rolling pin. Using a 3” round cookie cutter, cut circles of dough and place them on the cookie sheets.

When all of the dough has been cut place about 1 ½ teaspoon of filling in the center of the circle. Brush the perimeter with the egg wash or a little water. Now you can either use the pinch method as I do and pinch 3 corners together, or use the folding method where you flap one side, then the next two till you form a triangle.

Brush the tops of the cookies with the egg wash. I sprinkled mine with some sanding sugar for that extra sparkle and crunch. Bake the hamantashen for 18 to 20 minutes (checking after 15) or until the cookies are golden brown. To ensure even browning, rotate the pans top to bottom and front to back. When done, remove from the oven and let them rest for 2 to 3 minutes on the cookie sheet then remove to a wire rack.

Now to make the match… Place one hamantashen bottom side down, add a scoop of ice cream of your choice, top with another hamantashen top side up so you can see the beautiful topping and eat it carefully. Of course you can place it bottom side up as well – make it your own. It’s so yummy it won’t last long! If you want to plate it, dress up the plate with some chocolate sauce, maybe some whipped cream, and almonds. However you choose to eat it, it’s a match made in heaven!

* I used Bob’s Red Mill Almond Flour which I found in my local grocery. King Arthur makes a great one as well which you can purchase online. You can also make almond flour in a food processor, here is a how to link.

**For the egg wash I use the whole egg and put in a pinch of salt, a pinch of sugar, and a splash of water.